Welcome & Congratulations This Use & Care Manual contains general operating instructions for your range and feature information for several models. Your range may not have all the described features. The graphics shown are representational. The graphics on your range may not look exactly like those shown. © 2006 Electrolux Home Products, Inc. All rights reserved.
Important Safety Instructions Read all instructions before using this appliance. Save these instructions for future reference. This manual contains important safety symbols and instructions. Please pay attention to these symbols and follow all instructions given. This symbol will help alert you to situations that may cause serious bodily harm, death or property damage. This symbol will help alert you to situations that may cause bodily injury or property damage.
Important Safety Instructions IMPORTANT INSTRUCTIONS FOR USING YOUR COOKTOP IMPORTANT INSTRUCTIONS FOR USING YOUR OVEN • Know which knob controls each surface heating unit. Place a pan of food on the unit before turning it on, and turn the unit off before removing the pan. • Use Proper Pan Size—This appliance is equipped with one or more surface units of different sizes. Select utensils having flat bottoms large enough to cover the surface unit heating element.
Before Setting Oven Controls Oven Vent Location The oven vent is located under the left side of the control panel (See Fig. 1). When the oven is on, warm air passes through the vent. This venting is necessary for proper air circulation in the oven and good baking results. DO NOT BLOCK OVEN VENT. Removing & Replacing Oven Racks Fig. 1 To remove, pull the rack forward until it stops. Lift up front of rack and slide out. To replace, fit the rack onto the guides on the oven walls.
Setting Surface Controls Single Radiant Surface Elements (all models) To Operate a Single Radiant Element: 1. Place correctly sized cookware on radiant surface element. 2. Push in and turn the surface control knob in either direction to the desired setting (Refer to the Suggested Radiant Surface Element Settings Table, Figs. 3 & 4). Start most cooking operations on a higher setting and then turn to a lower setting to finish cooking.
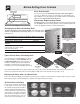
To Operate Dual Radiant Surface Elements (some models) Symbols on the backguard are used to indicate which coil of the Dual Radiant symbol indicates the inner coil only. The symbol element will heat. The indicates both inner and outer coils will heat (See Figs. 1 & 2 and Suggested Radiant Surface Element Settings Table on previous page). You may switch from either coil setting at any time during cooking. Push in and turn the control knob in either direction to the desired setting as instructed above.
Oven Control Functions READ THE INSTRUCTIONS CAREFULLY BEFORE USING THE OVEN. For satisfactory use of your oven, become familiar with the various pad functions of the oven as described below. CLOCK PAD— Used to set the time of day. BAKE TIME PAD— Used to enter the length of the baking time. UP and DOWN ARROW PADS— Used along with the function pads to select oven temperature, cook time, start time (when programming an automatic start time), time of day, clean time and minute timer.
Setting Oven Controls (cont’d) will show "350°F (177°C)." By pressing and holding To Set the Minute Timer: 1. Press the . 2. Press the to increase the 3. As soon as the pad is pressed first, the timer will advance to 11 hours and 59 minutes. 3. The display shows the timer countdown in minutes until 1 minute remains. Then the display will countdown in seconds. 4. When the set time has run out, the timer will beep 3 times and will continue to beep 3 times every 60 seconds until 4.
Setting Oven Controls (cont’d) To Set the Timed Bake and Delay Start (Delayed Timed Bake) Features The BAKE TIME and When the Set Bake Time Runs Out: a. "END" will appear in the display window and the oven will shut-off automatically. b. The control will beep 3 times every 60 seconds until START TIME pads operate the features that will turn the oven ON and OFF at the times you select in advance.
Setting Oven Controls (cont’d) 6. Place the broiler pan and insert on the oven rack (if equipped). Open the oven door to the broil stop position when broiling (See Fig 3). 7. Broil on one side until food is browned. Turn and broil food on 2nd side. Note: Always pull the oven rack out to the stop position before turning or removing the food. 6 5 4 3 2 1 8. When broiling is finished press Fig. 1 3. When using 2 oven racks at the same time, place in positions 2 & 5 for best results (See Fig.
NOTE: Prior to setting the Self-Clean cycle, any spills remaining on the oven bottom should be removed. The Bake element is located in the lower oven cavity (See illustration at left).The bake element is designed to be tilted up using your hand from the front of the bake element. This will allow easier access to the oven bottom for cleaning. Remove the Bottom Rack before raising the element. Be careful not to raise the element more than 4 or 5 inches from the resting position.
Self-Cleaning (cont’d) 4. Press (for 2 hour Self-Clean time) or 3. If “End” is in the display and the Clean indicator light (for 3 remains ON, press hour Self-Clean time). or 5. Press the the display. NOTE: When the oven is cool, wipe away any residue or pad. The time selected in step 4 powdered ash with a damp cloth or paper towel. above should appear in the display. As soon as the controls are set, the motor driven lock will begin to close automatically and the “LOCK” indicator light will flash.
General Care & Cleaning (Cleaning Table) Surfaces How to Clean Glass, Painted Plastic Body Parts & Control Knobs For general cleaning, use a soft cloth, clean with mild dish detergent & water or a 50/50 solution of vinegar & water. Follow by rinsing the area with clean water; dry & polish with a soft cloth. Glass cleaners may be used if sprayed on a soft cloth 1st. DO NOT spray liquids directly on the control pad and display areas.
General Care & Cleaning (cont’d) Cooktop Cleaning & Maintenance Consistent and proper cleaning is essential to maintaining your ceramic glass cooktop. Note: Additional cooktop cleaning cream may be ordered by visiting the Frigidaire website at www.frigidaire.com Prior to using your cooktop for the first time, apply some of the cooktop cleaning cream supplied with your new range. Buff with a non-abrasive cloth or no-scratch cleaning pad. This will make cleaning easier when soiled from cooking.
Before You Call Solutions to Common Problems Before you call for service, review the following list. It may save you time & expense. The list includes common occurrences (shown in bold) that are not the result of defective workmanship or materials in this appliance. The possible corrections to these problems are provided with the problem listed: Range is not level - (1) Poor installation. Place oven rack in center of oven. Place a level on the oven rack.
Major Appliance Warranty Information Your appliance is covered by a one year limited warranty. For one year from your original date of purchase, Electrolux will pay all costs for repairing or replacing any parts of this appliance that prove to be defective in materials or workmanship when such appliance is installed, used and maintained in accordance with the provided instructions. Exclusions This warranty does not cover the following: 1.