Electric Ranges Owner’s G u i d e CONTENTS GENERAL INFORMATION ........... 318200300 Avoid Service Check List ............ 318130500 Warmer Drawer (some models) ........................... 318150400 the LOOK of better performance P/N 318200404 (9909) Rev.
WARRANTY ELECTRIC RANGE WARRANTOR: FRIGIDAIRE CANADA 7075 Ordan Drive Mississauga, Ontario L5T 1K6 This range is a branded product of Frigidaire Canada. For service under this warranty, contact your local dealer/retailer, authorized FRIGIDAIRE PARTS AND SERVICE depot or: FRIGIDAIRE PARTS AND SERVICE 7075 Ordan Drive Mississauga, Ontario L5T 1K6 Tel.
General Information Page IMPORTANT SAFETY INSTRUCTIONS . . . . . . . . . . . . 2-3 INSTALLATION INSTRUCTIONS . . . . . . . . . . . . . . . . 4-5 OVEN LIGHT . . . . . . . . . . . . . . . . . . . . . . . . . . . . . . . . 5 SURFACE LIGHT . . . . . . . . . . . . . . . . . . . . . . . . . . . . . 5 CIRCUIT PROTECTION . . . . . . . . . . . . . . . . . . . . . . . . 6 SELECTING SURFACE COOKING UTENSILS . . . . . . . . . 6 SETTING SURFACE CONTROLS . . . . . . . . . . . . . . . . . . 6 CONVECTION ROASTING . . . .
IMPORTANT SAFETY INSTRUCTIONS Read all instructions before using this appliance. Save these instructions for future reference. This guide contains important safety symbols and instructions. Please pay special attention to these symbols and follow all instructions given. Here is a brief explanation of these symbols. This symbol will help you to situations that may cause serious bodily harm, death or property damage. This symbol will help you to situations that may cause bodily injury or property damage.
IMPORTANT SAFETY INSTRUCTIONS YOUR COOKTOP (continued) location while oven is cool. Remove all utensils from the rack before removing rack. If rack must be moved while oven is hot, use extreme caution. Use potholders and grasp the rack with both hands to reposition. Do not let potholders contact the hot oven element or interior of the oven. • Know which knob controls each surface heating unit. • Use Proper Pan Size — This appliance is equipped with one or more surface units of different sizes.
Installation Instructions INSTALLATION AND SERVICE MUST BE PERFORMED BY A QUALIFIED TECHNICIAN. IMPORTANT: SAVE FOR THE LOCAL ELECTRICAL INSPECTOR’S USE. READ AND SAVE THESE INSTRUCTIONS FOR FUTURE REFERENCE. Clearances and Dimensions a. Provide adequate clearances between the range and adjacent combustible surface (1.3cm (1/2”) to the cabinet side walls and the rear wall). b. Location—Check location where the range will be installed. Check for proper electrical supply and the stability of floor. c.
Installation Instructions (continued) To level the range: 1. Use a 1-1/4” open end key or an adjustable wrench to equally unscrew the four leveling legs two to three turns each. 2. Install an oven rack in the center of the oven. 3. Move the range to its final position, then put a spirit level on the rack to check for levelness. Take two readings, one with the level placed diagonally first in one direction, and then the other. 4. Use the 1-1/4” key or wrench to adjust the leveling legs.
Circuit Protection As a protection against surcharge, a 15 amp, 120 volt fuse is provided for each of the electric outlet(s) (2 max.) located on top of the control panel. To access the fuse(s) raise the control panel cover. Models with no electric outlet have no fuse. Selecting Surface Cooking Utensils For best results and energy conservation, choose cooking utensils that have these characteristics: *GOOD POOR • Curved and warped pan bottoms. • Pan overhangs unit by more than 2.5 cm (1”).
Convection Roasting (some models) When convection roasting, use the broiler pan and grid, and the roasting rack. The broiler pan will catch grease spills and the grid will help prevent grease spatters. The roasting rack will hold the meat. ROASTING RACK GRID 1. Place oven rack on bottom or next-bottom rack position. 2. Place the grid in the broiler pan.
Indicator Light Some models have an indicator light for each heating unit, other models have an indicator light for each pair of heating units. The indicator light glows as soon as a heating unit is turned on. Check if the indicator light glows when the control knob of the individual heating unit is turned on. If the knob is set to a very low temperature setting, the indicator may glow and yet, the heating unit may not be heating at all.
Broiling Broiling is a method of cooking tender cuts of meat by direct heat under the broil element of the oven. Preheating Preheating is suggested when searing rare steaks. (Remove the broiler pan before preheating. Foods will stick if placed on hot metal.) To preheat, set the oven control(s) to BROIL as instructed in the Owner’s Guide. Wait for the element to become red-hot, usually about 2 minutes. Preheating is not necessary when broiling meats well-done.
Ceramic Glass Cooktop (some models) The ceramic-glass cooktop has electric heating coils located below the ceramic glass surface. The design of the glass cooktop outlines the area of the surface heating unit below. Most importantly, make sure the diameter of the pan matches the diameter of the surface unit. Heat is transferred up through the surface of the cooktop. Only flat-bottomed pans should be used.
Ceramic Glass Cooktop (some models) Indicator Light (continued) HOT SURFACE INDICATOR LIGHT (some models) Some models have an indicator light located on the ceramic glass cooktop that glows as soon as the glass begins to warm up. When the heating unit is turned off, it will continue to glow as long as the glass remains warm enough to cause burns. Other models have 4 hot surface indicators (one per element) arranged in a cluster. Their location is as shown in the illustration above.
Ceramic Glass Cooktop (some models) USE AND CARE OF GLASS SURFACE (continued) (continued) CLEANING MATERIALS FOR CERAMIC GLASS COOKTOP Some cleaning materials may contain an ingredient which can damage the cooktop. Use recommended materials only (see below). Cleaner cream should be used regularly. First use recommended products listed below, then use cleaner cream. Use only recommended cleaning products and follow these basic cleaning suggestions. 1. 2. 3. 4. 5. BEFORE THE COOKTOP IS USED.
Cleaning the Appliance Before cleaning any part of the range, make sure all heating elements are turned to OFF “ ” and are cool. Exterior Cleaning Clean range after each use to prevent sticky grease built-up and spills from cooking on. Wash with hot, soapy water and a clean cloth. Wipe with a soft cloth or paper towel. Do not use abrasives, steel wool, cleaners containing ammonia, acids or commercial oven cleaners on any exterior parts of the range, except the porcelain enamel cooktop.
Cleaning the Appliance (continued) Porcelain enamel cooktop cleaning instructions. DO NOT use a cooktop cleaner on a hot cooktop. The fumes can be hazardous to your health, and can chemically damage the cooking surface. PORCELAIN ENAMEL COOKTOP CLEANING Correct and consistent cleaning is essential to maintaining your porcelain enamel cooktop. If food spills and grease spatters are not removed, they may burn onto the surface of the cooktop and cause permanent discoloration.
Cleaning the Appliance (continued) Cleaning the Regular Oven (Non self-clean oven) Make sure the oven is cool and that all control knobs are at OFF “ ” position. Cleaning the oven is a lot easier when the door is removed. 1. Remove the oven door; see page 16. 2. Empty the oven including the racks. 3. You can wash the broiler pan, grid and racks in the kitchen sink. 4. Clean oven lining thoroughly with soap and a wet cloth and wipe with a dry cloth.
Cleaning the Appliance AUTOMATIC LOCK OFF OF THE SURFACE ELEMENTS (Continued) (30“ models with a self-cleaning oven only) During the self-clean cycle, the surface elements, when used, are subjected to high heat. To ensure maximum element life, a safeguard locks off the use of the surface elements during the self-clean cycle. Once the oven cleaning cycle is complete and the oven door can be opened, the surface elements can be utilized.
Removable Outer Door Glass Panel (some models) Applicable only to models with an external glass panel not held with a frame. This design allows you to clean the inside face of the exterior door panel as well as the hidden face of the door inner glass. To remove the external door glass panel: 1. Pull the door off the range as per page 16 instructions and lay the door flat. 2. Using a screwdriver, remove the screws fastening the glass lower metal support rail to the underside of the door.
Notes Staple or clip original invoice here General 18 Information
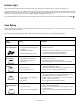
AVOID SERVICE CHECK LIST Before you call for service - read this You may save the cost and inconvenience of an unnecessary service call by first reviewing this easy to use AvoidService Check List of the most frequently encountered situations that are not the result of defective workmanship of materials. You will be charged for a service call while the appliance is in warranty if the problem is not caused by defective product workmanship or materials. Your new appliance is a carefully engineered product.
PROBLEM POSSIBLE CAUSE / SOLUTION RANGE DOES NOT OPERATE (continued) Surface elements do not heat. No power to range. Check steps “Entire range does not operate” above. Control knobs set too low. At very low heat settings of the control knobs, the surface signal light may come on; however, surface unit does not operate. Turn the control knob to a slightly higher setting until the elements start heating. Coil elements not seated properly in terminals. Turn temperature control knobs to OFF.
PROBLEM POSSIBLE CAUSE / SOLUTION POOR BAKING RESULTS Baked goods too done or not done enough. Actual oven temperature and cooking times may vary from recipe or box instruction. If this is a new range, temperatures may differ from your old range. Older ovens may drift in temperature. You may have to adjust your favorite recipe times and temperatures. Use the pan size recommended in the recipe. Except when baking pies or breads, set the oven temperature control 13°C (25°F) lower when using glass pans.
PROBLEM POSSIBLE CAUSE / SOLUTION BROILING Oven smokes excessively during broiling. Open the door to the broil stop position. Add 3 to 4 cups of water in the broiler pan to completely cover the bottom of the pan. Position food on grid and broil. The water catches the grease from the broiling food, cools the grease and reduces smoking. Meat too close to the element. Lower the rack. Remove excess fat from the meat. Slash remaining fat edges to prevent curling; do not cut into lean.
WARMER DRAWER (some models) To Operate the Warmer Drawer Setting Warmer Drawer Controls Your range is equipped with a warmer drawer. The purpose of the warmer drawer is to keep hot cooked foods at serving temperature. Always start with hot food. It is not recommended to heat cold food in the warmer drawer. Use the warmer drawer to keep hot foods hot such as: vegetables, gravies, meats, casseroles, biscuits and rolls, pastries and heated dinner plates.
WARMER DRAWER Arranging Warmer Drawer Rack Positions Set the warmer drawer rack in the vertical position as shown below. (some models) (continued) The rack can be used in 2 ways: • In the upright position to allow low profile food items to be placed both under and on top of the rack (for example, rolls or biscuits on top of the rack and a casserole dish under). • In the downward position to allow you to place light weight food items and empty dishware (for example, rolls or pastries and dinner plates).
Cuisinières électriques Guide de l’utilisateur CONTENU INFORMATIONS GÉNÉRALES ..... 318200300 Liste des vérifications préventives 318130500 Tiroir-réchaud (certains modèles) ...................... 318150400 VISIBLEMENT mieux P/N 318200404 (9909) Rev.
GARANTIE CUISINIÈRE ÉLECTRIQUE GARANT: FRIGIDAIRE CANADA 7075 Ordan Drive Mississauga, Ontario L5T 1K6 Cette cuisinière est un produit qui porte l’une des marques de Frigidaire Canada. Pour obtenir le service prévu par cette garantie, communiquez avec votre détaillant, un dépositaire de service autorisé par FRIGIDAIRE – PIÈCES ET SERVICE, ou: FRIGIDAIRE – PIÈCES ET SERVICE 7075 Ordan Drive Mississauga, Ontario L5T 1K6 Tél.
Informations générales Page IMPORTANTES MESURES DE SÉCURITÉ ................... 2-3 INSTRUCTIONS D’INSTALLATION ............................. 4-5 LAMPE DU FOUR ........................................................ 5 LAMPE DE SURFACE ................................................... 5 COUPE-CIRCUIT DE PROTECTION ............................... 6 CHOIX DES USTENSILES DE CUISINE POUR LA CUISSON SUR LES FOYERS .......................... 6 RÉGLAGE DES COMMANDES DES FOYERS DE SURFACE .......................
IMPORTANTES MESURES DE SÉCURITÉ Lisez ces instructions avant d’utiliser l’appareil. Conservez ces instructions pour références futures. Ce guide contient des instructions et symboles de sécurité importants. Veuillez faire particulièrement attention à ces symboles et suivre les instructions données. Voici une brève explication de ces symboles. Ce symbole vous prévient des situations qui risquent d’entraîner de graves blessures, la mort ou des dommages matériels.
IMPORTANTES MESURES DE SÉCURITÉ (suite) INSTRUCTIONS DE SÉCURITÉ IMPORTANTES POUR L’UTILISATION DE VOTRE SURFACE DE CUISSON • Vous devez savoir quel bouton commande chacun des éléments de la surface de cuisson. • Utilisez la grosseur de casserole appropriée – Cet appareil est équipé d’un ou de plusieurs éléments de différentes grosseurs. Choisissez les ustensiles ayant un dessous plat assez large pour recouvrir l’élément chauffant.
Instructions d’installation L’INSTALLATION ET LE SERVICE DOIVENT ÊTRE EXÉCUTÉS PAR UN TECHNICIEN QUALIFIÉ. IMPORTANT: CONSERVEZ CE DOCUMENT POUR LE PRÉSENTER À L’INSPECTEUR LOCAL D’ÉLECTRICITÉ S’IL LE DEMANDE. LISEZ ET CONSERVEZ CE DOCUMENT POUR RÉFÉRENCE. Espaces prévus et dimensions a. Laissez suffisamment d’espace entre la cuisinière et les surfaces combustibles adjacentes (1.3cm (1/2”) sur les côtés et à l’arrière). b. Endroit – Vérifiez l’endroit où la cuisinière sera installée.
Instructions d’installation (suite) Pour mettre la cuisinière de niveau: 1. Utilisez une clé ouverte de 1-1/4” ou une clé à molette pour dévisser chacune des quatre vis de nivellement de deux à trois tours. 2. Installez une des grilles dans le centre du four. 3. Installez la cuisinière à son emplacement final et déposez le niveau à bulle sur la grille pour vérifier si le niveau est acceptable.
Coupe-circuit de protection Comme protection en cas de surcharge, chacune des prises de courant (2 max.) qui se trouvent au dessus du panneau de commandes est protégée par un fusible de 15 ampères, 120 volts. Pour les apercevoir, soulevez le couvercle qui se trouve au dessus du panneau de commandes. Aucun fusible ne sera fourni si l’appareil ne comprend pas de prise de courant.
Rôtissage par convection (certains modèles) Pour le rôtissage par convection, servez-vous toujours de la lèchefrite et de son couvercle ainsi que de la grille de rôtissage convection. La graisse s’écoule dans la lèchefrite et son couvercle prévient les éclaboussures de graisse. La grille de rôtissage supporte la viande. GRILLE RÔTISSAGE COUVERCLE 1. Placez la grille du four sur le premier support ou le deuxième support du bas. 2. Placez le couvercle sur la lèchefrite.
Voyants lumineux Certains modèles possèdent un voyant pour chacun des foyers, d’autres en possède un pour chaque paire de foyers. Le voyant devient lumineux aussitôt qu’un foyer est allumé. Vérifiez si le voyant devient lumineux aussitôt que vous tournez chacun des boutons des commandes de foyer. Si le bouton est réglé à un très faible réglage de chaleur, le voyant peut s’allumer même si aucune chaleur n’est produite par le foyer.
Cuisson au gril La cuisson au gril est un procédé de cuisson des coupes tendres de viande grâce à la chaleur radiante émise par l’élément supérieure du four. Préchauffage Le préchauffage est recommandé pour saisir les biftecks saignants. (Retirez la lèchefrite avant le préchauffage. Les aliments placés sur le métal chaud collent). Pour le préchauffage, réglez la commande du four à BROIL (GRIL) en suivant les instructions du Guide de l’utilisateur.
Surface de cuisson vitrocéramique (certains modèles) Des éléments électriques chauffants sont situés sous la surface de cuisson vitrocéramique. L’emplacement des éléments sur la plaque de cuisson est clairement délimité par le design. Vous devez surtout vous assurer que le diamètre de la casserole est de dimension similaire au diamètre des éléments. La chaleur est propagée vers le haut, à travers la surface de la plaque de cuisson. N’utilisez que des ustensiles à fond plat.
Surface de cuisson vitrocéramique Voyant avertisseur (certains modèles) (suite) VOYANT AVERTISSEUR DE SURFACE CHAUDE (certains modèles) Certains modèles possèdent un voyant avertisseur situé sous la surface vitrocéramique qui s’allume aussitôt qu’elle devient chaude. Lorsque vous éteignez les foyers, le voyant demeure allumé tant que la vitre est suffisamment chaude pour causer des brûlures. D’autres modèles en possèdent 4 (1 pour chaque foyer).
Surface de cuisson vitrocéramique (certains modèles) ENTRETIEN DE LA SURFACE DE CUISSON (suite) (suite) COMMENT NETTOYER LA SURFACE DE CUISSON VITROCÉRAMIQUE Certains nettoyeurs à vitres contiennent des ingrédients qui endommageront votre surface de cuisson. Nous vous suggérons de vous servir de nettoyeurs approuvés, énumérés plus loin dans le texte. Pour nettoyer et protéger la surface de cuisson, une crème nettoyante devra être utilisée régulièrement.
Nettoyage de l’appareil Avant de débuter le nettoyage de la cuisinière, assurez-vous que toutes les commandes des éléments de chauffage sont bien à la position ARRÊT “ ” et que les éléments sont froids. Nettoyage extérieur Nettoyez la cuisinière après chaque usage afin d’éviter toute accumulation de saletés et prévenir ainsi qu’elles carbonisent et lavez avec de l’eau chaude et savonneuse. Essuyez avec un linge doux ou avec du papier essuie-tout.
Nettoyage de l’appareil (suite) Instructions pour le nettoyage de la surface de cuisson en émail vitrifié NETTOYAGE DE LA SURFACE DE CUISSON EN ÉMAIL VITRIFIÉ NE PAS utiliser de nettoyeur à plaque de cuisson sur une surface de cuisson chaude. Les émanations peuvent mettre votre santé en danger, et risquer d’endommager chimiquement la surface émaillée. Un nettoyage correct et consistant est essentiel au maintien de votre surface de cuisson en émail vitrifié.
Nettoyage de l’appareil (suite) Nettoyage du four régulier (four non autonettoyant) Assurez-vous d’abord que le four est froid et que toutes les commandes sont à la position ARRÊT “ ”. Il est plus facile de nettoyer le four lorsque la porte est retirée. 1. Enlevez la porte, voir page 16. 2. Videz le four de son contenu incluant les grilles. 3. La lèchefrite, le couvercle et les grilles peuvent être lavés dans l’évier. 4.
Nettoyage de l’appareil (suite) BLOCAGE AUTOMATIQUE DES ÉLÉMENTS DE SURFACE (Modèles avec four autonettoyant seulement) Les éléments de surface sont exposés à des températures élevées s’ils sont utilisés alors que le four fonctionne en mode autonettoyant. Pour maximiser la durée de vie des éléments de surface, un système de protection les rend hors d’usage pendant le cycle d’autonettoyage du four.
Porte avec vitre extérieure démontable (certains modèles) Ces modèles n’ont pas la vitre extérieure de la porte retenue par un cadre enveloppant. Ce design vous permet de nettoyer la face interne de la vitre extérieure, ainsi que la partie cachée de la vitre du hublot intérieur de la porte. Pour retirer la vitre extérieure de la porte: 1. Retirez la porte de la cuisinière en suivant les instructions de la page 16 et déposez-la à plat. 2.
Notes Brocher ici votre facture Informations 18 générales
LISTE DES VÉRIFICATIONS PRÉVENTIVES Avant d’appeler un technicien de service lisez ce qui suit : Dans bien des cas, vous pouvez épargner le coût et les inconvénients causés par la visite d’un technicien de service en consultant la liste des vérifications préventives qui suit. Elle décrit les situations les plus courantes n’ayant aucun rapport avec une pièce défectueuse ou un vice de construction.
PROBLÈME CAUSE POSSIBLE / SOLUTION LA CUISINIÈRE NE FONCTIONNE PAS (suite) Les éléments de la surface de cuisson ne chauffent pas. L’appareil n’est pas sous tension électrique. Voir “Aucune partie de l’appareil ne fonctionne” ci-dessus. Lorsque le réglage de chaleur d’un foyer de surface est très bas, son voyant lumineux peut s’allumer même si l’élément ne chauffe pas. Tournez alors le bouton de commande à un repère plus élevé jusqu’à ce que l’élément commence à chauffer.
PROBLÈME CAUSE POSSIBLE / SOLUTION MAUVAIS RÉSULTATS DE CUISSON AU FOUR Les aliments sont trop ou pas assez cuits. Les températures de cuisson au four et la durée de cuisson peuvent varier par rapport à la recette ou les instructions apparaissant sur l’emballage du produit. Pour un réglage donné, la température du four de votre nouvelle cuisinière peut être différente de celle de votre ancienne cuisinière. Avec votre ancienne cuisinière, le réglage de température était moins précis.
PROBLÈME CAUSE POSSIBLE / SOLUTION CUISSON AU GRIL Beaucoup de fumée se dégage du four durant la cuisson au gril. Entrouvrez la porte à la position grillage. Versez 3 à 4 tasses d’eau dans la lèchefrite, afin d’en recouvrir entièrement le fond. Déposez la viande sur le couvercle de la lèchefrite et mettez le tout au four. La graisse qui s’écoule de la viande tombe sur l’eau dans la lèchefrite où elle se refroidit; ceci réduit la formation de fumée.
TIROIR-RÉCHAUD (certains modèles) Pour faire fonctionner le tiroir-réchaud Réglage des commandes du tiroir-réchaud Votre cuisinière est munie d'un tiroir-réchaud. Ce tiroir a pour fonction de conserver les aliments chauds à la température de service. Commencez toujours par les mets chauds. Il n'est pas recommandé de chauffer des aliments froids dans le tiroir-réchaud.
TIROIR -RÉCHAUD (certains modèles) (suite) Disposition de la grille du tiroir-réchaud Disposez la grille du tiroir-réchaud comme illustré ci-dessous. La grille peut être utilisée de 2 façons : • Grille en U vers le bas pour permettre de disposer des aliments de moindre dimension sur et sous la grille (par exemple, petits pains ou biscuits sur la grille et casserole en dessous).