Gas Cooktop CONTENTS Page Versión en español ........................................................... 2 Product Registration ........................................................ 2 Important Safety Instructions ...................................... 3-4 Selecting Surface Cooking Utensils .................................. 5 Specialty Pans & Trivets ................................................... 5 Canning Tips & Information ............................................. 6 Grounding Instructions .
Product Registration Register Your Product The PRODUCT REGISTRATION CARD should be filled in completely, signed and returned to Electrolux Home Products North America. Thank you for choosing this appliance. The information contained within this Owner's Guide will instruct you on how to properly operate and care for your cooktop. Please read through the information contained in your literature pack to learn more about your new appliance.
IMPORTANT SAFETY INSTRUCTIONS Read all instructions before using this appliance. Save these instructions for future reference. This manual contains many important safety messages. Always read and obey all safety messages. This is the safety alert symbol. It alerts you to safety messages that inform you of hazards that can kill or hurt you or others, or cause damage to the product. Indicates an imminently hazardous situation which, if not avoided may result in death or serious injury.
IMPORTANT SAFETY INSTRUCTIONS IMPORTANT INSTRUCTIONS FOR USING YOUR •Glazed Cooking Utensils—Only certain types of glass, glass/ ceramic, ceramic, earthenware, or other glazed utensils are COOKTOP suitable for cooktop service without breaking due to the sudden change in temperature. Check the manufacturer’s recommendations for cooktop use. Use Proper Flame Size—Adjust flame size so it does not extend beyond the edge of the utensil.
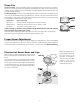
Selecting Surface Cooking Utensils For best result and energy conservation, choose cooking utensils that have these characteristics: POOR *GOOD • Curved and wraped pan bottoms. • Flat bottom and straight sides. Pans should have flat bottoms. Check for flatness by rotating a ruler across the bottom. There should be no gaps between the pan and ruler. Note: Always use a utensil for its intended purpose. Follow manufacturer's instructions. Some utensils were not made to be used in the oven or on the cooktop.
Canning Tips & Information Canning can generate large amounts of steam. Use extreme caution to prevent burns. Always raise the lid to vent steam away from you. 1. Use tested recipes and follow instructions carefully. Check with your local Cooperative Agricultural Extension Service or a manufacturer of glass jars for the latest canning information. 2. Use flat-bottomed canners only. Heat is spread more evenly when the bottom surface is flat. 3. Center canner on the burner grate. 4.
Flame Size For most cooking, start on the highest control setting and then turn to a lower one to complete the process. Use the chart below as a guide for determining proper flame size for various types of cooking. The size and type of utensil used and the amount of food being cooked will influence the setting needed for cooking. For deep fat frying, use a thermometer and adjust the surface control knob accordingly. If the fat is too cool, the food will absorb the fat and be greasy.
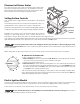
Placement of Burner Grates Place grate over burner pans. Make sure that the groove under grate fits over the raised lip of the burner pan. The rounded corners of the grates should be placed toward the front of the cooktop for the front burners and the rear of the cooktop for the back burners. Grate Grate Setting Surface Controls Your cooktop may be equipped with any combination of the following burners: Simmer Burner; this burner is best used for simmering delicate sauces, etc.
Setting Surface Controls (continued) To Operate the Warmer (Warm & Ready™) Zone The purpose of the warmer zone is to keep hot cooked foods at serving temperature. Use the warmer zone to keep cooked foods hot such as: vegetables, gravies, casseroles, soups, stews, breads, pastries and oven-safe dinner plates. Always start with hot food. It is not recommended to heat cold food on the warmer zone. All food placed on the warmer zone should be covered with a lid or aluminum foil to maintain quality.
General Cleaning Cleaning Various Parts of Your Cooktop Before cleaning any part of the cooktop, be sure all controls are turned OFF and the cooktop is cool. Remove spillovers and heavy soiling as soon as possible. Regular cleaning will reduce the effort required for major cleaning later. Surfaces How to Clean Painted and Plastic Control Knobs For general cleaning, use hot, soapy water and a cloth. For more difficult soils and built-up grease, apply a liquid detergent directly onto the soil.
General Cleaning To Clean the Ceramic-glass Cooktop (some models) The cooktop is designed to make cleaning easier. Because the burners are sealed, cleanups are easy when spillovers are cleaned up immediately. To clean, wipe with a clean, damp cloth and wipe dry. Heavy burned-on spills can be removed with a razor blade scraper. Use caution to avoid damaging surface. Correct and consistent cleaning is essential to maintaining your heat-resistant glass top.
General Cleaning (Continued) To Clean the Ceramic-Glass Cooktop (some models, Continued) Use and Care of Glass Surface Problem Fine ”brown lines“ (tiny scratches or abrasions which have collected soil) Cause To Prevent To Remove Coarse particles (salt, sand, sugar or grit) between bottom of cookware and cooktop that are not removed before cooking. Using incorrect cleaning materials. Clean cooktop after every use. Tiny scratches are not removable.
Ceramic Glass Cooktop (some models) (continued) Use and Care of Glass Surface (continued) Cleaning Materials for Ceramic Glass Cooktop Some cleaning materials may contain an ingredient which can damage the cooktop. Use recommended materials only (see below). Cleaner cream should be used regularly. Prior to using your cooktop for the first time, apply a cleaner cream to the ceramic surface. A sample of CERAMA BRYTE® cleaner cream is supplied with your range. More are available in stores if needed.
General Cleaning To Clean the Burner Grates, Contoured Burner Pans, Burner Cap, and Burner Base The burner grates, contoured burner pans, burner cap, and burner base should be routinely cleaned. Keeping the burner ports clean will prevent improper ignition and an uneven flame. Follow instructions below. To Clean the Contoured Burner Pans The burner pans are attached to the cooktop and are not removable. The burner pan forms a recessed well area located around each burner unit.
Avoid Service Checklist Before you call for service, review this list. It may save you time and expense. The list includes common occurrences that are not the result of defective workmanship or materials in this appliance. OCCURRENCE POSSIBLE CAUSE/SOLUTION Surface burners do not light. Surface Control knob has not been completely turned to LITE. Push in and turn the Surface Control knob to LITE until burner ignites and then turn control knob to desired flame size. Be sure gas supply valve is open.
Warranty Information COOKTOP WARRANTY Your cooktop is protected by this warranty In the U.S.A., your appliance is warranted by Electrolux Home Products North America, a division of White Consolidated Industries, Inc. We authorize no person to change or add to any of our obligations under this warranty. Our obligations for service and parts under this warranty must be performed by us or an authorized Electrolux Home Products North America servicer.