
Microwave/Wall Oven Combination Installation Instructions


5
MICROWAVE/ WALL OVEN COMBINATION
INSTALLATION INSTRUCTIONS
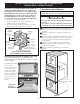
Figure 6
Even-CookConvectionOven
Speed
clean
Maxx
clean
Broil
Pre
Heat
Keep
Warm
Bake
Conv
roast
Start
time
Bake
time
Conv
bake
Conv
convert
Oven
light
Timer
On/Off
Clock
Clear
/Off
Controls
START
0
7 8 9
4 5
6
1 2 3
Clean
Figure 7
Bottom Trim
Screws
supplied
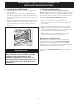
6 Install the Anti-tip Mounting Screws
The wall oven can tip when the door
is open. The anti-tip mounting screws supplied
with the wall oven must be installed to prevent
tipping of the wall oven and injury to persons.
A. The mounting holes in the side trims may be used
as a template to locate the appliance mounting screw
holes (see figure 6).
B. Use the two screws supplied to fix the appliance to
the cabinet.
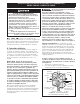
7 Install the Bottom Trim
Place the top of the bottom trim over the side trim
tabs on each side of the oven below the oven door
and fix it using the 2 screws supplied in the mounting
holes located on each side trim below the oven frame
(see Figure 7).