All about the Use & Care of your Wall Oven TA B L E O F C O N T E N T S Setting Oven Controls - Model B............................10 Important Safety Instructions..................................3 Care & Cleaning...................................................16 Features at a Glance...............................................5 Before You Call ...................................................18 Before Setting Oven Controls..................................7 Major Appliance Warranty........
Welcome & Congratulations Product Registration Register Your Product The PRODUCT REGISTRATION CARD should be filled in completely, signed and returned to Electrolux Major Appliances. Serial Plate Location Congratulations on your purchase of a new appliance! At Electrolux Major Appliances, we are very proud of our product and are completely committed to providing you with the best service possible. Your satisfaction is our number one priority.
Important Safety Instructions Read all instructions before using this appliance. Save these instructions for future reference. Definitions This is the safety alert symbol. It is used to alert you to potential personal injury hazards. Obey all safety messages that follow this symbol to avoid possible injury or death. WARNING This symbol will help alert you to situations that may cause serious bodily harm, death or property damage.
Important Safety Instructions During and after use, do not touch, or let clothing or other flammable materials touch these areas until they have had sufficient time to cool. Among these areas are the oven vent openings, the surfaces near these openings, oven door and window. • Wear Proper Apparel. Loose-fitting or hanging garments should never be worn while using the appliance. Do not let clothing or other flammable materials contact hot surfaces.
FEATURES AT A GLANCE (model A) Your Electric Wall-Oven Features: 1. 2. Oven vent. Electronic oven control with kitchen timer. 3. Oven light switch. 4. Broil element. 5. Oven interior light with removable cover. 6. Manual clean oven interior. 7. Adjustable interior oven rack(s). 8. Large 1-piece oven door handle. 9. Full width oven door with window. 10. Bottom trim. NOTE The features shown for your appliance may vary according to model type & color.
FEATURES AT A GLANCE (Model B) Your Electric Wall-Oven Features: 1. Oven vent. 2. Electronic oven control with kitchen timer. 3. Oven light switch. 4. Broil element. 5. Oven interior light with removable cover. 6. Self-cleaning oven interior. 7. Adjustable interior oven rack(s). 8. Large 1-piece oven door handle. 9. Full width oven door with window. 10. Bottom trim. NOTE The features shown for your appliance may vary according to model type & color.
BEFORE SETTING OVEN CONTROLS Oven Vent Location Arranging Oven Racks The oven is vented at the center trim. When the oven is on, warm air is released through the vent. This venting is necessary for proper air circulation in the oven and good baking results. Always arrange oven racks when THE oven is cool (Prior to operating the oven). Always use oven mitts when using the oven. To remove an oven rack, pull the rack forward until it stops. Lift up front of rack and slide out.
Setting OVEN controls - Model A Control pad features READ THE INSTRUCTIONS CAREFULLY BEFORE USING THE OVEN. For satisfactory use of your oven, become familiar with the various features and functions of the oven as described below. Detailed instructions for each feature and function follow later in this Use & Care Guide. 7 1 2 3 4 5 6 1. Bake pad—Use to select the bake cooking feature. 2. Broil pad—Use to select the broil cooking feature. 3. Timer on-off pad—Use to set or cancel the Timer.
Setting OVEN controls - Model A To Set or Change the Temperature for Baking The oven can be programmed to bake at any temperature from 170°F to 500°F (76°C to 260°C). To Set the Controls for Baking: 1. Press BAKE pad. "— — —°" appears in the display. 2. Within 5 seconds, press the UP or DOWN ARROW pad. The display will show "350°F." By pressing and holding the UP or DOWN ARROW pad, the temperature can then be adjusted in 5°F increments. 3.
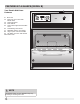
Setting OVEN controls - Model B Control pad features READ THE INSTRUCTIONS CAREFULLY BEFORE USING THE OVEN. For satisfactory use of your oven, become familiar with the various features and functions of the oven as described below. Detailed instructions for each feature and function follow later in this Use & Care Guide. NOTE The oven function will not work if the time of day clock is not set. 8 1 2 3 4 5 1. Clock pad—Use to set the time of day. 2.
Setting OVEN controls - Model B NOTE NOTE The oven function will not work if the time of day clock is not set. To turn the time of day display OFF or ON in the display press and hold the CLOCK pad for 8 seconds (the control will beep once) and then release. This feature does not remove the set time of day from the memory of the control. When the display is turned OFF the time of day will reappear for a few seconds any time the CLOCK pad is touched.
Setting OVEN controls - Model B To Set or Change the Temperature for Normal Baking The oven can be programmed to bake at any temperature from 170°F to 550°F (77°C to 287°C). NOTE The oven control has a built-in energy saving feature that will shut off the oven if the control is left on for more than 11 hours 59 minutes. To Set the Controls for Normal Baking: 1. Push BAKE pad."— — —" appears in the display. 2. Within 5 seconds, push the UP or DOWN ARROW pad. The display will show "350°F (177°C).
Setting OVEN controls - Model B To Set the Bake time Feature The BAKE TIME and START TIME controls operate the Timed Bake Feature. The automatic timer will turn the oven on and off at the times you select in advance. The oven can be programmed to start immediately and shut off automatically or to begin baking at a later time with an automatic shut off. To Program the Oven to Begin Baking Immediately and To Shut Off Automatically: 1. Be sure that the clock shows the correct time of day. 2.
Setting OVEN controls - Model B Self-cleaning A self-cleaning oven cleans itself with high temperatures (well above normal cooking temperatures) which eliminate soils completely or reduces them to a fine powdered ash you can wipe away with a damp cloth. IMPORTANT Adhere to the following cleaning precautions: • DO NOT use oven cleaners or oven protective coatings in or around any part of the oven interior. • DO NOT clean the oven door gasket.
Setting OVEN controls - Model B Self-cleaning To Start the Self-Clean Cycle *We recommend a 2 hour self-clean cycle for light soils, and a 3 hour cycle for average to heavy soils (to assure satisfactory results). To Set the Controls for a Self-Clean Cycle: 1. Be sure the clock shows the correct time of day. 2. Push the CLEAN pad. "- - -" appears in the display. 3.
CARE & CLEANING Cleaning Various Parts of Your Range Before cleaning any part of the range, be sure all controls are turned OFF and the range is COOL. Remove spillovers and heavy soiling as soon as possible. Regular cleaning will reduce the number of major cleaning later. Surface type Recommendation • Aluminum & Vinyl Use hot, soapy water and a cloth. Dry with a clean cloth.
Care & Cleaning Care and cleaning of stainless steel Some models are equipped with stainless steel exterior parts. Special care and cleaning are required for maintaining the appearance of stainless parts. Refer to the General Care & Cleaning table for detailed cleaning instructions. Removing and replacing the lift-off oven door CAUTION To Remove Oven Door: 1. Open oven door completely (horizontal with floor See Figure 1). 2.
Before you call - Solutions to Common Problems Oven Baking For best cooking results, heat the oven before baking cookies, breads, cakes, pies or pastries, etc. There is no need to preheat the oven for roasting meat or baking casseroles. The cooking times and temperatures needed to bake a product may vary slightly from your previously owned appliance. Baking Problems and Solutions Chart Baking Problems Cookies and biscuits burn on the bottom.
Before you call - Solutions to Common Problems IMPORTANT Before you call for service, review this list. It may save you time and expense. The list includes common occurrences that are not the result of defective workmanship or materials in this appliance. OCCURRENCE POSSIBLE CAUSE/SOLUTION Oven Control Beeps and Displays an “F” Error Code Electronic control has detected a fault condition. Push CLEAR pad to clear the display and stop the display from beeping. Reprogram the oven.
MAJOR APPLIANCE WARRANTY Your appliance is covered by a one year limited warranty. For one year from your original date of purchase, Electrolux will pay all costs for repairing or replacing any parts of this appliance that prove to be defective in materials or workmanship when such appliance is installed, used and maintained in accordance with the provided instructions.