Laundry Center use & care Introduction.......................................................2 Controls And Settings ................................ 28 Important Safety Information ....................3 Operating Instructions ............................... 35 Features ..............................................................8 Stain Removal Guide...................................40 Pre-Installation Requirements ....................9 Care and Cleaning .......................................
INTRODUCTION Welcome to our family Keep your product info here so it’s easy to find. Model Number Thank you for bringing Frigidaire into your home! We see your purchase as the beginning of a long relationship together.
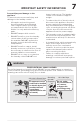
IMPORTANT SAFETY INFORMATION 3 WARNING FIRE or explosion hazard Failure to follow safety warning exactly could result in serious injury, death, or property damage. DO NOT store or use gasoline or other flammable vapors and liquids in the vicinity of this or any other appliance. WHAT TO DO IF YOU SMELL GAS: • DO NOT try to light any appliance. • DO NOT touch any electrical switch; DO NOT use any phone in your building. • Clear the room, building or area of all occupants.
IMPORTANT SAFETY INFORMATION WARNING Please read all instructions before using this laundry center. This Use & Care Guide provides general operating instructions for your laundry center. It also contains information about features for several other models. Your model may not have every feature included. Use the laundry center only as instructed in this Use & Care Guide. This book contains valuable information about operation, care and service. Keep it in a safe place.
IMPORTANT SAFETY INFORMATION • WARNING - risk of fire To reduce the risk of fire, electrical shock, or injury to persons when using this laundry center, comply with the basic warnings listed below. Failure to comply with the Important Safety Information and WARNINGS could result in serious personal injuries or death. Prevent fire • DO NOT wash or dry items that have been previously cleaned in, soaked in, or spotted with gasoline, cleaning solvents, kerosene, cooking oils, waxes, etc.
IMPORTANT SAFETY INFORMATION Protect children • DO NOT allow children to play on or in the laundry center. Close supervision of children is necessary when the laundry center is used near children. As children grow, teach them the proper, safe use of all appliances. • Destroy or recycle the carton, plastic bag, and other packing materials after the laundry center is unpacked. Children might use them for play. Cartons covered with rugs, bedspreads or plastic sheets can become airtight chambers.
IMPORTANT SAFETY INFORMATION Prevent injury and damage to the appliance To prevent serious personal injury and damage to the laundry center: • All repairs and servicing must be performed by an authorized service agent unless specifically recommended in this Use & Care Guide. Use only authorized factory parts. • DO NOT tamper with controls. • DO NOT install or store the laundry center where it will be exposed to the weather. DO NOT operate the laundry center in below freezing temperatures.
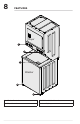
FEATURES Dryer 1 2 3 Washer 4 4 1. Washer Controls 3. Washer Lid Lock Location 2. Dryer Controls 4.
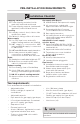
PRE-INSTALLATION REQUIREMENTS 9 Installation Checklist Shipping hardware Foam shipping restraint (inside wash tub) removed and stored Foam shipping support (underneath appliance) removed and stored Leveling Laundry center is level, side-to-side and front-to-back Cabinet is sitting solid on all corners Water supply Use only new hoses and verify rubber sealing washers are installed HOT supply is connected to HOT inlet and COLD supply is connected to COLD inlet HOT and COLD water supply turne
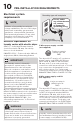
PRE-INSTALLATION REQUIREMENTS Electrical system requirements Grounding type wall receptacle Do not, under any circumstances, cut, remove, or bypass the grounding prong. NOTE Because of potentially inconsistent voltage capabilities, the use of this dryer with power created by gas powered generators, solar powered generators, wind powered generators or any other generator other than the local utility company is not recommended.
PRE-INSTALLATION REQUIREMENTS Electrical requirements for laundry center with gas dryer WARNING Improper grounding of the laundry center may cause serious injury or death. Check with a licensed electrician if you are in doubt as to whether the appliance is properly grounded. Grounding type wall receptacle Do not, under any circumstances, cut, remove, or bypass the grounding prong. Power cord with 3-prong grounded plug CIRCUIT - Individual, properly polarized and grounded 15 amp.
PRE-INSTALLATION REQUIREMENTS Drain system requirements 1. Drain capable of eliminating 17 gals (64.3 L) per minute. 2. A standpipe diameter of 1-1/4 in. (3.18 cm) minimum. 3. Standpipe height above the floor should be: Minimum height: 33 in. (84 cm) Maximum height: 96 in. (244 cm) FIRE HAZARD Failure to follow these instructions can create excessive drying times and fire hazards. The following are specific requirements for proper and safe operation of your dryer.
PRE-INSTALLATION REQUIREMENTS WARNING FIRE HAZARD A clothes dryer must be exhausted outdoors. DO NOT exhaust dryer into any gas vent, a chimney, a wall, a ceiling, an attic, a crawl space or any concealed space of a building. A clothes dryer produces combustible lint. If the dryer is not exhausted outdoors, some fine lint will be expelled into the laundry area. An accumulation of lint in any area of the home can create a health and fire hazard. The dryer must be connected to an exhaust outdoors.
PRE-INSTALLATION REQUIREMENTS Max. Number of 90° turns MAXIMUM LENGTH of 4” (102 mm) Rigid Metal Duct LONG VENT MODELS ONLY FLCE7523AW VENT HOOD TYPE 0 4” (10.2 cm) louvered 127 ft. (39 m) 2.5” (6.35 cm) 124 ft. (37 m) 1 117 ft. (35 m) 114 ft. (34 m) 2 107 ft. (32 m) 104 ft. (31 m) 3 97 ft. (29 m) 94 ft. (28 m) 4 87 ft. (26 m) 84 ft. (25 m) WARNING FIRE HAZARD • DO NOT install flexible plastic or flexible foil venting material. • If installing semi-rigid venting, DO NOT exceed 8 ft.
PRE-INSTALLATION REQUIREMENTS • The exhaust system should be inspected and cleaned a minimum of every 18 months with normal usage. The more the dryer is used, the more often you should check the exhaust system and vent hood for proper operation. Manufactured or mobile home installation 1.
PRE-INSTALLATION REQUIREMENTS Installation in a recess or closet 1. A dryer installed in a recess or closet, MUST be exhausted outdoors. 2. No other fuel burning appliance shall be installed in the same recess or closet as a gas dryer. 3. Your dryer needs space around it for proper ventilation. See "Clearance Requirements" chart. Ventilation Examples 120 sq. Inches 4.
PRE-INSTALLATION REQUIREMENTS Clearance requirements MINIMUM INSTALLATION CLEARANCES - Inches (cm) SIDES REAR TOP FRONT 0" 0" 0" Alcove/ Open recess (0 cm) (0 cm) (0 cm) Closet 0" 0" 1" 1" w/Door (0 cm) (0 cm) (0 cm) (2.5cm) Vent Closet 1" 1" 1" 1" w/Wall (2.5 cm) (2.5cm) (2.5cm) (2.5cm) Vent 120 sq. Inches of wall venting 17 WARNING EXPLOSION HAZARD DO NOT install the laundry center where gasoline or other flammables are kept or stored.
PRE-INSTALLATION REQUIREMENTS Laundry center dimensions Front view gas supply pipe on rear of gas unit 17.6" (45 cm) 77" (196.5 cm) power cord attachment location on rear of unit1 drain hoseretention clips on rear of washer2 9.4" (24 cm) 5.5" (14 cm) 4 in. (102 mm) exhaust vent on rear of unit 23" (58.5 cm) 13" (33 mm) water supply connection on rear of washer 43.5" (110.5 cm) Side view 47.5" (120.5 cm) 31.5" (80 cm) center line height for 4 in. (102 mm) exhaust outlet 55.75" (141.5 cm) 41.
INSTALLATION Unpacking instructions IMPORTANT 19 4. Carefully lower the laundry center to an upright position and remove the tape holding the lid shut. Remove the foam tub block, all foam inserts, and other tub contents. To prevent vibration, possible machine damage and maximize performance, the following steps must be completed. 1. If foam tub block has been removed, reinsert it now and tape the lid securely. 2. Carefully cut the front and back corners of the left side of the remaining cardboard. 3.
INSTALLATION Connecting the gas This gas dryer comes from the factory with natural gas burner components installed. DO NOT operate this gas dryer, using LP (liquid propane) gas, unless the LP gas conversion kit has been properly installed by a qualified service personnel. Improper gas installation or LP conversion kit installation could result in injury or even death. to dry er fro m ga ss up ply Shutoff Valve - Open position IMPORTANT DO NOT connect the dryer to L.P.
INSTALLATION WARNING ELECTRICAL SHOCK HAZARD • A U.L.-approved strain relief must be installed onto power cord. If the strain relief is not attached, the cord can be pulled out of the dryer and can be cut by any movement of the cord, resulting in electrical shock. • DO NOT use an aluminum wired receptacle with a copper wired power cord and plug (or vice versa). A chemical reaction occurs between copper and aluminum and can cause electrical shorts.
INSTALLATION For a grounded, cord-connected dryer: 1. The laundry center MUST be grounded. In the event of a malfunction or breakdown, grounding will reduce the risk of electrical shock by a path of least resistance for electrical current. 2.
INSTALLATION 6. Attach the remaining two power cord outer conductors to the outer, BRASS colored terminals on the terminal block. Tighten both screws securely. Brass Terminal Brass Terminal 1. Turn off power supply to outlet. 2. Remove the screw securing the terminal block access cover on the back of the dryer. 3. Install a UL-approved strain relief according to the power cord/strain relief manufacturer’s instructions in the power cord entry hole below the access panel.
8. INSTALLATION Attach the RED and BLACK power cord conductors to the outer, BRASS colored terminals on the terminal block. Tighten both screws securely. 3. BRASS terminals Press down on alternate corners and sides and feel for the slightest movement. Adjust the appropriate leg(s) so the laundry center sits solidly on the floor on ALL four legs. Keep the leveling leg extension at a minimum for best performance of the washer. Connecting the water BLACK or RED power wires 1.
INSTALLATION 25 Tighten by hand until snug. Then tighten each supply connection another 2/3 turn with pliers. DO NOT cross thread or over-tighten these connections. 4. Connect the HOT inlet hose to the HOT water supply and the COLD inlet hose to the COLD water supply. Tighten by hand until snug. 5. Tighten each supply connection another 2/3 turn with pliers. DO NOT bend, kink, or pinch water inlet hoses. 6. Turn on the water and check for leaks. Connecting the exhaust 1. Clamp 3.
INSTALLATION Grounding type wall receptacle Insert Less Than 8.5" (21.5 cm) Do not, under any circumstances, cut, remove, or bypass the grounding prong. Cable Tie Power cord with 3-prong grounded plug 2. Turn on the power at the circuit breaker/fuse box. 3. Run the washer through a complete cycle, checking for water leaks and proper operation. NOTE The standpipe inside diameter must be 1-1/4” (3.2 cm) minimum. There must be an air gap around the drain hose in the standpipe.
ACCESSORIES AND REPLACEMENT PARTS 27 Accessories Replacement parts: LP CONVERSION KIT P/N 5304523143 If replacements parts are needed for your laundry center, contact the source where you purchased your laundry center or refer to your Use and Care Guide for more information. Gas dryers intended for use in a location supplied with LP must use a conversion kit prior to installation.
CONTROLS AND SETTINGS Washer controls and settings This manual covers many models and not all cycles, options, or features listed are available on every model. Consoles shown above for reference only. Your model may differ. Wash cycle selection Rinse & Spin Select this cycle for loads that require a cold water rinse or to add fabric softener that For best results may have been omitted in a regular cycle.
CONTROLS AND SETTINGS Wash cycle settings Wash temp (water temperature) 29 MaxFill Select the MaxFill water level setting if the tub is over one half (1/2) full. Med (Medium) Select the Medium water level setting if the tub is between one third (1/3) and one half (1/2) full. Press the Wash Temp button to cycle through wash water temperatures until the desired temperature is selected. The LED will light to indicate the current selection.
CONTROLS AND SETTINGS Washer setting chart Normal Bulky Heavy Soil Colors Light Soil Soak Rinse & Spin *Drain & Spin Activewear Delicates Quick Wash These temperatures and water levels are available with the following cycles Wash Temperature Hot Warm Cold Water Level MaxFill Med Low = Available selections. = Factory presets.
CONTROLS AND SETTINGS Wash cycle indicator lights The washing cycle indicator lights provide information during the wash cycle. The Close Washer Lid advisory LED will illuminate if the washer lid is open. Fully close the washer lid before starting the washer. The washer will not operate with the lid open. The Balance Load advisory LED indicator will illuminate if the wash load is unbalanced in the drum during the wash cycle. Pause the washer and redistribute the wash load.
CONTROLS AND SETTINGS Dryer controls and settings This manual covers many models and not all cycles, options, or features listed are available on every model. Consoles shown above for reference only. Your model may differ. Dry cycle selection NOTE The Clean Lint Filter LED will illuminate after each drying cycle as a reminder to clean the lint filter. The lint filter must be cleaned after every load. This is NOT a warning of a clogged exhaust duct or filter.
CONTROLS AND SETTINGS Timed dry cycles WARNING FIRE HAZARD To avoid fire hazard, DO NOT use heat to dry items containing feathers or down, foam rubber, plastics similarly textured, rubber-like materials. Use the Air Fluff setting. Quick Dry Select this timed cycle to quickly dry a small load made up of just a few items. It provides approximately 25 minutes of tumbling including a cool down period.
CONTROLS AND SETTINGS Drying cycle controls Drying cycle indicator lights (Start, Pause, and Cancel) The drying cycle indicator lights provide information during the dry cycle. START Press DRYER START|PAUSE button once to begin the drying cycle. The unit will emit one beep before the drum begins to rotate. PAUSE Press DRYER START|PAUSE button while the dryer is running to pause the drying cycle. Opening the door with a cycle running will also pause the cycle. You will hear two beeps.
OPERATING INSTRUCTIONS Operating the washer WARNING To reduce the risk of fire, electric shock or injury to persons, read the Important Safety Information in this Use & Care Guide before operating your washer. WARNING DO NOT wash water-resistant and water-repellent type clothing or other materials. Failure to closely follow these instructions may result in abnormal vibrating and out-of-balance conditions that could result in physical injury, property damage, and/or appliance damage.
OPERATING INSTRUCTIONS STEPS TIPS IMPORTANT 4. Add liquid detergent/ detergent packs or powder detergent to wash tub BEFORE adding load. • The amount of detergent required depends on the type of detergent, load size, and water hardness. • For best results add the recommended quantity of detergent packs (One or Two) directly in the empty drum BEFORE placing the laundry into the unit.
OPERATING INSTRUCTIONS STEPS TIPS 8. Add liquid • Add diluted fabric softener to the final rinse following fabric fabric softener manufacturer’s softener to instructions. the final rinse • A fabric softener dispensing (if desired). ball can also be used. 37 IMPORTANT • To prevent staining, do not pour liquid fabric softener directly on to wash load. 9. Select washing cycle and settings for each load.
OPERATING INSTRUCTIONS Operating the dryer WARNING To reduce the risk of fire, electric shock or injury to persons, read the Important Safety Information in this Use & Care Guide before operating your dryer. STEPS TIPS CAUTION • DO NOT operate dryer without lint filter in place. • ALWAYS clean filter after each load. IMPORTANT 1. Prepare load • Dry items of similar fabric, weight, and • Dryer heat may for drying. construction in the same load. permanently set some stains.
OPERATING INSTRUCTIONS 39 STEPS TIPS IMPORTANT 4. Select the cycle and settings for each load. • See Drying Cycle Selection and Drying Cycle Settings on the following pages. • Over-drying can cause wrinkles, shrinkage, lint, harshness, and build up of static electricity. • For best results, follow fabric care label on items to be dried. 5. Start the dryer.
STAIN REMOVAL GUIDE Safe stain removal procedures • Remove stains promptly. • Follow the recommended treatment in the stain removal chart on the next page. • To pretreat stains, use a prewash product, liquid detergent, or a paste made from powder detergent and water. • Use cold water on unknown stains as hot water can set stains. • Consult care label instructions for treatments to avoid on specific fabrics. • Check for colorfastness by testing stain remover products on an inside seam.
STAIN REMOVAL GUIDE 41 Stain Removal Suggestions STAIN Adhesive tape, rubber cement, gum Baby formula, dairy products, egg Beverages (coffee, alcoholic beverages, tea, soda, juice) Blood TREATMENT Apply ice. Scrape off excess. Place stain face down on paper towels. Saturate with prewash stain remover or nonflammable dry cleaning fluid. Use product containing enzymes to pretreat or soak stains. Soak for 30 minutes or more. Wash. Pretreat stain. Wash using cold water and bleach safe for fabric.
CARE AND CLEANING WARNING FIRE HAZARD A clothes dryer produces combustible lint. The dryer must be connected to an outdoors exhaust. Regularly inspect the outdoor exhaust opening and remove any accumulation of lint around the opening and in the surrounding area. Cleaning Inside of Dryer WARNING FIRE HAZARD / HARMFUL VAPOR HAZARD DO NOT use any type spray cleanser when cleaning the dryer interior. Hazardous fumes or electrical shock could occur. • IMPORTANT Clean the lint filter after every load.
CARE AND CLEANING • The base plate or tub may become stained from fabric dye. Clean these parts with a nonabrasive household cleanser. This prevents dye transfer to future loads. IMPORTANT DO NOT store or place laundry products on top of laundry center at any time. They can damage the finish or controls. Cleaning Outside of Laundry Center • When washing is completed, wipe top and sides of laundry center with a damp cloth. Turn water faucets off to prevent pressure build-up in the hoses.
CARE AND CLEANING Winterizing Instructions IMPORTANT Winterize the laundry center if it is stored in an area where freezing can occur or moved in freezing temperatures to prevent damage to the washer: 1. Turn off water supply faucets. 2. Disconnect hoses from water supply and drain water from hoses. 3. Plug electrical cord into a properly grounded electrical outlet. 4. Add 1 gallon (3.8 L) nontoxic recreational vehicle (RV) antifreeze to empty wash drum. Close door. 5.
TROUBLESHOOTING 45 Common washing inquiries Many washing problems involve poor soil and stain removal, residues of lint and scum, and fabric damage. For satisfactory washing results, follow these suggestions provided by The Soap and Detergent Association. PROBLEM POSSIBLE CAUSES Blue stains • Undiluted liquid detergent or fabric softener dispensed directly onto fabric. SOLUTIONS • If caused by detergent, mix 1 cup (240 ml) white vinegar with 1 quart (.95 L) water in a plastic container.
TROUBLESHOOTING Common washing inquiries (continued) PROBLEM POSSIBLE CAUSES Pilling • Pilling is normal with synthetic (Fibers ball and permanent up and cling press fabrics due to fabric) to abrasion from normal wear. SOLUTIONS Residue or powder on dark items; • Rewash load. Stiff, harsh fabrics • Undissolved detergent. • Some granular detergents can combine with hard water minerals to form a residue. • Overloading the washer. • Use a lint brush or shaver to remove pills.
TROUBLESHOOTING 47 Common drying inquiries Many drying problems involve poor drying results, excess lint and residues of lint and scum, and fabric damage. For satisfactory drying results, follow these suggestions provided by The Soap and Detergent Association. PROBLEM POSSIBLE SOLUTIONS CAUSES Greasy, oily • Use of fabric • Rub fabric softener stains softener stains with bar soap. sheet. Rinse and rewash. PREVENTIVE MEASURES Lint • Add a few bath towels to small loads for proper tumbling.
TROUBLESHOOTING Before Calling Before calling for service, review this list. It may save both time and expense. The list includes common occurrences that are not the result of defective workmanship or materials in this laundry center. PROBLEM POSSIBLE CAUSES NOISE Rattling and • Foreign objects such as coins or safety pins may be in drum clanking or pump. noise Thumping sound Vibrating noise SOLUTIONS • Stop washer and check drum.
TROUBLESHOOTING 49 Before Calling (continued) PROBLEM POSSIBLE CAUSES No sound • The chime feature has been from button muted press or end of cycle notification Dryer runs but won’t heat • If 1 of the 2 fuses in the dryer circuit is blown, the drum may turn but the heater will not operate (electric models). • Gas supply valve is not open (gas models). • Dryer does not have enough air supply to support the burner flame (gas models).
PROBLEM TROUBLESHOOTING POSSIBLE CAUSES SOLUTIONS • DO NOT overload. See Operating Instructions. • Remove items as soon as cycle • Items left in dryer too long. ends. • Insufficient sorting of items. • Drying temperature too high. • See Operating Instructions. • Follow fabric care label instructions. Scratching • Foreign objects such as coins, • Always remove foreign objects from pins, clips or buttons are pockets before laundering. Remove or chipping inside the dryer.
TROUBLESHOOTING 51 Before Calling (continued) PROBLEM POSSIBLE CAUSES • Washer lid is open. Water does not enter washer or it • Water supply is not adequate enters slowly in area. SOLUTIONS • Close washer lid. The washer will not operate when the lid is open. • Check another faucet in the house. Wait until water supply and pressure increase. • Fully open hot and cold faucets. • Water supply faucets are not completely open.
LIMITED WARRANTY For the applicable warranty period as set forth below, as measured from your original date of purchase, Electrolux will repair or replace any parts of this appliance that prove to be defective in materials or workmanship when such appliance is installed, used and maintained in accordance with the provided instructions.
welcome home. Our home is your home. Visit us if you need help with any of these things: owner support accessories service registration (See your registration card for more information.) Frigidaire.com 1-800-374-4432 Frigidaire.