
Installation guide


5. Cabinet Installation
A. Easy Clean Models
I. Remove and lay aside the lower vent trim which is
taped to the oven outer side panel.
2. Slide the oven into the opening until the side trims
fit flush against the wall of the cabinet and check
for levelness of the oven racks. Shim as required.
Check the levelness of an oven rack with a spirit
level.
3. Using the holes in the oven front frame as
template, drill four I/8" (3 ram) diameter hols in
the cabinet.
4. Fasten the top of the wall oven to the cabinet by
means of 2 of the screws supplied in the
miscellaneous parts bag. These holes are located
underneath the control panel.
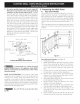
5. Fasten the bottom vent trim and the bottom of the
oven to the cabinet by means of the 2 remaining
screws (see figure 1I).
MOUNTING
DECORATIVETRIM
)
/
MOUNTING
,___ SCREW
Figure 11
B. Self Clean Models
Insert the appliance into the cutout. Screws are
provided for fastening the appliance front frame to the
cabinet. The mounting holes in the front frame may be
used as a template to locate the appliance mounting
screw holes.
To fasten the appliance to the cabinetry:
1. Line up the 2 mounting holes on the vent trim with
the lower mounting holes on each side of the oven
frame below the oven door (see Figure 11).
2. Use 2 screws from the miscellaneous parts bag to
secure the grille and appliance to the cabinetry.
3. Use the remaining 2 screws in the upper 2
mounting holes on each side of the oven frame,
above the door.
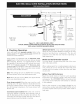
4. For typical under counter installation of an electric
built-in oven with an electric cooktop mounted
above, see Figure 12.
5. For typical under counter installation of an electric
built-in oven with a gas cooktop mounted above,
see Figure 13.