EIectdc Single and Double Welcome .................................. instructions 2 important Safety ... 3°4 Features at a Glance .............. 5 Before Setting Oven ControNs ......................... Setting Oven Cooking Controls Informations 6 ........... 6 ......... 7-9 Care & C_eaning ............... 10-13 Adjusting Your Oven Temperature ................ 13 Before You Call Solutions Visit the Frigidaire to co_o. P_ob_o_, ....................... 14-15 Warranty Cover ........
Questions? 1-800-944-9044 (United States/ 1-866-294-9911 (Canada) Please attach sales receipt here for future reference Congratulations on your purchase of a new appJiance! At Electromux Home Products, we are very proud of our product and are completely committed to providing you with the best service possible.Your satisfaction is our number one priority We know you'Jlenjoy your new appliance and ThankYou for choosing our product. We hope you consider us for future purchases.
Read aH instructions before using this appmiance. Save these instructions for future reference. This manual contains important safety symbols and instructions. Please pay attention to these symbols and follow all instructions given. • Remove all tape and packaging wrap before using the appliance. Destroy the carton and plastic bags after unpacking the appliance. Never allow children to play with packaging material. Do not remove the wiring label and other literature attached to the back of the wall oven.
, Do Not Use Water or Flour on Grease Fires--Smother the fire with a pan lid, or use baking chemical or foam=type extinguisher. soda, a dry • When heating fat or grease, watch it closely. Fat or grease may catch fire if allowed to become too hot. • Use Only Dry Pot holders--Moist or damp pot holders on hot surfaces may result in burns from steam. Do not let the pot holders touch the hot heating elements. Do not use a towel or other bulky cloth instead of a pot holder.
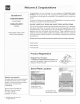
Oven Broil Vent Element Electronic Oven Controls with Clock and Kitchen Timer (Features will vary according to model) Your EJectric Wall Oven Features At A GMance Dual or Single interior Oven Lights depending on your model xX Manual or SelfzClean Oven \ depending on Broil Pan insertBroil Pan Electronic Oven Controls with Clock and Kitchen Timer (Features will vary according to model) Upper Oven Vent Broil Element Gla Door with Large Window Opening Single Wall Dual or Single interior Oven Lights de
SingleandUpperOven Some mode_s are equipped with a blower which runs in baking and self=cleaning mode to keep all internal components at a cool temperature. The blower may keep running even if the oven has been turned off, untit the components have cooled down. Oven Vent Location ......................... The ovens are vented at the center trim. When the oven is on, warm air is released th rough the vent. This venting is necessary for proper air circulation in the oven and good baking results.
Oven Baking For best cooking results, heat the oven before baking cookies, breads, cakes, pies or pastries, etc... There is no need to preheat the oven for roasting meat or baking casseroles. The cooking times and temperatures needed to bake a product may vary slightly from your previously owned appliance. Baking Problems and Solutions Baking Problems Causes Cookies and biscuits burn on the bottom. Cakes too dark on top or bottom. Cakes not done in the center. Cakes not level.
Broilingis a methodofcookingtendercutsofmeatbydirectheatunderthebroilelement oftheoven. Preheating Preheating is suggested when searing rare steaks. (Remove the broiler pan before preheating. Foods will stick if placed on hot metal.) To preheat, set the control(s) to BROIL as instructed in the Owner's Guide. Wait for the element to become red-hot, usually about 2 minutes. Preheating is not necessary when broiling meats well-done. .....
Convection Cooking (someode s) The convection oven uses a fan located in the rear wall of the oven to circulate heated air around the food to be cooked. The controlled airflow pattern quickly seals the food surface retaining the natural juices and flavour. This method of cooking enables you to obtain the best culinary results when baking, thawing, dehydrating and roasting foods. Convection notes: 1. Batch cooking is more convenient with better results. 2.
(C!eartmg Surfaces Aluminum & Vinyl Chart) How to Clean (Trim Pieces) Use hot, soapywater and a cloth. Dry with a clean cloth. Do not scour or use all-purpose cleaners, ammonia, powdered cleaners or commercial oven cleaner. They can scratch and discolor aluminum. Painted and Plastic Parts, Body Parts, and Decorative Trim For general cleaning, use hot, soapy water and a cloth. Formore difficult soils andbuflto up grease, apply a liquid detergent directly onto the soil.
Se f-C eaning Self-C_eaning (somemode s) Oven During the self=cleaning A Self-Cleaning oven cleans itself with high temperatures (well above cooking temperatures) which eliminate soils completely or reduces them to a fine powdered ash you can wipe away with a damp cloth. Adhere to the fo{Iowing cleaning precautions: , Allow the oven to cool before cleaning. , Wear rubber gloves when cleaning any exterior parts of the oven manually. DO NOT clean the oven door gasket.
C eaning the Manua C ean Oven (Reg.mar ovenmodem, onmy) Porcelain has a smooth finish and is a type of glass fused to metal. Oven cleaners can be used on all interior oven surfaces. REMOVE SPILLOVERS AND HEAVY SOILING AS SOON AS POSSIBLE. REGULAR CLEANINGS WiLL REDUCE THE NUMBER OF MAJOR CLEANINGS LATER. Adhere to the following cmeanBngprecautions: Allow the oven to cool before cleaning. Wear rubber gloves when cleaning the appliance manually. General Cleaning Remove soils using hot, soapy water.
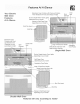
Hinge support ngeleverhook Lock engaged for door removal Figure 1 HINGE SLOT - Door removed from the oven Figure 2 O Removing and Replacing the Oven Door The door is heavy. For safe, temporary storage, lay the door fiat with the inside of the door facing down. To Remove Oven Door: 1. Open the door to the fully opened position. 2. Pull up the lock located on both hinge supports and engage it in the hinge lever hooks (Figure 1).
Care&Cleaning To remove the "hidden 1, 2, bake" cover: Unorder to remove the "hidden bake" cover, pull the back edge with one hand about 1/2" inch and Hft up the "hidden bake" cover with both hands, (See picture) When reqnstaHing the "hidden bake" cover, be sure to put it aH the way to the back of the oven and Uayit down on the 2 shouUder screws, Then push the front edge of the cover in its pUace beUow the front bracket, To have easier access to the "hidden bake" cover, you can remove door by following
OCCURRENCE Entire oven does POSSIBLE not operate. House fuse CAUSE / SOLUTION has blown or circuit breaker House fuse may not be fully engaged. securely. House fuse has blown installed Oven might does not work. Burned-out or loose or tighten Oven smokes excessively during Oven or circuit and previously breaker operating. bulb.
MM/TED WARRANTY Your Wall Oven is protected by this warranty WARRANTY PERIOD THROUGH OUR AUTHORIZED SERVICERS WE W}LL: THE CONSUMER WILL BE RESPONSIBLE FOR: Costs of service calls that are listed under NORMAL RESPONSIBILITIES OF THE CONSUMER.