All about the Use & Care of your Electric Range TABLE OF CONTENTS www.frigidaire.com USA 1-800-944-9044 Setting Oven Controls . . . . . . . . . . . . . . . . . . . . . . Care and Cleaning . . . . . . . . . . . . . . . . . . . . . . . . Before You Call . . . . . . . . . . . . . . . . . . . . . . . . . . . Warranty . . . . . . . . . . . . . . . . . . . . . . . . . . . . . . . . www.frigidaire.ca Canada 1-800-265-8352 13 22 29 32 808575803 Rev C (March 2015) Important Safety Instructions . . . . . .
PRODUCT RECORD AND REGISTRATION Need Help? . . . . . . . . . . . . . . . . . . . . . . . . . . . . . . . . .2 Product Registration . . . . . . . . . . . . . . . . . . . . . . . . . .2 Important Safety Instructions . . . . . . . . . . . . . . . . . . . . 3 Before Setting Surface Controls . . . . . . . . . . . . . . . . . . 8 Setting Surface Controls . . . . . . . . . . . . . . . . . . . . . . 11 Before Setting Oven Controls . . . . . . . . . . . . . . . . . . . 12 Setting Oven Controls . . . . . . . . . . .
IMPORTANT SAFETY INSTRUCTIONS CAUTIONS AND WARNINGS Read all instructions before using this appliance. This manual contains important safety symbols and instructions. Please pay attention to these symbols and follow all instructions given. Do not attempt to install or operate your appliance until you have read the safety precautions in this manual. Safety items throughout this manual are labeled with a WARNING or CAUTION statement based on the risk type. DEFINITIONS This is the safety alert symbol.
IMPORTANT SAFETY INSTRUCTIONS WARNING • • • CAUTION Do Not Leave Children Alone - Children should not be left alone or unattended in the area where appliance is in use. They should never be allowed to sit or stand on any part of the appliance, including the storage drawer, lower broiler drawer, warmer drawer, or lower double oven. • When heating fat or grease, watch it closely. Grease may catch fire if it becomes too hot. • Do not use water or flour on grease fires.
IMPORTANT SAFETY INSTRUCTIONS IMPORTANT Read and follow the below instructions and precautions for unpacking, installing, and servicing your appliance: • Remove all tape and packaging before using the appliance. Destroy the carton and plastic bags after unpacking the appliance. Never allow children to play with packaging material. Do not remove the wiring label and other literature attached to the range. Do not remove model/ serial number plate.
IMPORTANT SAFETY INSTRUCTIONS IMPORTANT INSTRUCTIONS FOR USING YOUR OVEN • • • • • • Use care when opening oven door, lower oven door, or warmer drawer (some models). Stand to the side of the appliance when opening the door of a hot range. Let hot air or steam escape before you remove or replace food in the oven. Keep oven vent ducts unobstructed. Touching surfaces in this area when the oven is on may cause severe burns. Do not place plastic or heatsensitive items on or near the oven vent.
IMPORTANT SAFETY INSTRUCTIONS GROUNDING INSTRUCTIONS IMPORTANT Do not attempt to operate any part of this appliance during a power failure. If the power fails, always turn off the unit. If the unit is not turned off and the power resumes, some parts of the appliance may begin to operate again. The clock must be set manually after the power resumes.
BEFORE SETTING SURFACE CONTROLS Using Proper Cookware Cookware Material Types The size and type of cookware used will influence the radiant element power level setting needed for best cooking results. Be sure to follow the recommendations for using proper cookware as illustrated in Figure 2 and Figure 3. Figure 2: Testing cookware Check for flatness by rotating a ruler across the bottom of the cookware (Figure 2).
BEFORE SETTING SURFACE CONTROLS About Surface Elements Hot Surface Indicator Light For efficient cooking, turn off the element several minutes before cooking is complete. This will allow residual heat to complete the cooking process. Your appliance is equipped with a radiant surface control indicator light, which is located on the control panel (Figure 4).
BEFORE SETTING SURFACE CONTROLS Home Canning CAUTION Canning can generate large amounts of steam. Use extreme caution to prevent burns. Always raise the lid to vent steam away from you. Safe canning requires that harmful micro-organisms are destroyed and the jars are sealed completely. When canning in a water bath canner, a gentle but steady boil must be maintained continuously for the required time. ‘ Be sure to read and observe all the following points when home canning with your appliance.
SETTING SURFACE CONTROLS Surface Cooking Elements and Settings To Operate the Surface Elements: The cooktop has four single radiant or coil surface elements, depending upon your appliance. CAUTION Radiant surface elements may appear to have cooled after they have been turned off. The indicator light will turn on and will continue to glow until the glass cooktop has cooled down to a moderate level.
BEFORE SETTING OVEN CONTROLS Oven Vent Location The oven vent is located under the control panel. When the oven is on, warm air passes through this vent. This venting is necessary for proper air circulation in the oven and good baking results. Do not block oven vent. Never close off the openings with aluminum foil or any other material. Steam or moisture may appear near the oven vent. This is normal. The Cooling Fan The cooling fan operates during cooking.
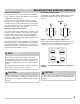
SETTING OVEN CONTROLS 5 4 10 1 2 6 3 7 9 8 Oven Control Features Operating the Oven Light 1. Up / Down arrows - Use to adjust and set the appliance’s timer functionality. Press the oven light switch located on the control panel to turn the interior oven light on and off. The light is located in the rear of the oven interior. To replace the interior oven light, see “Replacing the Oven Light” on page 28. 2. Timer on-off - Use to set or cancel the minute timer.
SETTING OVEN CONTROLS Timer Functions This appliance is equipped with three timer options: minute countdown timer, cook time (dur), and end time (END). Table 2: Timer Functions Function Application Minute Timer ( ) Use to track your cooking times without interfering with the cooking process. The timer may be set from a minimum time of 1 minute to a maximum of 23 hours and 59 minutes. Cook Time Duration (dur) Use to set the cooking time of the oven, from 1 minute to 10 hours.
SETTING OVEN CONTROLS Setting Bake 4. Turn the oven temp knob to the desired temperature position (Figure 14). Use the bake feature whenever the recipe calls for baking using normal temperatures. To set bake: CAUTION Always use pot holders or oven mitts when using the oven. When cooking the oven interior, oven racks, and cooktop will become very hot which can cause burns. Figure 14: Oven temp knob CAUTION Do not bake foods directly on the oven bottom.
SETTING OVEN CONTROLS Single Rack Baking Multi-Rack Baking Figure 16: Baking with a single rack If you choose to use a single rack while cooking, then radiant baking is preferred. IMPORTANT For this appliance, single rack radiant bake is the recommended bake function for best results for batter and dough-based baked goods such as cakes, pastries, and breads. • For best results when baking with one oven rack, place racks in positions 2 or 3 (Figure 15).
SETTING OVEN CONTROLS Setting Broil Broiler Insert Use to cook meats that require direct exposure to radiant heat for optimum browning results. Position the rack as suggested in Table 3. Searing Grill NOTE Broiler Pan Keep the oven door closed when broiling. The escaping heat could damage appliance knobs and controls. Broiler Pan & Insert Figure 18: Broil accessories To set broil 1. Arrange the oven rack while oven is still cool. Turn the oven mode knob to the broil position (Figure 13). 2.
SETTING OVEN CONTROLS Setting Convection Bake Convection functions use a fan to circulate the oven's heat uniformly and continuously around the oven (Figure 19). This improved heat distribution allows for fast, even baking and browning results. It also gives better baking results when using two oven racks at the same time. Heated air flows around the food from all sides, sealing in juices and flavors. Breads and pastry brown more evenly.
SETTING OVEN CONTROLS Multi-Rack Baking WARNING Incorrect operation of the appliance or defective components can cause dangerous overheating. To prevent this, this appliance has a safety thermostat which interrupts the power supply. The appliance must be manually activated after the temperature drop, restoring the timer. 5. To cancel the baking function, turn the oven mode and oven temp knobs to the OFF positions.
SETTING OVEN CONTROLS Setting Roast 3. Turn the oven mode knob to the roast position (Figure 25). Use the roast function to roast meats and poultry. Meats cooked using the roast function will be juicier and poultry will be crisp on the outside while staying tender and moist on the inside. Suggestions for roast: • The broiler pan will catch grease drippings, and the grid will help prevent splatters. The roasting rack will hold the meat.
SETTING OVEN CONTROLS Setting Convection Broil To set convection broil Use convection broil to cook thicker cuts of meat, fish, and poultry that require direct exposure to radiant heat and the convection fan for optimum browning results. Convection broil gently browns the exterior and seals in the juices. It uses the broil element and a fan to circulate the oven’s heat evenly and continuously within the oven. The convection fan will begin rotating once convection broil has been activated.
CARE AND CLEANING Cleaning Various Parts of Your Appliance Before cleaning any part of the appliance, be sure all controls are turned off and the cooktop and oven are cool. Remove spills and any heavy soiling as soon as possible. Regular cleaning will reduce the difficulty and time of major cleaning. Surface Type Recommendation Aluminum and Vinyl Use hot, soapy water and a cloth. Dry with a clean cloth.
CARE AND CLEANING Control panel Control keypad membrane Decorative trim (some models) Before cleaning the control panel, turn all controls off, activate oven lockout (on some models), and if needed remove any knobs from panel. Do not use abrasive cleaners on any of these materials; they can scratch. Clean using hot, soapy water and a cloth or sponge. Be sure to squeeze excess water from cloth or sponge before wiping control panel, especially when wiping around the controls area.
CARE AND CLEANING Coil Cooktop Surface Elements and Drip Bowls Cleaning Surface elements may be unplugged and removed to make cleaning the drip pans easier. The surface elements clean themselves when they are turned on. Food spilled on a hot element will burn off. Food spilled on a cool element may be cleaned with a damp cloth. Any remaining soil will burn off the next time the element is used.
CARE AND CLEANING Glass Cooktop Cleaning Consistent and proper cleaning is essential to maintaining your ceramic glass cooktop. Prior to using your cooktop for the first time, apply some glass-ceramic cooktop cleaner. Buff with a non-abrasive cloth or sponge. This will make cleaning easier when soiled from cooking. The special cooktop cleaning cream leaves a protective finish on the glass to help prevent scratches and abrasions.
CARE AND CLEANING Plastic or foods with a high sugar content need be removed immediately if spilled or melted onto the ceramic cooktop surface. Permanent damage (such as pitting of the cooktop surface) may occur if not removed immediately. After turning the surface elements off, use a razor blade scraper or a metal spatula with a mitt and scrape the soil from the hot surface (as illustrated). Allow the cooktop to cool, and use the same method for heavy or burned on soils.
CARE AND CLEANING Removing and Replacing the Oven Door The oven door has three glass panels. You can remove the oven door to clean it. To remove the oven door: CAUTION The door is heavy. For safe, temporary storage, lay the door flat with the inside of the door facing down. Do not use the appliance without the internal glass panel. Figure 32: Door hinge locations 1. Open the door fully, horizontal with the floor, and hold the two door hinges (Figure 32). 2 2.
CARE AND CLEANING To replace the oven door: IMPORTANT Special door care instructions - Most oven doors contain glass that can break. Do not close the oven door until all the oven racks are fully in place. Do not hit the glass with pots, pans, or any other object. Scratching, hitting, jarring, or stressing the glass may weaken its structure causing an increased risk of breakage at a later time. 1. Firmly grasp both sides of oven door along the door sides. Do not use the oven door handle (Figure 34).
BEFORE YOU CALL Oven Baking For best cooking results, heat the oven before baking cookies, breads, cakes, pies, pastries, et cetera. There is no need to preheat the oven for roasting meat or baking casseroles. The cooking times and temperatures needed to bake a product may vary slightly from your previously owned appliance. Baking Problems and Solutions Baking Problems Causes Cookies and biscuits burn • on the bottom.
BEFORE YOU CALL Solutions to Common Problems: Before you call for service, review the following list. It may save you time and expense. Possible solutions are provided with the problem listed: Problem Solution Poor baking results. Many factors effect baking results. Use proper oven rack position. Center food in the oven and space pans to allow air to circulate. Preheat oven to the set temperature before placing food in the oven. Try adjusting the recipe's recommended temperature or baking time.
BEFORE YOU CALL Metal marks on the cooktop. Sliding or scraping of metal utensils on cooktop surface. Do not slide metal utensils on cooktop surface. Apply a few drops of glass-ceramic cooktop cleaner directly on the area(s) with scratches or abrasions. Buff with a non-abrasive cloth or sponge. For more information, see “Glass Cooktop Cleaning” on page 25. Brown streaks or specks on cooktop surface. Boilovers are cooked onto surface. Use razor blade scraper to remove soil.
WARRANTY Your appliance is covered by a one year limited warranty. For one year from your original date of purchase, Electrolux will pay all costs for repairing or replacing any parts of this appliance that prove to be defective in materials or workmanship when such appliance is installed, used and maintained in accordance with the provided instructions. Exclusions This warranty does not cover the following: 1. 2. 3. 4. 5. 6. 7. 8. 9. 10. 11. 12. 13.
Tout sur l’utilisation et l’entretien de votre cuisinière électrique TABLE DES MATIÈRES www.frigidaire.com États-Unis 1 800 944-9044 Régler les commandes du four . . . . . . . . . . . . . . . Entretien et nettoyage . . . . . . . . . . . . . . . . . . . . . . Avant d'appeler . . . . . . . . . . . . . . . . . . . . . . . . . . . Garantie . . . . . . . . . . . . . . . . . . . . . . . . . . . . . . . . www.frigidaire.
NUMÉRO DE SÉRIE, DE MODÈLE ET ENREGISTREMENT DU PRODUIT Besoin d’aideg ? . . . . . . . . . . . . . . . . . . . . . . . . . . . . .2 Enregistrement du produit . . . . . . . . . . . . . . . . . . . . . .2 Consignes de sécurité importantes . . . . . . . . . . . . . . . 3 Avant de régler les commandes de surface . . . . . . . . 8 Réglage des commandes de surface . . . . . . . . . . . . 11 Avant de régler les commandes du four . . . . . . . . . . 12 Régler les commandes du four . . . . . . . . . . . . . . . . .
CONSIGNES DE SÉCURITÉ IMPORTANTES MISES EN GARDE ET AVERTISSEMENTS Lisez toutes les instructions avant d'utiliser cet appareil. Ce guide contient des instructions et des symboles importants concernant la sécurité. Veuillez porter une attention particulière à ces symboles et respecter toutes les directives. Ne tentez pas d'installer ou d'utiliser votre appareil avant d'avoir lu les mesures de sécurité contenues dans ce manuel.
CONSIGNES DE SÉCURITÉ IMPORTANTES ATTENTION AVERTISSEMENT • • • Ne laissez pas les enfants sans surveillance. Les enfants ne devraient jamais être laissés seuls ou sans surveillance à proximité de l'appareil lorsque celui-ci est en marche. Ne les laissez jamais s'asseoir ou se tenir debout sur une partie quelconque de l'appareil, notamment le tiroir de rangement, le tiroirgril inférieur, le tiroir chauffant ou le four double inférieur.
CONSIGNES DE SÉCURITÉ IMPORTANTES IMPORTANT • Sachez quels boutons ou commandes tactiles correspondent à chaque zone de cuisson. Placez un ustensile contenant des aliments sur la zone de cuisson avant de la mettre en marche. Éteignez la zone de cuisson avant de retirer l'ustensile. • Utilisez des ustensiles de taille appropriée. Cet appareil est équipé d’un ou de plusieurs éléments de différentes tailles.
CONSIGNES DE SÉCURITÉ IMPORTANTES INSTRUCTIONS IMPORTANTES POUR L'UTILISATION DE VOTRE FOUR • • • Soyez prudent lorsque vous ouvrez la porte du four, la porte du four inférieur ou le tiroir chauffant (sur certains modèles). Tenez-vous sur le côté de la cuisinière lorsque vous ouvrez la porte d'un four chaud. Laissez l’air chaud ou la vapeur s’échapper du four avant d'en retirer ou d'y placer des aliments.
CONSIGNES DE SÉCURITÉ IMPORTANTES IMPORTANT N'essayez pas de faire fonctionner une partie du four lors d'une panne de courant. En cas de panne, arrêtez toujours l'appareil. Si l'appareil n'est pas éteint et que le courant revient, il se peut que certaines parties se remettent en marche. L'horloge doit être réglée manuellement une fois le courant revenu.
AVANT DE RÉGLER LES COMMANDES DE SURFACE Utilisation d'ustensiles appropriés Le type de l'ustensile de cuisson utilisé et sa dimension influencent le réglage de l'élément radiant nécessaire à l'obtention de résultats de cuisson optimaux. Assurez-vous de suivre les recommandations relatives à l'utilisation des ustensiles appropriés, tels qu'illustrés sur Figure 2 et Figure 3. Figure 2: Vérification de l'ustensile Vérifiez que le fond des ustensiles est bien plat en y faisant tourner une règle (Figure 2).
AVANT DE RÉGLER LES COMMANDES DE SURFACE À propos des éléments de surface Surface chaude Voyant Pour une cuisson efficace, éteignez l’élément plusieurs minutes avant que la fin de la cuisson. Ceci permet à la chaleur résiduelle de terminer la cuisson. Votre four est muni d'un voyant de commande d'élément de surface radiant qui se trouve sur le panneau de commande (Figure 4).
AVANT DE RÉGLER LES COMMANDES DE SURFACE Mise en conserve ATTENTION La mise en conserve peut provoquer de grandes quantités de vapeur. Soyez très prudent pour éviter de vous brûler. Soulevez toujours le couvercle pour permettre à la vapeur de s'échapper à l'écart de vous. Pour une mise en conserve sécuritaire, les microorganismes nocifs doivent être détruits et les bocaux doivent être entièrement scellés.
RÉGLAGE DES COMMANDES DE SURFACE Éléments de cuisson de surface et réglages Pour faire fonctionner les éléments de surface : La table de cuisson dispose de quatre éléments de surface tubulaires ou radiants en fonction de votre appareil. ATTENTION Les éléments radiants de surface peuvent sembler refroidis une fois éteints. Le voyant de surface chaude s'allumera et restera allumé tant que la table de cuisson n'aura pas refroidi jusqu'à un niveau modéré.
AVANT DE RÉGLER LES COMMANDES DU FOUR Emplacement de l'évent du four L'évent du four est situé sous le tableau de commande. Lorsque le four fonctionne, l'air chaud s'échappe par cet évent. Cette ventilation est nécessaire pour assurer une bonne circulation d’air et de bons résultats de cuisson. Ne bloquez pas l'évent du four. Ne bouchez jamais les ouvertures à l'aide de papier d'aluminium ou de tout autre matériau. De la vapeur ou de l'humidité peuvent apparaître près de l'évent du four. C'est normal.
RÉGLER LES COMMANDES DU FOUR 5 4 10 1 2 6 3 7 9 8 Utilisation de l'éclairage du four Fonctions des commandes du four 1. Flèches vers le haut et vers le bas : servent à modifier les réglages et à régler la minuterie du four. 2. Timer on-off (minuterie marche-arrêt) : sert à mettre en marche ou à annuler la minuterie. La minuterie ne fait pas démarrer ni arrêter la fonction de cuisson. 3. Sélecteur oven temp (température du four) : sert à choisir la température de cuisson souhaitée. 4.
RÉGLAGE DES COMMANDES DU FOUR Fonctions de minuterie Ce four est doté de trois options de minuterie : compte à rebours en minutes, temps de cuisson (dur) et heure de fin (END). Tableau 2: Fonctions de minuterie Fonction Application Minuterie ( ) Sert à suivre vos temps de cuisson sans interférer sur le processus de cuisson. La minuterie peut être réglée pour une durée minimale de 1 minute et une durée maximale de 23 heures 59 minutes.
RÉGLAGE DES COMMANDES DU FOUR Réglage de la cuisson au four 4. Réglez le sélecteur oven temp (température du four) sur la température souhaitée (Figure 14). Utilisez la fonction de cuisson au four lorsque la recette nécessite une cuisson au four à une température normale. Pour régler la cuisson : ATTENTION Servez-vous toujours de maniques ou de gants isolants lorsque vous utilisez le four.
RÉGLAGE DES COMMANDES DU FOUR Cuisson sur une seule grille AV AN Cuisson sur plusieurs grilles T AV AN T Figure 16: Cuisson sur une seule grille Si vous choisissez d'utiliser la cuisson au four traditionnelle à une seule grille, la cuisson à radiant est recommandée.
RÉGLAGE DES COMMANDES DU FOUR Réglage du gril Grille de la lèchefrite Sert à cuire des viandes qui nécessitent une exposition directe à la chaleur radiante pour des résultats de brunissement optimaux. Placez la grille selon les suggestions dans le Tableau 3. Grille à rôtir NOTE Laissez la porte du four fermée lors d'une cuisson au gril. La chaleur qui s'échappe risque d'endommager les boutons et commandes du four.
RÉGLAGE DES COMMANDES DU FOUR Cuisson à convection Les fonctions à convection font circuler l'air à l'intérieur du four à l'aide d'un ventilateur, de façon uniforme et continue (Figure 19). La distribution de la chaleur étant ainsi améliorée, la nourriture cuit et brunit de uniformément. Vous obtenez également de meilleurs résultats de cuisson lorsque vous utilisez deux grilles en même temps. L’air chaud circule autour de la nourriture de tous les côtés, emprisonnant jus et saveurs.
RÉGLAGE DES COMMANDES DU FOUR Cuisson sur plusieurs grilles AVERTISSEMENT Si le four ne fonctionne pas correctement ou si des composants sont défectueux, il risque d'y avoir une surchauffe dangereuse. Pour empêcher cela, ce four dispose d'un thermostat de sécurité qui coupe l'alimentation. Le four doit être activé manuellement une fois que la température a diminué, ce qui remet la minuterie à zéro. 5.
RÉGLAGE DES COMMANDES DU FOUR Réglage du rôtissage Utilisez la fonction roast (rôtissage) pour rôtir les viandes et les volailles. Les viandes cuites avec le rôtissage seront plus juteuses et la volaille sera croustillante à l'extérieur tout en demeurant tendre à l'intérieur. Suggestions pour le rôtissage : • La lèchefrite recueille les écoulements de graisse et sa grille prévient les éclaboussures. La grille de rôtissage supporte la pièce de viande.
RÉGLAGE DES COMMANDES DU FOUR Réglage du gril à convection Pour sélectionner la cuisson au gril à convection : Utilisez la fonction de gril à convection pour cuire des pièces de viande, de poisson ou de volaille plus épaisses qui doivent être exposées à la chaleur radiante directe, ainsi que le ventilateur de convection pour obtenir un brunissement optimal. Le gril à convection permet de brunir délicatement l'extérieur des aliments tout en conservant les jus de cuisson à l'intérieur.
ENTRETIEN ET NETTOYAGE Nettoyage des différentes parties de votre appareil Avant de nettoyer une partie de l'appareil, assurez-vous que toutes les commandes sont éteintes et que la cuisinière et le four ont refroidi. Nettoyez dès que possible les débordements et la saleté épaisse. Un nettoyage régulier réduira la difficulté et repoussera les nettoyages importants. Type de surface Recommandation Aluminium et vinyle Utilisez de l'eau chaude savonneuse et un chiffon. Séchez avec un chiffon propre.
ENTRETIEN ET NETTOYAGE Panneau de commande Tableau de commande tactile Garnitures décoratives (certains modèles) Avant de nettoyer le tableau de commande, placez toutes les commandes à l'arrêt, activez le verrouillage du four (certains modèles) et enlevez les boutons du panneau au besoin. N'utilisez pas de produits abrasifs sur ces matières, au risque de les rayer. Nettoyez avec un chiffon ou une éponge et de l'eau savonneuse chaude.
ENTRETIEN ET NETTOYAGE Éléments de surface de la table de cuisson à éléments tubulaires Les éléments de surface peuvent être débranchés et enlevés afin de faciliter le nettoyage des cuvettes. Les éléments de surface se nettoient d’eux-mêmes lorsqu'ils sont en marche. La nourriture renversée sur un élément chaud brûlera complètement. Vous pouvez nettoyer de la nourriture renversée sur un élément froid à l'aide d'un chiffon humide. Le reste de la saleté sera éliminé à la prochaine utilisation de l'élément.
ENTRETIEN ET NETTOYAGE Nettoyage de la table de cuisson en vitrocéramique Un nettoyage régulier et approprié est essentiel au maintien du bon état de votre table de cuisson en vitrocéramique. Avant d'utiliser votre table de cuisson pour la première fois, appliquez la crème de nettoyage pour table de cuisson en vitrocéramique. Frottez avec une éponge ou un linge non abrasif. Ceci facilitera le nettoyage des résidus de cuisson.
ENTRETIEN ET NETTOYAGE Nettoyage général Le plastique ou les aliments à teneur élevée en sucre doivent être enlevés immédiatement s'ils sont renversés ou s'ils ont fondu sur la surface en céramique. Des dommages permanents (comme la piqûre de la surface) peuvent se produire si ces saletés ne sont pas enlevées immédiatement.
ENTRETIEN ET NETTOYAGE Retrait et remise en place de la porte du four La porte du four comprend trois panneaux de verre. Vous pouvez retirer la porte du four pour la nettoyer. Pour retirer la porte du four : ATTENTION La porte est lourde. Pour la ranger de façon temporaire, mais sûre, posez-la à plat, l’intérieur de la porte vers le bas. N'utilisez pas le four sans le panneau de verre interne. 1. 2. 3. 4. 5.
ENTRETIEN ET NETTOYAGE Pour remettre la porte du four : NOTE IMPORTANT Entretien de la porte : la plupart des portes possèdent une vitre qui peut casser. Ne fermez pas la porte du four tant que toutes les grilles ne sont pas bien en place. Ne heurtez pas la vitre avec des casseroles, des plats ou tout autre objet. Égratigner, cogner et frapper la vitre ou la soumettre à des tensions indues peut affaiblir sa structure et augmenter le risque de bris dans le futur. 1. 2. 3. 4. 5.
AVANT D'APPELER Cuisson au four Pour de meilleurs résultats de cuisson, faites chauffer le four avant de faire cuire des biscuits, des pains, des gâteaux, des tartes, des pâtisseries, etc. Il n'est pas nécessaire de préchauffer le four pour le rôtissage de viandes ou pour la cuisson de plats mijotés. Les temps de cuisson et les températures nécessaires pour faire cuire un plat peuvent différer légèrement de ceux de votre ancien appareil.
AVANT D'APPELER Solutions aux problèmes courants : Avant de faire une demande de service, consultez le tableau suivant. Cela pourrait vous faire économiser du temps et de l'argent. Les solutions possibles sont fournies à la suite de la description du problème : Problème Solution Mauvais résultats de cuisson. De nombreux facteurs peuvent influencer les résultats de cuisson. Utilisez la bonne position de grille.
AVANT D'APPELER Marque de métal sur la table de cuisson. Des ustensiles en métal ont glissé sur la surface de cuisson et l'ont éraflée. Ne faites pas glisser d'ustensiles en métal sur la table de cuisson. Appliquez quelques gouttes de nettoyant pour table de cuisson en vitrocéramique directement aux endroits où il y a des égratignures ou des éraflures. Frottez avec une éponge ou un linge non abrasif. Pour en savoir plus, lisez la section “Nettoyage de la table de cuisson en vitrocéramique” à la page 25.
GARANTIE Votre appareil est couvert par une garantie limitée d'un an. Pendant un an à partir de la date d'achat originale, Electrolux assumera les coûts des réparations ou du remplacement des pièces de cet appareil qui présente un défaut de fabrication ou un vice de matériau, si cet appareil est installé, utilisé et entretenu selon les instructions fournies avec celui-ci. Exclusions Cette garantie ne couvre pas ce qui suit : 1. 2. 3. 4. 5. 6. 7. 8. 9. 10. 11. 12. 13.