
Installation guide


mnsta ation
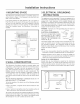
9 OVEN iNSTALLATiON cont.
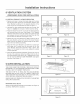
MOUNTING PLATE
1_ Separate 4 Toggle BoIts _, packed in the INSTALLATION
HARDWARE, from the Toggle Nuts.
2_ Match 5/8" holes (not in studs), drilled through WALL TEM-
PLATE into wail to corresponding holes on Mounting Plate.
3_ Insert Toggle Bolts into matched openings on Mounting
Plate. Put ToggIe Nuts on ToggIe Bolts. See Figure 17_
4_ Position the Mounting Plate with the Toggle Bolts attached at
the wall location and insert Toggle Nuts and Bolts through
the holes in the wall with the Toggle Nuts closed. Figure l&
Use Wood Screws (_ to attach the Mounting Plate to studs.
NOTE: Before insertion, be sure you Ieave a space more
than the thickness of the wall between the Mounting Plate
and the end of each of the Toggle Nuts (in the closed posF
tion). If you do not leave enough space, the Toggle Nut will
not be able to open on the other side of the wall ABso, once
a Toggle Nut opens, it cannot be withdrawn from the
ho{e; therefore make sure aH of the Toggles are in the
correct position before insertion°
5_ Align the Mounting Plate carefully and hold in position while
tightening Toggle Bolts_ PulI Toggle Bolt toward you and turn
clockwise to tighten. Figure 19.
z::>(_
¢=
Figure 17
morethan
wallthick-
heSS
Wall
olt
Figure 18 Figure 19
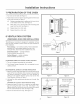
10 PREPARATION AND USE OF
THE CARTON TO ASSIST IN
THE INSTALLATION OF THE
MICROWAVE OVEN
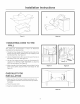
Utilization of the carton may make installation easier.
1. Place carton upside down. See Figure 20.
2. Using cutting line around the carton, cut into two pieces (A)
and (B). See Figure 21.
3. Position oven to assist in mounting to the wall.
See Figure 22.
TopSide CuttingLine
Figure 20