FRIGIDAIRE Important Safety Instructions. Features at a Glance... Before Setting Oven Controls. Setting Oven Controls. Cc ane www. frigidness USA 1-800-944-5044 www.frigidaire.
WELCOME & CONGRATULATIONS Product Registration Register Your Product The PRODUCT REGISTRATION CARD should be filled in completely, signed and returned to Electrolyte Home Products, Serial Plate Location Please record your model and serial numbers below for future reference. Model Nuremberg: Serial Number: Purchase Date: © 2010 Electrolyte Canada Corp.
IMPORTANT SAFETY INSTRUCTIONS Read all instructions before using this appliance. Save these instructions for future reference. DEFINITIONS 4b This is the safety alert symbol. It is used to alert you to potential personal injury hazards. Obey all safety messages that follow this symbol to avoid possible injury or death. A) WARNING This symbol will help alert you to situations that may cause serious bodily harm, death or property damage.
IMPORTANT SAFETY INST RUCTIONS 4k caution Do not store items of interest to children in the cabinets above the appliance. Children climbing on the cook top to reach items could be seriously injured, # Do not leave children alone. Children should not be left alone or unattended in the area where an appliance is in use. They should never be allowed to sit or stand on any part of the appliance. e DO NOT TOUCH INTERIOR OVEN ELEMENTS OR INTERIOR SURFACES OF THE OVEN UNTIL THEY HAVE COOLED.
IMPORTANT SAFETY INSTRUCTIONS IMPORTANT SAFETY INSTRUCTIONS FOR CLEANING YOUR OVEN # Clean the appliance regularly to keep all parts free of grease that could catch fire. Exhaust fan ventilation hoods and grease filters should be kept clean. Do not allow grease to accumulate. Greasy deposits in the fan could catch fire. Refer to the hood manufacturer's instructions for cleaning. # Cleaners Aerosols—Always follow the manufacturer's recommended directions for use.
BEFORE SETTING OVEN CONTROLS OVEN VENT LOCATION The oven is vented at the upper control panel and center trim. When the oven is on, warm air is released through the vent, This venting is necessary for proper air circulation in the oven and good baking results. caution Some models are equipped with a blower which runs in self-cleaning mode to keep all internal components at a cool temperature. The blower may keep running even if the oven has been turned off, until the components have cooled down.
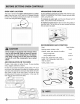
BEFORE SETTING OVEN CONTROLS CONTROL PAD FEATURES READ THE INSTRUCTIONS CAREFULLY BEFORE USING THE OVEN. For satisfactory use of your oven, become familiar with the various features and functions of the oven as described below. Detailed instructions for each feature and function follow later in this Use & Care Guide. A Q oven fu B timer cancel preheat pericardia nail Lv ') @ road locket ports viviparous o oS BAKE PAD—Use to select the bake cooking feature.
SETTING OVEN CONTROLS SETTING THE CLOCK The SET CLOCK pad is used to set the clock. The clock may be set for 12 or 24 hour time of day operation. The clock has been preset at the factory for the 12 hour operation. When the range is first plugged in, or when the power supply to the range has been interrupted, the timer in the display will flash “12:00” To set the clock (example below for 1:30) 1. Press SET CLOCK. 2.
SETTING SILENT CONTROL OPERATION The START TIME and ARROW pads control the Silent Control operation feature. The Silent Control operation feature allows the oven control to be operated without sounds or beeps whenever necessary. If desired the control can be programmed for silent operation and later returned to operating with all the normal sounds and beeps. To change control from normal sound operation to silent control operation 1.
SETTING OVEN CONTROLS SETTING BAKE The BAKE pad controls normal baking. The oven can be programmed to hake at any temperature from 170°F to 550°F, Baking Tips: » Preheat your oven before using the bake mode. « During preheat, the 2 elements and the convection fan are used in cycle to quickly heat the oven. » Use only one rack and center the pans as much as possible on rack using two racks, place the oven racks in positions 2 and 4.
SETTING QUICK BAKE This mode of cooking enables you to obtain the best culinary results when baking with multiple pans and racks. Multiple rack baking may slightly increase cook time for some foods but the overall result is time saved. Some food may cook faster and more evenly with Quick Bake. Quick baking uses the two elements and a fan to circulate the oven’s heat evenly and continuously within the oven.
SETTING OVEN CONTROLS SETTING BROIL This mode is best for meats, fish and poultry up to 1” thick.
SETTING BAKE TIME Bake Time allows the oven to be set to cook for a specific length of time and shut off automatically. The oven will shut off and will beep when the countdown is finished. To program the oven to begin baking immediately and to shut off automatically: 1. Be sure the clock is set for the correct time of day. 2. Arrange interior oven rack(s) and place the food in the oven. 3. Press the BAKE pad. “ — —" appears in the display. 4. Within 5 seconds, press the UP or DOWN ARROW pad.
SETTING OVEN CONTROLS Setting the Keep Warm Feature The Keep warm pad turns ON the Keep Warm feature and will maintain an oven temperature of 170° F The Keep Warm feature will keep oven baked foods warm for serving up to 3 hours after cooking has finished. After 3 hours the Keep Warm feature will shut the oven OFF automatically. The Keep Warm feature may be used without any other cooking operations or can be used after cooking has finished using Bake time or Delayed timed BAKE. To set Keep Warm: 1.
To Set the Sabbath Feature (for use on the Jewish Sabbath & Holidays) The Bake time and Start time pads are used to set the Sabbath feature. The Sabbath feature may only be used with the Bake pad.
SELF-CI WANING Self-Cleaning A self-cleaning oven cleans itself with high temperatures {well above normal cooking temperatures) which eliminate soils completely or reduces them to a fine powdered ash you can wipe away with a damp cloth, m9 IMPORTANT Adhere to the following cleaning precautions: « DO NOT use oven cleaners or oven protective coatings in or around any part of the oven interior + COROT clean the oven door gasket. The woven material of the oven door gasket is essential for a good seal.
Leif-Clean or Quick Clean Cycle For satisfactory results, use a 2 hour Quick Clean cycle for light soils and a 3 hour Self-Clean cycle for average or heavy soils, § NOTE The kitchen area should be well ventilated using an open window, ventilation fan or exhaust hood during the Leif-Clean cycle. This will help eliminate the normal odors associated with the Self-cleaning cycles.
CARE & CLEANING CLEANING VARIOUS PARTS OF YOUR RANGE Before cleaning any part of the range, be sure all controls are turned OFF and the range is COOL. REMOVE SPILLOVERS AND HEAVY SOILING AS SOON AS POSSIBLE, REGULAR CLEANING WILL REDUCE THE NUMBER OF MAJOR CLEANING LATER, SURFACE TYPE RECOMMENDATION : o Aluminum & Vinyl Use hot, soapy water and a cloth, Dry with a clean cloth.
REMOVING AND REPLACING THE OVEN DOOR £4) caution The door is heavy. For safe, temporary storage, lay the door flat with the inside of the door facing down, To Remove Oven Door: 1. Pull the door open. 2. While supporting the door with one hand, remove the 2 screws securing the top hinge to the door 3. Remove the top hinge, then [iff up the door to clear the lower hinge pin and remove the door. To Replace Oven Door: 1. Insert the door into the lower hinge. 2.
BEFORE YOU CALL Inhibitions to Common Problems OVEN BAKING For best cooking results, heat the oven before baking cookies, breads, cakes, pies or pastries, ete, There is no need to preheat the oven for roasting meat or baking casseroles. The cooking times and temperatures needed to bake a product may vary slightly from your previously owned appliance. BAKING PROBLEMS Cookies and biscuits burn on the bottom. Cakes too dark an top or-bottom. Cakes not done in the center. Foods not done when cooking time sup.
od IMPORTANT Solutions bn Common Problems BEFORE YOU CALL Before you call for service, review this list. It may save you time and expense. The list includes common occurrences that are not the result of defective workmanship or materials in this appliance.
MAJOR APPLIANCE WARRANTY | Your appliance is covered by a one year limited warranty. For one year from your original date of purchase, Electrolyte will pay all costs for repairing or replacing any parts of this appliance that prove to be defective in materials or workmanship when such appliance is installed, used and maintained in accordance with the provided instructions.