
Assembly Instruction


3
42
42
42
42
42
42
42
42
55
55
55
55
55
55
55
55
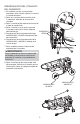
“55” orifi ce for
LP gas
blocking pin for
LP gas
“42” or “44”
orifi ce for
natural gas
leak limiter for
natural gas
shutter full open
press tube
onto collar
CONVERTING BURNER ASSEMBLY
Remove natural gas orifi ce (stamped “42” or 1.
“44”) and replace with LP orifi ce (stamped
“55”). Tighten securely.
Remove leak limiter from gas valve and re-2.
place with LP blocking pin. Tighten securely.
NOTE
Save natural gas orifi ce (stamped “42” or
“44”) and leak limiter in event dryer might
need to be converted back in the future.
Assemble air shutter to stainless steel burner 3.
tube furnished in installation kit so shutter is
in full open position (see image below). Ad-
ditional shutter adjustment may be needed
later. Shutter should be assembled so adjust-
ing screw head is accessible from below
after burner assembly is mounted in dryer.
Lay alignment collar on fl at surface and press 4.
stainless steel tube fi rmly onto collar as
shown in image below.
Slide alignment collar around (“55”) LP 5.
orifi ce and mount stainless steel burner tube
to mounting bracket with original screws
removed earlier.
REINSTALLING BURNER ASSEMBLY
Reinstall burner assembly into cabinet by 1.
reversing previous removal instructions.
IMPORTANT
Take care not to damage the ignitor coils as
you install the burner assembly. If broken, the
ignitor will not function.
Apply control conversion label to gas inlet 2.
pipe near control valve to notify future ser-
vice technicians of conversion.
Apply new rating plate as close to the origi-3.
nal rating plate as possible.
This control has
been converted for
use with LP gas.
Cette sécheuse a été
convertie pour
fonctionner au gaz LP.
137070500 0807