All about the Use & Care of your Dehumidifier TA B L E O F C O N T E N T S Im ortant Safety Insttruc Imp ructio tions tio n ........... ns .. ...................... 2 Care And Cleaning ............. .. ....... ......... ........................ 6 Location ................................... Loc .. ...... ......... ...... .. .......... . ..... 3 Storage ...................................... ..... ............... ........... 6 How It Wo W rks...................... ......... ................ .. ...... .
Important Safety Instructions NO OTE: This USE & CARE MANUAL provides specific operating instructions for your model. Use the dehumidifier only as instructed in this USE & CARE MANUAL. These instructions are not meant to cover every possible condition and situation that may occur. Common sense and caution must be practiced when installing, operating, and maintaining any appliance. WARNING WARNING For Your Safety Avoid fire hazard or electric shock. Do not use an extension cord or an adaptor plug.
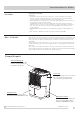
Location & How It Works Location Selecting a Location IMPORTANT: 1. Dehumidifier must be operated in an enclosed area to be most effective. Close all doors, windows, and other outside openings to the room. The effectiveness of the dehumidifier depends on the rate at which new moisture-laden air enters the room. 2. Place dehumidifier in a location that does not restrict airflow through the front of the unit or out of the louvers on the left side of cabinet. 3.
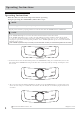
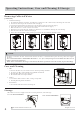
Operating Instructions Operating Instructions Allow the unit to reach room temperature before operating. To begin operating the dehumidifier, follow these steps: N NOTE: Unit must be upright for one hour prior to operating. 1. Plug the power cord into a properly grounded 115 volt AC outlet. Note the POWER indicators will illuminate. N NOTE: If the "BUCKET FULL" light is on, remove the bucket and re-install to reset the float switch.
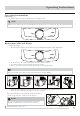
Operating Instructions Operating Instructions (continued) 1. To shut the unit down, rotate the humidity knob to the OFF position. N NOTE: While the power indicator lit, rotate the humidity knob to the OFF position or removing the plug will extinguish this light. Removing Collected Water 1. Emptying the Bucket: a. When the bucket is full the unit will shut down and the BUCKET FULL indicator light will illuminate. b. Do not move the unit at this time otherwise water may spill on the floor. c.
Operating Instructions, Care and Cleaning & Storage Removing Collected Water (continued) 2. Continuous Drainage: a. b. c. d. e. f. g. h. For continuous drainage operation, you will need a garden hose and a drain nearby to discharge the water into. Unscrew the drain cap on the back side of the unit. (fig.1) Insert the female threaded end of the hose onto the drain connector of the unit. (fig.2) Screw the garden hose onto the threaded portion of the drain connector. (fig.
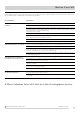
Before You Call Before calling for service, review this list. It may save you time and expense. This list includes common occurrences that are not the result of defective workmanship or materials in this appliance. OCCURRENCE SOLUTION DEHUMIDIFIER DOES NOT OPERATE. Wall plug disconnected. Push plug firmly into wall outlet. House fuse blown or circuit breaker tripped. Replace fuse with time delay type or reset circuit breaker. The dryness level you selected has been reached.
Major Appliance Limited Warranty Your appliance is covered by a limited one-year warranty and a limited 2-5 year warranty on the sealed system (the compressor, condenser, evaporator and tubing). For one year from your original date of purchase, Electrolux will pay all costs for repairing or replacing any parts of this appliance that prove to be defective in materials or workmanship when such appliance is installed, used and maintained in accordance with the provided instructions.