All about the Use & Care of your Washer TA B L E O F C O N T E N T S Important Safety Instructions ..............................2-4 Warranty ............................................................ 22 Operating Instructions ...................................... 5-16 Français..............................................................23 Care and Cleaning .......................................... 17-18 Español ..............................................................45 Avoid Service ...
IMPORTANT SAFETY INSTRUCTIONS WARNING Please read all instructions before using this washer. Recognize safety symbols, words and labels Product Record Record Your Model and Serial Numbers The model and serial numbers of your washer are found on the serial plate located at the back of the tub opening under the washer lid. Record and retain these numbers.
IMPORTANT SAFETY INSTRUCTIONS WARNING To reduce the risk of fire, electrical shock, or injury to persons when using this washer, comply with the basic warnings listed below. Failure to comply with these warnings could result in serious personal injuries.
IMPORTANT SAFETY INSTRUCTIONS PREVENT INJURY • To prevent shock hazard and assure stability during operation, the washer must be installed and electrically grounded by a qualified service person in accordance with local codes. Installation instructions are packed in the washer for installer’s reference. Refer to INSTALLATION INSTRUCTIONS for detailed grounding procedures. If the washer is moved to a new location, have it checked and reinstalled by a qualified service person.
OPERATING INSTRUCTIONS Washing Procedures • Place delicate and small items such as bras, hosiery and baby socks in a mesh bag. WARNING To reduce the risk of fire, electric shock or injury to persons, read these IMPORTANT SAFETY INSTRUCTIONS in this Use and Care Guide before operating your washer. 1 Sort laundry into loads that can be washed together. (Mesh bag not included.) WHITES Pretreat stains and heavy soil. • See Stain Removal Guide in this guide for safe, successful stain removal instructions.
OPERATING INSTRUCTIONS Washing Procedures, continued 6 For models without a built-in fabric softener dispenser: • Follow fabric softener label directions. • Add diluted fabric softener to the final rinse. You may use a fabric softener dispensing ball. Add laundry load to washer. • For best washing performance, dry load level should not be higher than the upper row of holes in the wash tub. Do not overload the washer.
OPERATING INSTRUCTIONS Washing Procedures, continued 10 Remove items when the cycle is completed. • For your safety, the lid is locked during the operation of the washer. It will unlock at the cycle end after the tub has come to a complete stop. • Place washed items in automatic dryer, line dry, or dry flat as directed by fabric care label. Excess wrinkling, color transfer or odors may develop in items left in the washer after the cycle has ended.
OPERATING INSTRUCTIONS push to start | push to pause | push & hold to cancel normal casual extra + fresh spin rinse fresh heavy duty warm hot off rinse presoak extra cold delicates cold water clean spin bedding options rinse & spin temp normal/heavy sensing add a garment wash final spin clean push to start | push to pause | push & hold to cancel normal casual cold comforter energy + fresh saver cool warm normal rinse fresh off rinse heavy presoak cold water hot on light
OPERATING INSTRUCTIONS Cycle Selection, continued normal Use this load for light to normally soiled cottons, towels, shirts, denims and mixed loads. For best combination of energy and water saving and washing performance, perform this cycle with energy saver option (if available) selected. comforter (on select models only) Add one large comforter or two light-duty sleeping bags to the comforter cycle.
OPERATING INSTRUCTIONS Cycle Settings For best results Follow the fabric care label instructions on items to be washed. Select appropriate wash water temperature, soil level (if equipped), water level (if equipped) and options most suitable for each load. Make selections according to fiber content, colorfastness and soil level. The settings can be changed before the cycle is started. If changes are attempted after the cycle starts, the lights will flash and a signal will beep, but the cycle will continue.
OPERATING INSTRUCTIONS Cycle Settings, continued Cycle Options Water Level (on select models, automatic on others) Turn the water level knob (on select models) to select a water level appropriate for the load size. For best results, DO NOT overload. Add items loosely to the tub. The dry load should not be higher than the top row of holes in the wash tub. There should be enough water in the tub for items to move freely.
OPERATING INSTRUCTIONS Washer Settings Chart push to start | push to pause | push & hold to cancel normal casual extra + fresh spin rinse fresh heavy duty warm hot off rinse presoak extra cold delicates cold water clean spin bedding options rinse & spin temp normal/heavy sensing add a garment wash final spin clean 9 9 9 9 9 9 9 9 9 presoak 9 9 9 bedding 9 9 9 norm/heavy heavy duty 9 9 9 9 rinse & spin normal 9 9 9 9 9 9 9 delicates casual These Temperatures and Options
OPERATING INSTRUCTIONS Washer Settings Chart push to start | push to pause | push & hold to cancel normal casual saver cool cold comforter energy + fresh warm normal rinse fresh off rinse heavy presoak cold water hot on light off heavy duty energy saver clean delicates rinse & spin temp options quick wash sensing add a garment soil level bedding wash final spin clean fabric softener estimated time remaining 9 9 9 9 9 9 9 9 9 9 9 9 9 9 9 9 9 9 9 9 9 9 9 9 9 9 9 9 9 9 9
OPERATING INSTRUCTIONS Washer Settings Chart push to start | push to pause | push & hold to cancel normal casual extra + fresh spin rinse cool cold warm cold water hot fresh comforter presoak heavy energy rinse & spin extra spin normal heavy duty off rinse delicates saver normal light max stain extra treat light min auto clean drain & spin options temp bedding whites soil level jeans water level quick wash fabric softener chime sensing add a garment wash final spin clea
OPERATING INSTRUCTIONS Safe Stain Removal Procedures To reduce the risk of fire or serious injury to persons or property, comply with the basic warnings listed below: • Read and comply with all instructions on stain removal products. • Keep stain removal products in their original labeled containers and out of children’s reach. • Thoroughly wash any utensils used.
OPERATING INSTRUCTIONS Stain Removal Suggestions STAIN TREATMENT Adhesive tape, chewing gum, rubber cement Apply ice. Scrape off excess. Place stain face down on paper towels. Saturate with prewash stain remover or nonflammable dry cleaning fluid. Baby formula, dairy products, egg Use product containing enzymes to pretreat or soak stains. Soak for 30 minutes or more. Wash. Beverages (coffee, tea, soda, juice, alcoholic beverages) Pretreat stain. Wash using cold water and bleach safe for fabric.
CARE AND CLEANING Common Washing Problems Many washing problems involve poor soil and stain removal, residues of lint and scum, and fabric damage. For satisfactory washing results, follow these suggestions provided by The Soap and Detergent Association. PROBLEM POSSIBLE CAUSES SOLUTIONS PREVENTIVE MEASURES Blue stains • Undiluted liquid detergent or fabric softener dispensed directly onto fabric. • If caused by detergent, mix 1 cup (240 ml) white vinegar with 1 quart (.
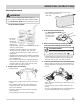
CARE AND CLEANING Cleaning Instructions Í NOTE Fabric softener may build up in the dispenser well. Residue should be removed once or twice a month. a b Orient correctly for reinsertion. INSIDE • Remove items from the washer as soon as the cycle ends. Excess wrinkling, color transfer, and odors may develop in items left in the washer. • Dry the washer top, the area around the lid opening, and the underside of the lid. These areas should always be dry before the lid is closed.
AVOID SERVICE CHECKLIST Winterizing Instructions IMPORTANT If the washer is stored in an area where freezing can occur or moved in freezing temperatures, follow these winterizing instructions to prevent damage to the washer: 1 Turn off water supply faucets. 2 Disconnect hoses from water supply and drain water from hoses. 3 Plug electrical cord into a properly grounded electrical outlet. 4 Add 4 gallons (15 L) nontoxic recreational vehicle (RV) antifreeze to empty wash tub. Close lid.
AVOID SERVICE CHECKLIST Before calling for service, review this list. It may save both time and expense. The list includes common occurrences that are not the result of defective workmanship or materials in this washer. OCCURRENCE POSSIBLE CAUSE SOLUTION Foreign objects such as coins or safety pins may be in tub or pump. Stop washer and check drum. If noise continues after washer is restarted, objects may be in pump. Call your authorized servicer. Belt buckles and metal fasteners are hitting wash tub.
AVOID SERVICE CHECKLIST OCCURRENCE POSSIBLE CAUSE SOLUTION Washer is overloaded. Do not overload washer. See Washing Procedures. Load is out of balance. Rearrange load to allow proper spinning. Drain hose is kinked. Straighten drain hose. Washer lid is open. Close washer lid. The washer will not operate when the lid is open. Water supply is not adequate in area. Check another faucet in the house. Wait until water supply and pressure increase. WATER Wash load too wet after spin.
MAJOR APPLIANCE WARRANTY INFORMATION For the applicable warranty period as set forth below, as measured from your original date of purchase, Electrolux will repair or replace any parts of this appliance that prove to be defective in materials or workmanship when such appliance is installed, used and maintained in accordance with the provided instructions.