All about the Use & Care of your Dryer TA B L E O F C O N T E N T S Important Safety Instructions ..............................2-4 Warranty ............................................................ 17 Operating Instructions ...................................... 5-13 Notes ................................................................. 18 Care and Cleaning ............................................... 14 Français..............................................................
IMPORTANT SAFETY INSTRUCTIONS WARNING WARNING Please read all instructions before using this dryer. Recognize safety symbols, words and labels Safety items throughout this manual are labeled with a WARNING or CAUTION based on the risk type as described below: Definitions This is the safety alert symbol. It is used to alert you to potential personal injury hazards. Obey all safety messages that follow this symbol to avoid possible injury or death.
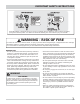
IMPORTANT SAFETY INSTRUCTIONS 240 v Electric Dryer 120 v Gas Dryer Grounding type wallll receptacle wa receptacl 10-30R 3-wire (fused 30 amp) 14-30R 4-wire UL-approved service cord must be installed on electric dryers (not provided with unit except those manufactured for sale in Canada). Do not, under anyy circumstances, an circumstances, cut, remo remove ve, or b bypass ypass the grounding gr ounding pr prong. ong.
IMPORTANT SAFETY INSTRUCTIONS PROTECT CHILDREN • Do not allow children to play on or in the dryer. Close supervision of children is necessary when the dryer is used near children. As children grow, teach them the proper, safe use of all appliances. • Destroy the carton, plastic bag and other packing materials after the dryer is unpacked. Children might use them for play. Cartons covered with rugs, bedspreads or plastic sheets can become airtight chambers. • Keep laundry products out of children’s reach.
OPERATING INSTRUCTIONS Normal Operating Sounds You may or may not hear the following sounds from your new dryer: A. SUSPENSION ROLLERS The dryer drum is supported by a set of suspension rollers. At times there may be a thumping or rolling sound when the dryer starts. This may happen if the dryer has not been in use for a period of time, or after a heavy load has remained in the dryer drum for an extended period, creating a temporary flat spot on the edge of the roller.
OPERATING INSTRUCTIONS Operating Your Dryer WARNING To reduce the risk of fire, electric shock or injury to persons, read the IMPORTANT SAFETY INSTRUCTIONS in this Use and Care Guide before operating your dryer. 1 Prepare load for drying. • Dry items of similar fabric, weight and construction in the same load. • Separate dark items from light-colored items. Separate items that shed lint from those that attract lint. • Check for stains which may not have been removed in washing.
OPERATING INSTRUCTIONS This manual covers many models and not all cycles, options, or features listed are available on every model. Consoles shown above for reference only. Your model may differ. Cycle Selection Turn the cycle selector in either direction to the cycle desired. For best results Follow the fabric care label instructions on items to be dried. Once a cycle is running, turning the selector knob to another selection will not change the cycle.
OPERATING INSTRUCTIONS Cycle Selection, continued Auto Dry Cycles Auto Dry cycles take the guesswork out of selecting the correct drying time for each load. Moisture sensing bars (if equipped) at the back of the dryer drum sense the moisture level of the load as it tumbles through the heated air. With Auto Dry cycles, the load will automatically be dried at the selected temperature to the desired dryness level. Auto Dry cycles save time and energy and protect fabrics.
OPERATING INSTRUCTIONS Cycle Settings For best results Follow the fabric care label instructions on items to be dried. Select appropriate drying temperature, dryness level and options most suitable for each load. Make selections based on load size, dampness and fabric type and durability. The settings can be changed before the cycle is started. If changes are attempted after the cycle starts, the lights will flash and a signal will beep, but the cycle will continue.
OPERATING INSTRUCTIONS Dryer Settings Chart heavy duty 9 9 9 9 9 9 9 9 9 9 9 9 9 timed dry (15-90) normal 9 9 9 delicates casual These Temperatures and Options are available with the following cycles: temp1 high normal low 9 9 air dry 9 9 9 9 options chime chime/wrinkle release wrinkle release 9 9 9 9 9 = Available selections. If an unavailable temperature setting is selected by the user, the nearest available temperature will be substituted.
OPERATING INSTRUCTIONS Dryer Settings Chart 9 9 9 9 9 9 9 9 9 9 9 9 9 9 9 9 9 9 9 9 9 9 9 9 9 9 9 9 9 9 9 9 timed dry (60-90) 9 9 9 quick dry 9 9 9 bedding 9 9 delicates 9 9 9 towels heavy duty 9 9 9 casual normal These Temperatures, Dryness levels and Options are available with the following cycles: temp1 max high normal low 9 9 9 9 9 9 9 9 9 9 9 9 9 9 9 air dry dryness level high normal low options chime shrink guard wrinkle release wrinkle release/shrink guard 9 = Availab
OPERATING INSTRUCTIONS Dryer Settings Chart 9 9 9 9 9 9 9 9 9 9 timed dry (90) 9 9 9 9 9 timed dry (60-75) 9 9 9 9 9 9 9 9 9 9 9 9 9 9 9 9 9 9 quick dry 9 9 9 9 9 9 9 9 9 9 9 refresh 9 9 9 jeans 9 9 9 9 9 9 9 9 bedding 9 9 delicates 9 9 9 towels heavy duty 9 9 9 casual normal These Temperatures, Dryness levels and Options are available with the following cycles: temp1 sanitize high normal low 9 9 9 9 9 9 9 9 9 9 9 9 9 9 9 9 9 9 9 9 9 9 9 9 9 9 9 9 9 9 9 9 9 air dry
OPERATING INSTRUCTIONS Other Features Drying Rack (on select models) Use the drying rack for items which should not be tumble dried. Insert the rack into the dryer drum, resting the back support on the moisture sensor bars and the front legs on the air grill. Place items to be dried on top of the rack, leaving space between items and not allowing them to hang over the sides or through the holes. The weight should not exceed 10 lbs (4.5 kg).
CARE AND CLEANING WARNING FIRE HAZARD A clothes dryer produces combustible lint. The dryer must be connected to an outdoors exhaust. Regularly inspect the outdoor exhaust opening and remove any accumulation of lint around the opening and in the surrounding area. WARNING To reduce risk of fire or serious injury to persons or property, comply with the basic warnings listed in the Important Safety Instructions and those listed below.
SOLUTIONS TO COMMON PROBLEMS Common Drying Problems Many drying problems involve poor cleaning results, poor soil and stain removal, residues of lint and scum, and fabric damage. For satisfactory drying results, follow these suggestions provided by The Soap and Detergent Association. PROBLEM POSSIBLE CAUSES SOLUTIONS PREVENTIVE MEASURES Greasy, oily stains • Fabric softener sheet. • Rub fabric softener stains with bar soap. Rinse and rewash. • Add a few bath towels to small loads for proper tumbling.
SOLUTIONS TO COMMON PROBLEMS Avoid Service Checklist Before calling for service, review this list. It may save both time and expense. The list includes common occurrences that are not the result of defective workmanship or materials in this dryer. OCCURRENCE POSSIBLE CAUSE SOLUTION Dryer does not start. Electrical power cord is not securely plugged in or plug may be loose. Make sure the plug fits tightly in wall outlet. House fuse blown or circuit breaker tripped.
MAJOR APPLIANCE WARRANTY INFORMATION For the applicable warranty period as set forth below, as measured from your original date of purchase, Electrolux will repair or replace any parts of this appliance that prove to be defective in materials or workmanship when such appliance is installed, used and maintained in accordance with the provided instructions.
NOTES 18