
Complete Owner's Guide


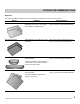
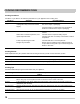
Table Of Contents
- Table of contents
- Questions?
- Product Record and Registration
- Important Safety Instructions
- Cooking Recommendations
- Using Proper Cookware
- Cookware Material Types
- Element On and Hot Surface Indicator Lights
- Before Setting Surface Controls
- Radiant surface elements
- 1. Place correctly sized cookware on the radiant surface element.
- 2. Push in and turn the surface control knob in either direction (Figure 5) to the desired setting (refer to the “Suggested radiant surface element settings” table, Table 1).
- 3. When cooking is complete, turn the radiant surface element OFF before removing the cookware.
- Suggested radiant surface element settings
- Home Canning
- Radiant surface elements
- Setting Surface Controls
- Before Setting Oven Controls
- Oven Control Features
- 1. Bake - Use to select for all baking.
- 2. Broil - Use to select the broil feature. When broil is active the indicator light above the broil key will glow.
- 3. Timer On-Off - Use to set or cancel the minute timer. The minute timer does not start or stop cooking.
- 4. Set Clock - Use with up or down arrows to set the time of day.
- 5. OFF - Use to stop or to clear any feature previously entered except time of day and minute timer. Press OFF to stop cooking.
- 6. Up and Down arrow keys - Use with the feature or function keys to set oven temperature or to adjust the clock or minute timer.
- LO
- HI
- 12 Hr.
- 12 Hr.
- 1:00 Hr./Min.
- 12:59 Hr./Min.
- Setting the Clock
- Temperature display (Fahrenheit/Celsius)
- Operating oven light
- Setting the minute timer
- 1. Press Timer on-off.
- 2. Press to increase time in one-minute increments. Press and hold to increase time in 10-minute increments. The timer can be set for any amount of time from 1 minute to 11 hours and 59 minutes.
- 3. When the diesired timer setting is reached, release the arrow key. The timer will start counting down within a few seconds.
- 4. When the set time expires, the timer will sound a 3 second tone. The display will show 00:00 until the timer is cancelled by pressing Timer On/Off.
- 1. Press Timer on-off once.
- Setting Bake
- 1. Press Bake. — — — appears in the display.
- 2. Within 5 seconds, press or. The display will show 350°F (177°C). The temperature can then be adjusted in 5°F (1°C) increments.
- 3. When a key is released, the bake indicator light turns on and the oven will heat to the selected temperature. When the oven reaches the set temperature, the control will beep once indicating the oven is finished preheating. During bake, the indica...
- 4. To cancel the baking function, press OFF.
- 1. Press Bake.
- 2. Press or to increase or decrease to a new temperature. The bake indicator light on the electronic display will turn on and off when using the bake feature. This is normal and indicates that the oven is cycling to maintain the selected baking tempe...
- 3. To cancel baking press OFF.
- Figure 8: Rack positions
- Figure 9: Baking layer cakes with one or two oven racks
- Setting Broil
- 1. Arrange the oven rack while oven is still cool.
- 2. Press Broil. — — will appear in display.
- 3. Press for HI broil or for LO broil. Most foods may be broiled at the HI broil setting.
- 4. For optimum results, preheat Broil for 5 minutes before adding food.
- 5. Place the insert on the broil pan (if equipped), then place the food on the broil pan insert (if using a broiler pan and insert).
- 6. Place the broiler pan and insert on the oven rack.
- 7. Broil on one side until food is browned. Turn and broil food on 2nd side.
- 8. When broiling is finished press OFF
- Figure 10: Broil pan and insert (L) Broil stop position (R)
- Figure 11: Open door broil position
- Table 2: Broil recommendations
- 5
- 5
- HI
- 6:00
- 7:00
- 4:00
- 5:00
- Rare
- Medium
- 4
- HI
- 8:00
- 6:00
- Well
- 3
- HI
- 20:00
- 10:00
- Well
- 4
- HI
- 8:00
- 6:00
- Well
- 3
- HI
- 13:00
- --
- Well
- 4
- HI
- 5:00
- --
- Well
- 5
- HI
- 8:00
- 7:00
- Well
- Adjusting the oven temperature
- 1. Press and hold the Bake key and release when the display shows the factory temperature setting of 00. If the oven temperature has been previously adjusted from the factory setting, the last adjusted value will appear in the display instead.
- 2. The temperature can now be adjusted up +35°F (+19°C), in 5°F increments with each press of the key.
- 3. When lowering the oven temperature using the key, minus sign (-) will appear before the number to indicate that the oven will be cooler by the displayed amount of degrees.
- 4. To accept the change, wait for the oven control to provide an acceptance beep.
- Adjusting the oven temperature
- Oven Control Features
- Oven Controls
- Figure 12: Use cleaners with caution
- Surface elements and drip bowls
- Surface elements and drip bowls
- Figure 13: Coil element
- 1. Lift the edge of the drip bowl across from the terminal end. Lift the surface element and drip bowl together just enough to clear the cooktop.
- 2. While holding the drip bowl and surface element, gently pull the terminal end out from terminal plug. Do not remove the hold-down clip (if equipped) from the drip bowl.
- Figure 14: Removing coil and drip bowl
- Figure 13: Coil element
- Cleaning drip bowls
- 1. Slide the terminal end on the element through the opening in the drip bowl.
- 2. Align the element support to rest on the rim inside the drip bowl. If your drip bowl is equipped with a hold-down clip, align the element support opposite the terminal end with the slot in the hold-down clip, and snap into place.
- 3. After the element is positioned in the drip bowl, line up the terminal end with the terminal plug as shown.
- 4. Hold the surface element and drip bowl together as level as possible and firmly push the terminal end into the terminal plug. Make sure element terminal is seated properly into terminal plug. Make sure the surface element is level to reduce the ha...
- Cleaning under bake element (some models)
- Cleaning under cooktop (some models) To raise the cooktop for cleaning (some models)
- Removing and Replacing the Oven Door:
- 1. Open oven door completely, horizontal with floor (See Figure 17).
- 2. Pull the door hinge locks on both left and right door hinges down from the oven frame completely towards the oven door (See Figure 18). A tool such as a small flat-blade screwdriver may be required.
- 3. Firmly grasp both sides of oven door along the door sides. Do not use the oven door handle (See Figure 19).
- 4. Close the door to approximately 10 degrees from the door frame (See Figure 19).
- 5. Lift the oven door hinge arms over the roller pins located on each side of the oven frame (See Figure 20).
- 1. Firmly grasp both sides of oven door along the door sides. Do not use the oven door handle (See Figure 19).
- 2. Holding the oven door at the same angle as the removal position, seat the hook of the hinge arm over the roller pins located on each side of the oven door frame (See Figure 19 and Figure 20). The hook of the hinge arms must be fully seated onto th...
- 3. Fully open the oven door, horizontal with floor (See Figure 17).
- 4. Push the door hinge locks up towards and into the oven frame on both left and right oven door hinges to the locked position (See Figure 18).
- 5. Close the oven door.
- Figure 17: Door hinge location
- Figure 18: Door hinge locks
- Figure 19: Holding door for removal
- Figure 20: Replacement and location of hinge arm and roller pin
- Replacing the Oven Light
- 1. Turn electrical power off at the main source or unplug the appliance.
- 2. Remove the interior oven light shield after removing the wire holder by carefully moving the wire to the side of the glass shield. The tension from the wire holds the glass shield in place.
- 3. Pull the shield straight out. Do not twist or turn.
- 4. Replace the bulb with a new appliance bulb.
- 5. Replace the glass oven light shield. Replace wire holder.
- 6. Turn the power back on again at the main source (or plug the appliance back in).
- 7. Be sure to reset the time of day on the clock.
- Figure 21: Oven light protected by glass shield
- Remove and replace storage drawer (some models)
- Care and Cleaning
- Before You Call
- Warranty
- Blank Page

6
IMPORTANT SAFETY INSTRUCTIONS
Save these instructions for future reference
IMPORTANT INSTRUCTIONS FOR USING
YOUR RADIANT COOKTOP
Know which knob or key controls each surface
heating area. Place cookware with food on the
cooking area before turning it on. Turn the
cooking area off before removing the cookware.
Cookware handles should be turned inward and
not extend over adjacent surface elements — To
reduce the risk of burns, ignition of flammable
materials, and spillage due to unintentional
contact with the utensil, the handle of the
cookware should be positioned so that it is turned
inward, and does not extend over other cooking
areas.
Use proper pan size - This appliance is equipped
with one or more surface units of different sizes.
Select cookware with flat bottoms that match the
surface unit size. Using the proper cookware on
the cooking area will improve efficiency.
Glazed cooking utensils— Only certain types of
glass, glass/ceramic, ceramic, earthenware, or
other glazed utensils are suitable for cooktop
service without breaking due to the sudden
change in temperature. Check the manufacturer’s
recommendations for cooktop use.
Improper cookware may break due to sudden
changes in temperature. Check the cookware
manufacturer’s recommendations for cooktop
use.
Never leave surface elements unattended. Boil-
overs may cause smoking and greasy spills that
may ignite. A pan that has boiled dry could be
damaged and may damage the cooktop.
Do not use a searing grill meant for use with a
broiler pan on the cooktop. The searing grill is not
designed for use on the cooktop. Doing so may
result in a fire.
When you are flaming foods under a ventilating
hood, turn on the fan.
IMPORTANT INSTRUCTIONS FOR USING
YOUR COIL COOKTOP
Make sure reflector pans or drip bowls are in
place - absence of these pans or bowls during
cooking may subject wiring or components under-
neath to damage.
Carefully check the reflector pans, drip bowls, and
coils for packaging material. Remove all
packaging material before using the cooktop.on
the cooking zone will improve efficiency.
Protective Liners - Do not use aluminum foil to
line surface drip bowls. Improper use of these
liners may result in a risk of electric shock or fire.
Do not immerse or soak removable heating
elements—Heating elements should never be
immersed in water. Heating elements clean them-
selves during normal operation.
Do not use decorative surface burner covers. If
an element is accidentally turned on, the decora-
tive cover will become hot and possibly melt.
Burns will occur if the hot covers are touched.
Damage may also be done to the cooktop.
Do not allow grease to accumulate around
surface burners and drip bowls.