
Use and Care Guide


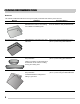


Table Of Contents
- Table of contents
- Questions?
- Product Record and Registration
- Important Safety Instructions
- Bakeware
- Cooking Conditions:
- Cooking Results
- Cooking Tips
- Cooking Recommendations
- Before Setting Surface Controls
- Single radiant surface elements
- 1. Place correctly sized cookware on surface element.
- 2. Push in and turn the surface control knob in either direction (Figure 6) to the desired setting (refer to the “Suggested radiant surface element settings” in Table 1).
- 3. When cooking is complete, turn the radiant surface element OFF before removing the cookware.
- Table 1: Suggested radiant surface element settings
- Figure 6: Single element knob
- 1. Place correctly sized cookware on the surface element.
- 2. Push in and turn the surface control knob clockwise to begin heating both the inner and outer elements. If only the inner element is needed for smaller cookware, push in and turn the knob counter-clockwise (see Figure 7).
- 3. When cooking is complete, turn the knob to OFF before removing the cookware.
- Figure 7: Dual element knob settings
- Warm Zone
- 1. Push in the knob and turn in either direction (see Figure 8). The temperatures are designated by hi and lo. However, the control can be set at any position between hi and lo for different levels of warming.
- 2. When ready to serve, turn the control to OFF. The hot surface indicator light will remain on until the warm zone cools. .
- Table 2: Recommended warm zone settings
- Home Canning
- Single radiant surface elements
- Setting Surface Controls
- Before Setting Oven Controls
- 1. Bake - Use to select for all baking.
- 2. Broil - Use to select the broil feature. When broil is active the indicator light above the broil key will glow.
- 3. Timer On-Off - Use to set or cancel the minute timer. The minute timer does not start or stop cooking.
- 4. Set Clock - Use with up or down arrows to set the time of day.
- 5. OFF - Use to stop or to clear any feature previously entered except time of day and minute timer. Press OFF to stop cooking.
- 6. Up and Down arrow keys - Use with the feature or function keys to set oven temperature or to adjust the clock or minute timer.
- LO
- HI
- 1:00 Hr./Min.
- 12:59 Hr./Min.
- Setting the Clock
- Temperature display (Fahrenheit/Celsius)
- Operating oven light
- Setting the minute timer
- 1. Press Timer on-off.
- 2. Press to increase time in one-minute increments. Press and hold to increase time in 10-minute increments. The timer can be set for any amount of time from 1 minute to 11 hours and 59 minutes.
- 3. When the diesired timer setting is reached, release the arrow key. The timer will start counting down within a few seconds.
- 4. When the set time expires, the timer will sound a 3 second tone. The display will show 00:00 until the timer is cancelled by pressing Timer On/Off.
- 1. Press Timer on-off once.
- Setting Bake
- 1. Press Bake. — — — appears in the display.
- 2. Within 5 seconds, press or. The display will show 350°F (177°C). The temperature can then be adjusted in 5°F (1°C) increments.
- 3. When a key is released, the bake indicator light turns on and the oven will heat to the selected temperature. When the oven reaches the set temperature, the control will beep once indicating the oven is finished preheating. During bake, the indica...
- 4. To cancel the baking function, press OFF.
- 1. Press Bake.
- 2. Press or to increase or decrease to a new temperature. The bake indicator light on the electronic display will turn on and off when using the bake feature. This is normal and indicates that the oven is cycling to maintain the selected baking tempe...
- 3. To cancel baking press OFF.
- Figure 11: Rack positions
- Figure 12: Baking layer cakes with one or two oven racks
- Setting Broil
- 1. Arrange the oven rack while oven is still cool.
- 2. Press Broil. — — will appear in display.
- 3. Press for HI broil or for LO broil. Most foods may be broiled at the HI broil setting.
- 4. For optimum results, preheat Broil for 5 minutes before adding food..
- 5. Place the insert on the broil pan (if equipped), then place the food on the broil pan insert (if using a broiler pan and insert).
- 6. Place the broiler pan and insert on the oven rack.
- 7. Broil on one side until food is browned. Turn and broil food on 2nd side.
- 8. When broiling is finished press OFF
- Figure 13: Broil pan and insert (L) Broil stop position (R)
- Figure 14: Open door broil position
- Table 3: Broil recommendations
- 5
- 5
- HI
- 6:00
- 7:00
- 4:00
- 5:00
- Rare
- Medium
- 4
- HI
- 8:00
- 6:00
- Well
- 3
- HI
- 20:00
- 10:00
- Well
- 4
- HI
- 8:00
- 6:00
- Well
- 3
- HI
- 13:00
- --
- Well
- 4
- HI
- 5:00
- --
- Well
- 5
- HI
- 8:00
- 7:00
- Well
- Adjusting the oven temperature
- 1. Press and hold the Bake key and release when the display shows the factory temperature setting of 00. If the oven temperature has been previously adjusted from the factory setting, the last adjusted value will appear in the display instead.
- 2. The temperature can now be adjusted up +35°F (+19°C), in 5°F increments with each press of the key.
- 3. When lowering the oven temperature using the key, minus sign (-) will appear before the number to indicate that the oven will be cooler by the displayed amount of degrees.
- 4. To accept the change, wait for the oven control to provide an acceptance beep.
- Adjusting the oven temperature
- Setting Oven Controls
- Figure 14: Use cleaners with caution
- Cooktop Maintenance
- Cooktop Cleaning
- Cleaning under bake element (some models)
- Removing and Replacing the Oven Door
- 1. Open oven door completely, horizontal with floor (See Figure 18).
- 2. Pull the door hinge locks on both left and right door hinges down from the oven frame completely towards the oven door (See Figure 19). A tool such as a small flat-blade screwdriver may be required.
- 3. Firmly grasp both sides of oven door along the door sides. Do not use the oven door handle (See Figure 20).
- 4. Close the door to approximately 10 degrees from the door frame (See Figure 20).
- 5. Lift the oven door hinge arms over the roller pins located on each side of the oven frame (See Figure 21).
- 1. Firmly grasp both sides of oven door along the door sides. Do not use the oven door handle (See Figure 20).
- 2. Holding the oven door at the same angle as the removal position, seat the hook of the hinge arm over the roller pins located on each side of the oven door frame (See Figure 20 and Figure 21). The hook of the hinge arms must be fully seated onto th...
- 3. Fully open the oven door, horizontal with floor (See Figure 18).
- 4. Push the door hinge locks up towards and into the oven frame on both left and right oven door hinges to the locked position (See Figure 19).
- 5. Close the oven door.
- Figure 18: Door hinge location
- Figure 19: Door hinge locks
- Figure 20: Holding door for removal
- Figure 21: Replacement and location of hinge arm and roller pin
- Replacing the Oven Light
- Remove and replace storage drawer (some models)
- Care and Cleaning
- Before You Call

2
2017 Electrolux Home Products, Inc. All rights reserved. Printed in the USA
Product Registration . . . . . . . . . . . . . . . . . . . . . . . . . .2
Product Record and Registration . . . . . . . . . . . . . . . . . 2
Need Help? . . . . . . . . . . . . . . . . . . . . . . . . . . . . . . . . .2
Important Safety Instructions . . . . . . . . . . . . . . . . . . . . 3
Cooking Recommendations . . . . . . . . . . . . . . . . . . . . . 8
Before Setting Surface Controls . . . . . . . . . . . . . . . . . 10
Setting Surface Controls . . . . . . . . . . . . . . . . . . . . . . 13
Before Setting Oven Controls . . . . . . . . . . . . . . . . . . 17
Setting Oven Controls . . . . . . . . . . . . . . . . . . . . . . . . . 18
Care and Cleaning . . . . . . . . . . . . . . . . . . . . . . . . . . . . 23
Oven Baking . . . . . . . . . . . . . . . . . . . . . . . . . . . . . . .29
Before You Call . . . . . . . . . . . . . . . . . . . . . . . . . . . . . . 29
Warranty . . . . . . . . . . . . . . . . . . . . . . . . . . . . . . . . . . . . 32
Questions?
For toll-free telephone support in the U.S. and Canada call
1-800-944-9044.
For online support and Internet production information visit
http://www.frigidaire.com.
Product Registration
Registering your product with Frigidaire enhances our
ability to serve you. You can register online at
http://www.frigidaire.com or by dropping your Product
Registration Card in the mail.
Record model & serial numbers here
Purchase Date
Frigidaire model number
Frigidaire serial number
Serial Plate Location
Serial plate location: open lower oven drawer (some
models) or storage drawer (some models).
PRODUCT RECORD AND REGISTRATION
Thank you for choosing Frigidaire.
Important: This Use and Care Guide is part of our commit-
ment to customer satisfaction and product quality
throughout the service life of your new appliance. We view
your purchase as the beginning of a relationship. To ensure
our ability to continue serving you, please use this page to
record important product information.
Need Help?
Visit the Frigidaire web site at www.frigidaire.com
Before you call for service, there are a few things you can
do to help us serve you better.
Read this Use & Care Manual
This manual contains instructions to help you use and
maintain your range properly.
If You Received a Damaged Range...
Immediately contact the dealer (or builder) that sold you the
range.
Save Time and Money
Check the section title “Before You Call”. This section helps
step you through some common problems that might occur.
If you do need service, help is only a phone call away. Call
Frigidaire Customer Services at 1-800-944-9044.