
Installation Guide
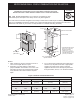


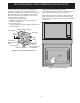


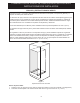
Table Of Contents

6
MICROWAVE/WALL OVEN COMBINATION INSTALLATION
Figure 6: Cabinet Installation
1.
2. Find the anti-tip screws and spacers included in the
3.
inward leaving
4.
the appliance inward.
5.
• Use 2 or more people to move and install wall oven.
damage to the unit.
or the control panel.
IMPORTANT!
Figure 7: Anti-tip screw locations
6. Install the Anti-tip Mounting Screws
The wall oven can tip when the door is
open. The anti-tip mounting screws supplied with the
used as a template to locate the appliance mounting
screw holes (see Figure 7).
Tip Over Hazard
• A child or adult can tip the oven
and be killed.
• Install the anti-tip device to oven
and/or structure per installation
instructions.
• Ensure the anti-tip device is re-engaged when the
oven is moved.
• Do not operate the oven without the anti-tip device
in place and engaged.
• Failure to follow these instructions can result in
death or serious burns to children and adults.
Refer to the installation
instructions supplied with your
appliance for proper installa-
tion.
Check for proper installation
with a visual check that the
anti-tip screws are present.
Test the installation with light
downward pressure on the
open oven door. The oven
should not tip forward.
Anti-tip mounting holes
clearance