OWN ER'SGUIDE READ AND SAVE THESE INSTRUCTIONS Record Model No. and Serial No. of this dehumidifier in space provided printed on the nameplate located behind the bucket. Model below. These numbers are No. Serial No. IM PORTANT: Keep a copy of your bill of sale. The date on the bill establishes the warranty period should service be required. If service is performed, it is in your best interest to obtain and keep all receipts.
DEHUMIDIFIER Your product is protected Your appliance is warranted ranty. Electrolux authorizes ranty must be performed WARRANTY by this warranty by Electrolux. Electrolux has authorized by Frigidaire Consumer Services or an authorized WARRANTY PERIOD FULL ONE-YEAR WARRANTY One year from purchase date. LIMITED 2ND-5TH YEAR WARRANTY Second through from original date.
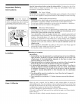
Important Read all instructions before using this dehumidifier. To reduce the risk of fire, electric shock, or injury to persons when using your dehumidifier, follow basic precautions, including the following: Safety Instructions For Your Safety Do not store or use gasoline or other flammable vapors and liquids in the vicinity of this or any other appliance. Read product labels for flammability and other warnings. Avoid fire hazard or electric shock.
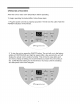
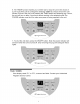
OPERATION & FEATURES Allow the unit to reach room temperature To begin operating the dehumidifier, 1. Plug the power cord into a properly POWER indicators will illuminate. before operating. follow these steps: grounded 110/120 volt AC outlet. Note the 2. To turn the unit on press the ON/OFF button. The unit will run in the factory setting of CONTINUOUS and high fan speed.After a few seconds the unit will display the actual room's relative humidity.
3. After a few days when the Relative Humidity has declined, press the HUMIDITY /_oorV buttons to choose a value between 35% to 80%, so the room is kept at a comfortable concentration.Pressing the _, or V buttons will change the humidity selection in 5% increments.If at any time you want to return to the CONTINUOUS Mode, pressing the HUMIDITY V button will lower the Relative Humidity through the 5% increments until the Continuous indicator is lit and the display reads CO. 4.
. The TIMER function enables you to either start or stop the unit in the choice of 2 or 4 hours.If the unit is running then selecting TIMER at 2 hours will turn the unit off after 2 hours.If the unit is off pressing the TIMER button and selecting say 4 hours, the unit will turn on after 4 hours and remain working in the selected mode.The POWER indicator must be lit to make sure power is being supplied to the unit. 7. To shut the unit down, press the ON/OFF button.
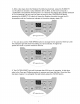
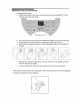
REMOVING COLLECTED WATER 1. Emptying the Bucket: a. When the bucket is full the unit will shut down and the BUCKET indicator light will illuminate. FULL b. Do not move the unit at this point otherwise water may spill on the floor. c. Press sides of bucket gently to unclip the bucket from the unit. d. Remove the bucket as shown in the photographs below and empty the bucket. k@ _@l _ 7 _0_/'_ , ..... --_XR ,i" / / e.
, Continuous Drainage: a. For constant drainage operation, you will need a garden hose and a drain nearby to discharge the water into. b. Remove the bucket from the unit and set aside. c. Lift up the side flap located on the left side of the unit as looking from the front. (fig. 1) d. Insert the female threaded end of the hose through the opening. e. Screw the garden hose onto the threaded portion of the tray underneath the bucket opening. (fig.3) f. Make sure the hose is secure so there are not leaks.
Avoid Service Checklist Before calling for service, review this list. It may save you time and expense. This list includes common occurrences that are not the result of defective workmanship or materials in this appliance. OCCURRENCE SOLUTION DEHUMIDIFIER DOES NOT OPERATE. Plug is disconnected House fuse blown breaker. from outlet. or circuit Push plug firmly breaker tripped. into wall outlet. Replace fuse with time delay type or reset circuit The dryness level you selected has been reached.
OWN ER'SGUIDE READ AND SAVE THESE INSTRUCTIONS Record Model No. and Serial No. of this dehumidifier in space provided printed on the nameplate located behind the bucket. Model below. These numbers are No. Serial No. IMPORTANT: Keep a copy of your bill of sale. The date on the bill establishes the warranty period should service be required. If service is performed, it is in your best interest to obtain and keep all receipts.
DEHUMIDIFIER Your product is protected Your appliance is warranted ranty. Electrolux authorizes ranty must be performed WARRANTY by this warranty by Electrolux. Electrolux has authorized by Frigidaire Consumer Services or an authorized WARRANTY PERIOD FULL ONE-YEAR WARRANTY One year from purchase date. LIMITED 2ND-5TH YEAR WARRANTY Second through from original date.
Important Read all instructions before using this dehumidifier. To reduce the risk of fire, electric shock, or injury to persons when using your dehumidifier, follow basic precautions, including the following: Safety Instructions For Your Safety Do not store or use gasoline or other flammable vapors and liquids in the vicinity of this or any other appliance. Read product labels for flammability and other warnings. Avoid fire hazard or electric shock.
OPERATION & FEATURES Allow the unit to reach room temperature To begin operating the dehumidifier, 1. Plug the power cord into a properly POWER indicators will illuminate. before operating. follow these steps: grounded 110/120 volt AC outlet. Note the 2. To turn the unit on press the ON/OFF button. The unit will run in the factory setting of CONTINUOUS and high fan speed.After a few seconds the unit will display the actual room's relative humidity.
3. After a few days when the Relative Humidity has declined, press the HUMIDITY /_oorV buttons to choose a value between 35% to 80%, so the room is kept at a comfortable concentration.Pressing the _, or V buttons will change the humidity selection in 5% increments.If at any time you want to return to the CONTINUOUS Mode, pressing the HUMIDITY V button will lower the Relative Humidity through the 5% increments until the Continuous indicator is lit and the display reads CO. 4.
6. The TIMER function enables you to either start or stop the unit in the choice of 2 or 4 hours.If the unit is running then selecting TIMER at 2 hours will turn the unit off after 2 hours.If the unit is off pressing the TIMER button and selecting say 4 hours, the unit will turn on after 4 hours and remain working in the selected mode.The POWER indicator must be lit to make sure power is being supplied to the unit. 7. To shut the unit down, press the ON/OFF button.
REMOVING COLLECTED WATER 1. Emptying the Bucket: a. When the bucket is full the unit will shut down and the BUCKET indicator light will illuminate. FULL b. Do not move the unit at this point otherwise water may spill on the floor. c. Press sides of bucket gently to unclip the bucket from the unit. d. Remove the bucket as shown in the photographs below and empty the bucket. k@ _@l _ 7 _0_/'_ , ..... --_XR ,i" / / e.
, Continuous Drainage: a. For constant drainage operation, you will need a garden hose and a drain nearby to discharge the water into. b. Remove the bucket from the unit and set aside. c. Lift up the side flap located on the left side of the unit as looking from the front. (fig. 1) d. Insert the female threaded end of the hose through the opening. e. Screw the garden hose onto the threaded portion of the tray underneath the bucket opening. (fig.3) f. Make sure the hose is secure so there are not leaks.
Avoid Service Checklist Before calling for service, review this list. It may save you time and expense. This list includes common occurrences that are not the result of defective workmanship or materials in this appliance. OCCURRENCE SOLUTION DEHUMIDIFIER DOES NOT OPERATE. Plug is disconnected House fuse blown breaker. from outlet. or circuit Push plug firmly breaker tripped. into wall outlet. Replace fuse with time delay type or reset circuit The dryness level you selected has been reached.