
Use and Care Manual


99
GROUNDING INSTRUCTIONS (CONTINUED)
1. Turn o or disconnect all power to the wall junction box
serving the disposer.
2. Open the junction box in the wall and remove the wire
nuts or electrical tape or whatever is tying the old
disposer wire to the electrical wire inside of the junction
box.
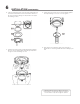
3. Open the end bell plate at the bottom or the disposer.
If you are using fl exible armored (BX) cable:
1. Install cable fi tting in the disposer end bell hole.
2. Secure the cable to the fi tting and install an insulating
bushing or equivalent.
3. Connect white wire from the junction box to the white
(or blue) wire of the disposer.
4. Connect black wire from the junction box to the black (or
brown) wire of the disposer.
5. Connect bare ground wire from the junction box to green
ground screw within the disposer end bell.
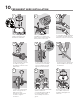
If you are using nonmetallic-sheathed (ROMEX)
cable:
1. Install cable fi tting in the end bell hole and secure the
cable to the fi tting.
2. Connect white wire from the junction box to the white
(or blue) wire of the disposer.
3. Connect black wire from the junction box to the black (or
brown) wire of the disposer.
4. Connect bare ground wire from the junction box to green
ground screw within the disposer end bell.
If your power supply cable does not include a grounding wire,
one must be provided. Attach a copper wire securely to the
disposer ground screw and attach other end of ground wire
to a metal cold water pipe. Do not attach ground wire to a gas
supply pipe. Use only UL Listed grounding clamp. If plastic
pipe is used in your home, a qualifi ed electrician should install a
proper ground.
Having Problems? Don't go back to the store.
Call us toll-free at 1-833-240-6224 for assistance.
M-F 8:00am-5:00pm PST English & Spanish