All about the Use & Care of your Dehumidifier TABLE OF CONTENTS Important Safety Instructions ................................ 2 Care And Cleaning ............................................... 10 Location ............................................................... 3 Storage .............................................................. 10 How It Works ....................................................... 3 Normal Sounds ...................................................
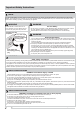
Important Safety Instructions NOTE: This USE & CARE MANUAL provides specific operating instructions for your model. Use the dehumidifier only as instructed in this USE & CARE MANUAL. These instructions are not meant to cover every possible condition and situation that may occur. Common sense and caution must be practiced when installing, operating, and maintaining any appliance. WARNING WARNING For Your Safety Avoid fire hazard or electric shock. Do not use an extension cord or an adaptor plug.
Location & How It Works Selecting a Location Location IMPORTANT: 1. Dehumidifier must be operated in an enclosed area to be most effective. Close all doors, windows, and other outside openings to the room. The effectiveness of the dehumidifier depends on the rate at which new moisture-laden air enters the room. 2. Place dehumidifier in a location that does not restrict the airflow of the air intake and air outlet. 3.
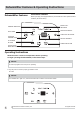
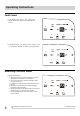
Dehumidifier Features & Operating Instructions Dehumidifier Features ELECTRONIC CONTROL Before you begin, thoroughly familiarize yourself with the control panel and all its functions (as shown below). DEFROST INDICATOR SETS TIMER BUCKET FULL INDICATOR DISPLAYS HUMIDITY TURNS UNIT ON OR OFF CONTINUE DRAIN BUTTON AUTO MODE BUTTON ADJUSTS HUMIDITY TURBO FAN BUTTON CHECK FILTER RESET BUTTON Operating Instructions Allow the unit to reach room temperature before operating.
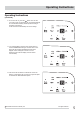
Operating Instructions Operating Instructions (continued) 2. To turn the unit on, press the button. The unit will run in Auto mode. In this mode, the unit will automatically set a comfortable humidity and fan speed according to the indoor environment. In this mode the set dehumidity can not be change. 3. It is recommended to press the Cont. Drain button to use the CONTINUOUS setting for the first three or four days until the sweating and dampness odors have stopped.
Operating Instructions Operating Instructions (continued) 5. After a few days when the Relative Humidity has declined, press the Cont. Drain button to deactivate the Cont. Drain feature then press the HUMIDITY or buttons to choose a value between 35% to 85%, so the room is kept at a comfortable humidity. Pressing the or buttons will change the humidity selection in 5% increments. After you have set the desired humidity, the readout will display the actual room humidity. 6.
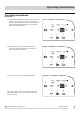
Operating Instructions Operating Instructions (continued) 7. The CLEAN FILTER light will illuminate after 250 hours of operation. At this time refer to the care and cleaning section to remove and clean the filter. Once the filter has been cleaned and replaced, simply press the FILTER button to extinguish the light. 8. When frost builds up on the evaporator coils, the compressor will cycle off and the fan will continue to run until the frost disappears. 9. To shut the unit down, press the ON/OFF button.
Operating Instructions Fault Codes 1. If the display reads "AS" or "ES" , a sensor has failed. Contact your Authorized Frigidaire Service Center. 3. If the display reads "P2", Bucket is full or removed or not in right position. Replace the bucket in the right position. Removing Collected Water 1. Emptying the Bucket: a. When the bucket is full, the unit will shut down and the BUCKET FULL indicator will illuminate. b. Do not move the unit at this time otherwise water may spill on the floor. c.
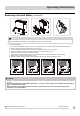
Operating Instructions Removing Collected Water (continued) WARNING Discard water from bucket. Water is not potable and cannot be used for drinking. 2. Continuous Drainage: a. b. c. d. e. f. g. h. For continuous drainage operation, you will need a garden hose and a drain nearby to discharge the water into. Unscrew the drain cap on the back side of the unit. (fig.1) Insert the female threaded end of the hose onto the drain connector of the unit. (fig.
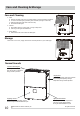
Care and Cleaning & Storage Care and Cleaning 1. Filter a. Remove the back grille every two weeks based on normal operating conditions. b. To remove the back grille, pull back grille outwards (see figure on the left). c. Wash the back grille with clean water then dry. d. Re-install the back grille. 2. Cabinet a. Dust cabinet with an oil-free cloth, or using a damp cloth. b. Vacuum grill using brush attachment. 3. Water Bucket a. Clean bucket with warm water and detergent.
Before You Call Before calling for service, review this list. It may save you time and expense. This list includes common occurrences that are not the result of defective workmanship or materials in this appliance. OCCURRENCE SOLUTION DEHUMIDIFIER DOES NOT OPERATE. Wall plug disconnected. Push plug firmly into wall outlet. House fuse blown or circuit breaker tripped. Replace fuse with time delay type or reset circuit breaker. The dryness level you selected has been reached.
Major Appliance Limited Warranty Your appliance is covered by a limited one-year warranty for functional repairs only. For one year from your original date of purchase, Electrolux will pay all costs for repairing or replacing any parts of this appliance that prove to be defective in materials or workmanship when such appliance is installed, used and maintained in accordance with the provided instructions.