use & care Dehumidifier Introduction .....................................................2 Care And Cleaning ...................................... 17 Important Safety Instructions ...................3 Storage ............................................................ 18 Location............................................................ 11 Normal Sounds ............................................. 19 How It Works.................................................. 11 Before You Call............
INTRODUCTION Welcome to our family Thank you for bringing Frigidaire® into your home! We see your purchase as the beginning of a long relationship together. This manual is your resource for the use and care of your product. Please read it before using your appliance. Keep it handy for quick reference. If something doesn’t seem right, the troubleshooting section will help you with common issues. FAQs, helpful tips and videos, cleaning products, and kitchen and home accessories are available at www.
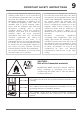
IMPORTANT SAFETY INSTRUCTIONS WARNING For Your Safety • Do not store or use gasoline or other flammable vapors and liquids in the vicinity of this or any other appliance. Read product labels for flammability and other warnings. • Discard water from bucket. Water is not potable and cannot be used for drinking. WARNING Electrical Information • For your safety and protection, this dehumidifier is equipped with a three-prong grounding plug on the power cord.
IMPORTANT SAFETY INSTRUCTIONS SAFETY PRECAUTIONS CAUTION! Avoid Injury or damage to the unit or other property • Do not direct airflow at fireplaces or other heat related sources as this could cause flare ups. • Do not climb on or place objects on the unit. Do not hang objects off the unit. • Do not place containers with liquids on the unit. • Turn off the dehumidifier at the power source when it will not be used for an extended period of time. • Operate the unit with air filter in place.
IMPORTANT SAFETY INSTRUCTIONS • No any open fire or device like switch which may generate spark/arcing shall be around air conditioner to avoid causing ignition of the flammable refrigerant used. Please follow the instruction carefully to store or maintain the air conditioner to prevent mechanical damage from occurring. • Do not use means to accelerate the defrosting process or to clean, other than those recommended by the manufacturer.
IMPORTANT SAFETY INSTRUCTIONS equipment is to be surveyed to make sure that there are no flammable hazards or ignition risks. No Smoking signs shall be displayed. g)Ventilated area Ensure that the area is in the open or that it is adequately ventilated before breaking into the system or conducting any hot work. A degree of ventilation shall continue during the period that the work is carried out.
IMPORTANT SAFETY INSTRUCTIONS ensuring that this will not exceed the permissible voltage and current permitted for the equipment in use. Intrinsically safe components are the only types that can be worked on while live in the presence of a flammable atmosphere. The test apparatus shall be at the correct rating. Replace components only with parts specified by the manufacturer. Other parts may result in the ignition of refrigerant in the atmosphere from a leak. 9.
IMPORTANT SAFETY INSTRUCTIONS 12. Charging procedures In addition to conventional charging procedures, the following requirements shall be followed. Ensure that contamination of different refrigerants does not occur when using charging equipment. Hoses or lines shall be as short as possible to minimise the amount of refrigerant contained in them. Cylinders shall be kept in an appropriate position according to the instructions.
IMPORTANT SAFETY INSTRUCTIONS The recovery equipment shall be in good working order with a set of instructions concerning the equipment that is at hand and shall be suitable for the recovery of flammable refrigerants. In addition, a set of calibrated weighing scales shall be available and in good working order. Hoses shall be complete with leak-free disconnect couplings and in good condition.
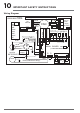
IMPORTANT SAFETY INSTRUCTIONS Wiring Diagram Notes: Display and Fan's conntors must be match the actual indicates. 16020100001654 Notes: CN2 DC POWER BOARD ION BLUE COMP. OverLoad Protector RED BLACK ~ Y/G WHITE(OR BLUE OR BLACK)(N) POWER CN5 DISPLAY BOARD CN11 TOUCH/LIGHT PANEL CN12 WIFI Y/G(or GREEN) BLACK(OR BROWN OR RED)(L) WATER PIPE HUMI. SWITCHTEMP.
LOCATION & HOW IT WORKS 11 Location How It Works Selecting a Location When the unit is started, the fan begins to pull moisture-laden air across the dehumidifying coils. The coils condense or draw moisture from the air, and air flows through the air outlet louvers into the room as dry, warm air. Moisture removed from air is collected in a bucket on the front of the dehumidifier. The unit is designed to operate between 41°F (5°C), and 89°F (32°C) and between 30%(RH) and 80%(RH).
DEHUMIDIFIER FEATURES & OPERATING INSTRUCTIONS Dehumidifier Features ELECTRONIC CONTROL Before you begin, thoroughly familiarize yourself with the control panel and all its functions (as shown below). B A G C F E D A Check Filter Reset Button E Sets Fan Speed B Bucket Full Indicator F Adjusts Humidity C Displays Humidity G Sets Timer D Turns Unit On Or Off H Pump Feature H Operating Instructions Allow the unit to reach room temperature before operating.
OPERATING INSTRUCTIONS 3. After a few days when the Relative Humidity has declined, press the HUMIDITY ( ) or ( ) buttons to choose a value between 35% to 85%, so the room is kept at a comfortable humidity. Pressing the ( ) or ( ) buttons will change the humidity selection in 5% increments. 5 seconds after you have set the desired humidity, the readout will display the actual room humidity.
OPERATING INSTRUCTIONS NOTE: • Pump drain hose must be well connected for this mode. • If the Pump indicator and Bucket Full indicator flash simultaneously, after pressing the Pump button, check if the pump drain hose in the bucket is installed properly. 8. To shut the unit down, press the ON/OFF button. Note: After a power outage, the unit will memorize the last setting and return the unit to the same setting once power is restored. 3.
OPERATING INSTRUCTIONS 15 Removing Collected Water 1. Emptying the Bucket: a. When the bucket is full, the unit will shut down and the BUCKET FULL indicator will illuminate. b. Do not move the unit at this time otherwise water may spill on the floor. c. Press sides of bucket gently to unclip the bucket from the unit. d. Remove the bucket as shown in the photographs below and empty the bucket. WARNING Discard water from bucket. Water is not potable and cannot be used for drinking. e.
OPERATING INSTRUCTIONS 2. Continuous Drainage: a. For continuous drainage operation, you will need a garden hose and a drain nearby to discharge the water into. b. Unscrew the drain cap on the back side of the unit. (fig.1) fig. 3 fig. 1 c. Insert the female threaded end of the hose onto the drain connector of the unit. (fig.2) e. Make sure the hose is secure so there are no leaks. f. Direct the hose toward the drain, making sure that there are no kinks that will stop the water flowing. g.
CARE AND CLEANING NOTE 1. Check the seal between the hose and the drain connector. If there is a small leak then replace the hose gasket and re-tighten the hose. 2. It is recommended that a Dehumidifier Drain Hose - 1/2" (12.7 mm) or larger be used. Make sure there are no kinks or elevations in the hose. 3. When a hose is not attached to the drain connector, please ensure drain cap is screwed securely to the connector to prevent leakages. 3. Pump function: To connect pump drain hose: a.
STORAGE Filter Tabs fig.21 c. Wash the filter with clean water then dry. d. Re-install the filter. 2. Cabinet a. Dust cabinet with an oil-free cloth, or using a damp cloth. b. Vacuum grill using brush attachment. 3. Water Bucket Clean the Water Bucket every two weeks based on normal operating conditions. a. Clean bucket with warm water and detergent. b. Clean the pump filter at the same time in cleaning the bucket. 4.
NORMAL SOUNDS Normal Sounds 2 3 1 4 1 Dripping Sound The sound of dripping water may be heard during the dehumidification cycle. 2 Sound of Rushing Air At the top of the unit, you may hear the sound of rushing air being moved by the fan. 3 Gurgle/Hiss “Gurgling or hissing” noise may be heard due to refrigerant passing through evaporator during normal operation. 4 High pitched Chatter Today’s high efficiency compressors may have a high pitched chatter during the dehumidification cycle.
BEFORE YOU CALL Before calling for service, review this list. It may save you time and expense. This list includes common occurrences that are not the result of defective workmanship or materials in this appliance. OCCURRENCE SOLUTION • Wall plug disconnected. Push plug firmly into wall outlet. • House fuse blown or circuit breaker tripped. Replace fuse with time delay type or reset circuit breaker. Dehumidifier does not operate. • The dryness level you selected has been reached.
MAJOR APPLIANCE LIMITED WARRANTY 21 Your appliance is covered by a limited one-year warranty for functional repairs only. For one year from your original date of purchase, Electrolux will pay all costs for repairing or replacing any parts of this appliance that prove to be defective in materials or workmanship when such appliance is installed, used and maintained in accordance with the provided instructions.
welcome home Our home is your home. Visit us if you need help with any of these things: owner support accessories service registration (See your registration card for more information.) Frigidaire.com 1-800-944-9044 Frigidaire.
Deshumidificador uso & cuidado Introducción.....................................................2 Cuidados Y Limpieza.................................. 17 Importantes Instrucciones De Seguridad ...3 Almacenado ................................................... 18 Ubicación ......................................................... 11 Sonidos Normales........................................ 19 Funcionamiento............................................. 11 Antes De Llamar..............................
2 INTRODUCCIÓN Bienvenido a nuestra familia ¡Gracias por llevar Frigidaire® a su hogar! Vemos su compra como el principio de una gran relación juntos. Este manual es su recurso para usar y cuidar del producto. Léalo antes de usar el aparato. Guárdelo a mano para consultarlo rápidamente. Si alguna vez no parece correcto, la sección de resolución de problemas le ayudará con los problemas comunes.
IMPORTANTES INSTRUCCIONES DE SEGURIDAD PRECAUCIÓN Por su seguridad • No almacene gasolina ni otros líquidos o vapores inflamables alrededor de este u otro aparato eléctrico. Lea las etiquetas del producto sobre inflamabilidad y otras advertencias. • Deseche el agua del cubo. Este agua no es potable y no puede usarse para beber. PRECAUCIÓN Información eléctrica • Para su seguridad y protección, este deshumidificador está equipado con un enchufe a tierra de tres clavijas, colocado en el cable de potencia.
4 IMPORTANTES INSTRUCCIONES DE SEGURIDAD PRECAUCIONES DE SEGURIDAD ADVERTENCIA ! Evite lesiones o daño a la unidad u otros objetos de su propiedad • No dirija el flujo de aire hacia la estufa hogar ya que esto podría causar llamaradas. • No se suba ni coloque objetos sobre la unidad. No cuelgue objetos de la unidad. • No coloque recipientes con líquidos sobre la unidad. • Apague el dehumidificador en la fuente de potencia cuando no será usado por un período de tiempo prolongado.
IMPORTANTES INSTRUCCIONES DE SEGURIDAD • Ningún fuego abierto o dispositivo como un interruptor que pueda generar chispas/cebado, se debe colocar cerca del aire acondicionado para evitar provocar el encendido del refrigerante inflammable utilizado. Siga las instrucciones detenidamente para guardar o mantener el aire acondicionado para evitar que se produzca cu alquier daño mecánico.
6 IMPORTANTES INSTRUCCIONES DE SEGURIDAD al espacio circundante. Antes de iniciar el trabajo, hay que revisar la zona alrededor del equipo para asegurase de que no hay riesgos de ignición ni ningún otro peligro inflamable. Se deberá poner señales de «Prohibido fumar». g) Zona ventilada Asegúrese de que el área está abierta o de que está adecuadamente ventilada antes de entrar en el sistema o realizar cualquier trabajo en caliente.
IMPORTANTES INSTRUCCIONES DE SEGURIDAD detección de fugas. Los componentes que son intrínsicamente seguros no deben estar aislados antes de trabajar con ellos. 8. Reparación de los componentes intrínsicamente seguros No aplique ninguna carga inductiva o capacitiva permanente al circuito sin asegurarse de que esto no excede el voltaje y la corriente permitidos para el equipo que está utilizando.
8 IMPORTANTES INSTRUCCIONES DE SEGURIDAD proceso hasta que no haya refrigerante en el sistema (opcional para A2L). Cuando se utilice la carga final de nitrógeno libre de oxígeno, el sistema deberá regular la presión para que esté a presión atmosférica y permitir que se pueda realizar el trabajo. Para garantizar que la salida de la bomba de vacío no está cerrado para ninguna fuente de ignición potencial y que hay un sistema de ventilación disponible. 12.
IMPORTANTES INSTRUCCIONES DE SEGURIDAD refrigerante y etiquetados para ese refrigerante (por ejemplo, cilindros especiales para la recuperación del refrigerante). Los cilindros deben estar completos y tener la válvula de alivio de presión y las válvulas de cierre funcionando correctamente. Hay que vaciar los cilindros de recuperación y, si es posible, se deben enfriar antes de recuperarlos.
10 IMPORTANTES INSTRUCCIONES DE SEGURIDAD Diagrama de cableado
UBICACIÓN & FUNCIONAMIENTO 11 Ubicación Funcionamiento Elegir la Ubicación Cuando la unidad se inicia, el ventilador comienza a tomar aire cargado de humedad a través de circuitos refrigerantes de deshumidificación. Las bobinas se condensan o atraen humedad del aire, y éste circula a través de las rejillas de salida de aire hacia el ambiente en forma de aire seco y cálido. La humedad que se quita del aire se acumula en un recipiente al frente del deshumidificador.
12 FUNCIONES DE SU APARATO DE DESHUMIDIFICADOR & INSTRUCCIONES DE OPERACIÓN Funciones de su aparato de deshumidificador CONTROL ELECTRÓNICO Antes de comenzar, familiarícese con el panel de control y todas sus funciones (como se muestra a continuación).
INSTRUCCIONES DE OPERACIÓN 3. Después de unos días cuando la Humedad Relativa haya declinado, presione el (los) botones HUMEDAD ( ) o ( ) para seleccionar un valor entre 35% a 85%, de modo que el ambiente se mantenga a una concentración confortable. Al presionar los botones ( ) o ( ) cambiará la selección de humedad en incrementos del 5%. La pantalla de visualización indicará la humedad actual en la habitación 5 segundos después de configurar la humedad deseada.
14 INSTRUCCIONES DE OPERACIÓN NOTA: • La manguera de drenaje de la bomba se conectará para este modo. • Si el indicador de la bomba y el indicador de cubo lleno parpadean simultáneamente, después de pulsar el botón de la bomba, compruebe si la manguera de drenaje de la bomba en el cubo está instalada correctamente. 8. Para apagar la unidad, presione el botón ENCENDIDO / APAGADO.
INSTRUCCIONES DE OPERACIÓN 15 Quitar el Agua Acumulada 1. Vaciar el Recipiente: a. Cuando el recipiente está lleno la unidad se apagará y se encenderá la luz indicadora RECIPIENTE LLENO. b. No mueva la unidad en este momento, pues de lo contrario el agua puede llegar a derramarse en el piso. c. Presione suavemente los lados del recipiente para sacarlo de la unidad. d. Quite el recipiente como se indica en las fotos a continuación y vacíe el recipiente. PRECAUCIÓN Deseche el agua del cubo.
16 INSTRUCCIONES DE OPERACIÓN 2. Drenaje Continuo: a. Para un drenaje constante, necesitará una manguera de jardín y un desagote cercano para descargar el agua. b. Desatornille la tapa de drenaje en la parte posterior de la unidad. (fig.1) fig. 3 fig. 1 c. Inserte el extremo roscado hembra de la manguera en el conector de drenaje de la unidad. (fig. 2) e. Asegúrese que la manguera esté bien fijada para que no haya pérdidas. f.
CUIDADO Y LIMPIEZA NOTA 1. Revise el cierre entre la manguera y el conector de drenaje. Si hay una pequeña pérdida, reemplace la rosca de la manguera y vuelva a afirmar la manguera. 2. Se recomienda utilizar una manguera de drenaje deshumidificadora de 1/2" (12.7 mm) o más larga. Asegúrese de que no haya torceduras o elevaciones en la manguera. 3. Cuando no haya una manguera acoplada al conector de drenaje, asegúrese que la tapa de drenaje esté enroscada de manera segura al conector para evitar pérdidas. 3.
18 ALMACENADO Filtro Pestañas c. Limpie el filtro con agua limpia y luego séquelo. d. Re-instale el filtro. 2. Carcasa a. Quite el polvo de la carcasa con un paño sin aceite o use un paño húmedo. b. Limpie con aspiradora la rejilla usando el accesorio cepillo. 3. Recipiente para Agua Limpie el cubo de agua cada dos semanas según las condiciones normales de funcionamiento. a. Limpie el recipiente con agua tibia y detergente. b. Limpie el filtro de la bomba al mismo tiempo en el cubo de limpieza. 4.
SONIDOS NORMALES Sonidos normales 2 3 1 4 1 Goteo de sonido El sonido del agua que gotea puede escuchar durante el ciclo de deshumidificación. 2 Sonido de ráfagas de aire En la parte superior de la unidad, puede oír el sonido de ráfagas de aire que son movidas por el ventilador. 3 Borboteo/Siseo Un sonido parecido a un "borboteo o siseo" puede escucharse debido al refrigerante pasando a través del evaporador durante una normal operación.
20 ANTES DE LLAMAR Antes de llamar al servicio técnico, revise esta lista. Puede ahorrarle tiempo y costos. Esta lista incluye problemas comunes que no son consecuencia de un trabajo o materiales defectuosos en el equipo. SUCESO SOLUCIÓN • El enchufe está desconectado. Afiance firmemente el enchufe en el tomacorrientes. • El fusible o el diferencial del circuito eléctrico doméstico han saltado. Reemplace el fusible por uno retardante o restablezca el diferencial. El deshumidificador no funciona.
LIMITADO GARANTÍA PRINCIPAL DEL APARATO 21 Su aparato está cubierto por una garantía limitada de un año, para reparaciones funcionales solamente. Durante un año desde la fecha original de compra, Electrolux pagará todos los costes de reparaciones o asumirá el coste del cambio de cualquier parte de este aparato que resulte ser defectuosa en materiales o en mano de obra, durante la instalación, el uso y el mantenimiento de dicho aparato de acuerdo con las instrucciones proporcionadas.
bienvenido casa Nuestro hogar es su hogar. Visítenos si necesita alguna de estas cosas: apoyo de propietario accesorios servicio registro (Vea su tarjeta de registro para obtener más información) Frigidaire.com 1-800-944-9044 Frigidaire.
Déshumidificateur l’utilisation et l’entretien Introduction .....................................................2 Entretien Et Nettoyage.............................. 17 Importantes Instructions De Sécurité ....3 Stockage ......................................................... 18 Emplacement.................................................. 11 Sons Normaux............................................... 19 Fonctionnement ............................................ 11 Avant D’appeler.............
2 INTRODUCTION Bienvenue dans notre famille Merci de faire entrer Frigidaire® dans votre maison! Nous considérons votre achat comme le début d'une longue relation entre vous et nous. Ce manuel est votre ressource pour l'utilisation et l'entretien de votre produit. Veuillez le lire avant d'utiliser votre appareil. Gardez-le à portée de main pour une consultation rapide. Si quelque chose ne semble pas fonctionner, la section de dépannage vous aidera à résoudre les problèmes courants.
IMPORTANTES INSTRUCTIONS DE SÉCURITÉ AVERISSEMENT Pour votre sécurité • Ne stockez ni n’utilisez d’essence ou d’autres vapeurs et liquides inflammables à proximité de cet appareil ou de tout autre appareil. Lisez les étiquettes des produits concernant l’inflammabilité, ainsi que les autres mises en garde. • Mettre au rebut l'eau du seau. L'eau n'est pas potable.
4 IMPORTANTES INSTRUCTIONS DE SÉCURITÉ CONSIGNES DE SECURITE ATTENTION! Évitez les blessures et d'endommager l'unité ou d'autres propriétés • Ne dirigez pas le flux d'air vers les cheminées car ceci peut faire vaciller les flammes. • Ne grimpez pas sur l'unité ou ne placez pas d’objets dessus. Ne suspendez pas d’objets à l’unité. • Ne placez pas de conteneur des liquides sur l'unité. • Éteignez le déshumidificateur à la source d'alimentation lorsque vous n'allez pas l'utiliser pendant une longue période.
IMPORTANTES INSTRUCTIONS DE SÉCURITÉ • ouvrir des enceintes ventilées. • Aucun feu ouvert ou dispositif tel qu'un interrupteur qui peut générer des étincelles ou un arc électrique ne doit se trouver autour du climatiseur afin d’éviter l’inflammation du fluide frigorigène inflammable utilisé. Veuillez suivre attentivement les instructions d’entreposage ou d’entretien du climatiseur afin d’éviter tout dommage mécanique.
6 IMPORTANTES INSTRUCTIONS DE SÉCURITÉ frigorigène inflammable peut éventuellement être libéré dans l'espace environnant. Avant le début des travaux, la zone autour de l'appareil doit être examinée pour s'assurer qu'il n'y a pas de risques d'inflammabilité ou d'inflammation. Des panneaux de Défense de fumer doivent être installés. g) zone ventilée Assurez-vous que la zone est à l'air libre ou qu'elle est suffisamment ventilée avant de pénétrer dans le système ou d'effectuer des travaux à chaud.
IMPORTANTES INSTRUCTIONS DE SÉCURITÉ d'isoler les composants à sécurité intrinsèque avant de travailler dessus. 8. Réparation des composants à sécurité intrinsèque N'appliquez pas de charges inductives ou capacitives permanentes au circuit sans vous assurer que cela ne dépassera pas la tension et le courant autorisés pour l'appareil utilisé. Les composants à sécurité intrinsèque sont les seuls à pouvoir être travaillés sous tension en présence d'une atmosphère inflammable.
8 IMPORTANTES INSTRUCTIONS DE SÉCURITÉ ventilant dans l'atmosphère et enfin en tirant jusqu'au vide (facultatif pour les fluides A2L). Ce processus doit être répété jusqu'à ce qu'il n'y ait plus de fluide frigorigène dans le système (facultatif pour les fluides A2L). Lorsque la charge finale d'azote sans oxygène est utilisée, le système doit être ramené à la pression atmosphérique pour permettre le travail.
IMPORTANTES INSTRUCTIONS DE SÉCURITÉ bouteilles pour contenir la charge totale du système est disponible. Toutes les bouteilles à utiliser sont désignées pour le fluide frigorigène récupéré et étiquetées pour ce fluide frigorigène (c'est-à-dire des bouteilles spéciales pour la récupération du fluide frigorigène). Les bouteilles doivent être équipées d'une soupape de surpression et de vannes d'arrêt associées en bon état de fonctionnement.
10 IMPORTANTES INSTRUCTIONS DE SÉCURITÉ Diagramme de câblage
EMPLACEMENT ET FONCTIONNEMENT Emplacement Fonctionnement Sélection d'un emplacement IMPORTANT : 1. Le déshumidificateur doit être utilisé dans une zone fermée pour être le plus efficace. Fermez toutes les portes, fenêtres, et autres ouvertures extérieures à la pièce. L'efficacité du déshumidificateur dépend du taux auquel le nouvel air chargé d’humidité entre dans la pièce. 2. Placez le déshumidificateur dans un endroit qui ne restreint pas le débit d’air de l’entrée et de la sortie d’air. 3.
12 FONCTIONS DU DÉSHUMIDIFICATEUR ET INSTRUCTIONS DE FONCTIONNEMENT Fonctions du déshumidificateur COMMANDE ÉLECTRONIQUE Avant de commencer, familiarisez-vous avec le panneau de commande et toutes ses fonctions (comme indiqué ci-dessous).
INSTRUCTIONS DE FONCTIONNEMENT 3. Après quelques jours quand l’humidité relative a diminué, appuyez sur les boutons HUMIDITÉ ( ) ou ( ) pour choisir une valeur entre 35% à 85%, afin que la pièce soit maintenue à une concentration confortable. Appuyer sur les boutons ( ) ou ( ) changera la sélection d'humidité par incréments de 5%. 5 secondes après avoir réglé l’humidité souhaitée, l’indicateur affiche l’humidité ambiante réelle.
14 INSTRUCTIONS DE FONCTIONNEMENT REMARUQE: • Le boyau de vidange de la pompe doit être bien raccordé pour ce mode de fonctionnement. • Si l’indicateur de pompe et l’indicateur de godet plein clignotent simultanément, après avoir appuyé sur le bouton de la pompe, vérifiez si le boyau de vidange de la pompe dans le godet est correctement installé. 8. Pour arrêter l'unité, appuyez sur le bouton MARCHE/ARRÊT.
INSTRUCTIONS DE FONCTIONNEMENT 15 Enlever l'eau recueillie 1. Vider le seau: a. Quand le seau est plein l'unité s'arrêtera et le voyant SEAU PLEIN s’allumera. b. Ne déplacez pas l'unité à ce moment car de l’eau peut se renverser sur le sol. c. Poussez les côtés du seau doucement pour détacher le seau de l'unité. d. Enlevez le seau comme indiqué dans les photographies ci-dessous et videz le seau. AVERISSEMENT Mettre au rebut l'eau du seau. L'eau n'est pas potable. e.
16 INSTRUCTIONS DE FONCTIONNEMENT 2. Drainage continu: a. Pour l'utilisation constante du drainage, vous aurez besoin d'un tuyau de jardin et d'un drain tout près pour y décharger l'eau. b. Dévissez le bouchon de purge à l'arrière de l'unité. (fig. 1) fig. 3 fig. 1 c. Insérez l'extrémité filetée femelle du tuyau dans le connecteur de purge de l'unité. (fig. 2) e. Assurez-vous que le tuyau est sécurisé afin qu’il n’y a pas de fuite. f.
ENTRETIEN ET NETTOYAGE REMARQUE 1. Vérifiez le joint entre le tuyau et le connecteur de purge. S'il y a une petite fuite alors remplacez le joint de tuyau et resserrez le tuyau. 2. Il est recommandé d’utiliser un tuyau de vidange de déshumidificateur de 1/2 po. (12,7 mm) ou plus. Assurez -vous qu'il n'est pas plié ou d'élévation dans le tuyau. 3. Lorsqu’un tuyau n’est pas fixé au raccord de vidange, assurez-vous que le bouchon de vidange est bien vissé au raccord pour éviter les fuites. 3.
18 STOCKAGE Filtre Languettes c. Lavez le filtre avec de l'eau propre et séchez-le. d. Réinstallez le filtre, puis replacez le Godet. 2. Boîtier a. Dépoussiérez le boîtier avec un chiffon sans huile, ou utiliser un chiffon humide. b. La grille à vide utilise l'accessoire brosse. 3. Seau d'eau Nettoyez le seau d'eau toutes les deux semaines en fonction des conditions de fonctionnement normales. a. Nettoyez le seau avec de l'eau chaude et du détergent. b.
SONS NORMAUX Sons normaux 2 3 1 4 1 Dripping sonore Le bruit des gouttes d'eau peut être entendu pendant le cycle de déshumidification. 2 Son de vent En tête de de l'unité, il est possible que vous entendiez un bruit de vent provoqué par l’air déplacé par le ventilateur. 3 Gargouillements/sifflements Peuvent être dus au frigorigène passant par le système d’évaporation pendant le fonctionnement normal.
20 AVANT D’APPELER Avant de faire appel à un technicien, consultez cette liste. Elle peut vous faire économiser temps et argent. Cette liste comprend les situations courantes qui ne résultent pas de défaut de pièce ou de fabrication de l’appareil. SITUATION SOLUTION • Prise murale déconnectée. Enfoncez fermement dans la prise. • Fusible fondu ou disjoncteur déclenché. Remplacez le fusible avec un fusible temporisé ou réenclenchez le disjoncteur. Le Déshumidificateur Ne Fonctionne Pas.
GARANTIE LIMITÉ D’APPAREIL PRINCIPALE 21 Votre appareil est couvert par une garantie limitée d’un an pour les réparations fonctionnelles seulement. Pendant un an à compter de la date d’achat initiale, Electrolux paiera tous les frais de réparation ou de remplacement de toute pièce de cet appareil en cas de défection apparente en raison d’un défaut de matériaux ou de fabrication, lorsque cet appareil est installé, utilisé et entretenu conformément aux instructions fournies.
bienvenue maison Notre maison est votre maison. Contacteznous si vous avez besoin d'aide pour : assistance du propriétaire accessoires entretien enregistrement (Voir votre carte d'enregistrement pour plus d'informations.) Frigidaire.com 1-800-944-9044 Frigidaire.