All about the Use & Care of your Dishwasher Important Safety Instructions ......................2 Dishwasher Dispenser and Detergents .......10 Product Registration ...................................3 Factors Affecting Performance ...................11 Features at a Glance...................................4 Care and Cleaning ............................... 12-13 Operating Instructions .............................5-6 Before you Call....................................
IMPORTANT SAFETY INSTRUCTIONS WARNING Please read all instructions before using this dishwasher. • Repairs should be done by a qualified technician. • Do not tamper with controls. • Do not touch the heating element during or immediately after wash has completed. • Use your dishwasher only as instructed in this Use and Care Manual. • Use care unloading the dishwasher when the SANITIZE option has been selected. Contents may be hot to the touch immediately after the end of cycle.
PRODUCT REGISTRATION Thank you for choosing Frigidaire This Use & Care Guide is part of our commitment to customer satisfaction and product quality throughout the service life of your new appliance. We view your purchase as the beginning of a relationship. To ensure our ability to continue serving you, please use this page to record important product information.
FEATURES AT A GLANCE Your dishwasher cleans by spraying a mixture of hot water and detergent through the spray arms against soiled surfaces. First, the dishwasher fills with water covering the filter area. Water is then pumped through the spray arms. Soil particles go through and across the filter and down the drain as the water is pumped out. This series of steps are repeated as needed. The number of water fills vary with the cycle being used.
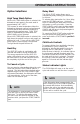
OPERATING INSTRUCTIONS Option Selections High Temp Wash Option When HIGH TEMP WASH option is selected, the dishwasher heats water in the main wash to approximately 140oF (60oC). This increase in water temperature helps the dishwasher detergent remove food grease and soil from dishes more effectively and aids in improved drying performance. HIGH TEMP WASH is automatically provided when the HEAVY WASH cycle is selected.
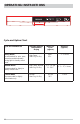
OPERATING INSTRUCTIONS Cycle and Option Chart Cycle and intended use Available Options Temperature; Drying Heavy Wash Recommended for pots, pans, casseroles and dinnerware having light to heavily soiled loads. High-Temp Heat Dry, Air Dry Normal Wash Recommended for lightly to heavily soiled loads. High Temp, Normal Heat Dry, Air Dry 1 Hour Wash Recommended for lightly soiled loads only. Normal Heat Dry, Air Dry 6 Water per Cycle (approx.) Duration* (approx.) 9 gal. 34 L. 2 - 3 Hours 2.9 - 7.
PREPARING AND LOADING DISHES Dish Preparation Scrape away large pieces of food, bones, pits, toothpicks, etc. The continuously filtered wash fluid will remove remaining food particles. Burned-on foods should be loosened before loading. Empty liquids from glasses and cups. Foods such as mustard, mayonnaise, vinegar, lemon juice and tomato based products may cause discoloration of stainless steel and plastics if allowed to sit for a long period of time.
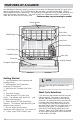
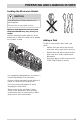
PREPARING AND LOADING DISHES Top Rack The TOP RACK option can be used to wash a wide assortment of items when you don’t have a full load. Also, when the upper rack fills up with glasses and the lower rack is still empty, you don’t have to wait anymore for clean glasses. STEMWARE HOLDER/CUPSHELF not available on all models. Loading the Bottom Rack Features and appearance of racks and silverware basket may vary from your model. The lower rack is best for plates, saucers, bowls, and cookware.
PREPARING AND LOADING DISHES Loading the Silverware Basket CAUTION Load sharp items (knives, skewers, etc.) pointing down. Failure to do so may result in injury. Features and appearance of racks and silverware basket may vary from your model. Load the silverware basket while it is in the bottom rack or take the basket out for loading on a counter or table. Adding a Dish To add or remove items after wash cycle starts: • Unlatch door and wait a few seconds until wash action stops before opening.
DISHWASHER DISPENSER & DETERGENTS Filing the Detergent Dispenser How much Detergent to use The detergent dispenser has one covered and one uncovered cup. Detergent in the uncovered cup falls into the dishwasher when the door is closed. The covered cup opens automatically to release detergent. • Use only fresh automatic dishwashing detergent. Other detergents may cause oversudsing. • When using automatic dishwashing detergent tabs, place one tab in main wash cup and close.
FACTORS AFFECTING PERFORMANCE Rinse Aid Water Pressure Rinse aid greatly improves drying, reduces water spots, filming, and lubricates wash arm bearing for proper rotation. With it water “sheets” off dishes rather than forming water droplets that cling and leave spots. A dispenser, located next to the detergent cup, automatically releases a measured amount of rinse aid during the last rinse.
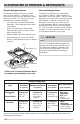
CARE AND CLEANING Spray Arm varies by model WARNING (2) Burn Hazard (3) Allow heating element to cool before cleaning the interior. Glass Trap Failure to do so can result in burns. (1) Glass Trap Removal To empty the glass trap: 1. Grasp the glass trap’s handle and rotate it 900 clockwise while pressing down on the center of the wash arm. 2. Grab the spray arm in the center and lift the spray arm and glass trap assembly up and out form the dishwasher. 3.
CARE AND CLEANING Winterizing A dishwasher left in an unheated place should be protected from freezing. Have a qualified person do the following: To Disconnect Service: 1. 2. 3. 4. Turn off electrical power to the dishwasher at the supply source by removing fuses or tripping circuit breaker. Shut off water supply Place a pan under the inlet valve. Disconnect water line from inlet valve and drain into pan. Disconnect drain line from pump and drain water into pan. To Restore Service: 5. 6. 7. 8.
BEFORE YOU CALL Dishware Chipped Detergent Left in Cups • • Load with care and do not overload. (See Preparing and Loading Dishes). • Place delicate items in top rack. • Place glasses securely against pins and not over pins. • Load items so they are secure and don’t jar loose when moving racks in and out. Move racks in and out slowly. • Make sure tall glasses and stemware will clear top of tub when rack is pushed in. • Fine antique china and crystal should be hand-washed.
BEFORE YOU CALL Dishwasher Won’t Run Stains on Tub Interior • Check to see if circuit breaker is tripped or if a fuse is blown. • • Make sure water supply is turned on. • Check to see if cycle is set correctly. (See Operating Instructions). • Is dishwasher set for Delay Start Option? • Make sure door is closed and latched. • Make sure START/CANCEL pad is pressed after the cycle has been selected.
MAJOR APPLIANCE WARRANTY Your appliance is covered by a one year limited warranty. For one year from your original date of purchase, Electrolux will pay all costs for repairing or replacing any parts of this appliance that prove to be defective in materials or workmanship when such appliance is installed, used and maintained in accordance with the provided instructions. Exclusions This warranty does not cover the following: 1.