
Complete Owner's Guide


6
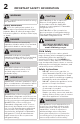
INSTALLATION
To install the casters:
1. Move appliance to a work area that
provides sucient clearance on all
4 sides to allow easy handling and
access to the appliance.
2. Cover the floor area behind the ap-
pliance with a protective material to
prevent damage while it is resting on
its back during the caster installation.
3. Remove the adjustable leveling legs
already installed on the appliance by
unscrewing counterclockwise, as they
are not required when using casters.
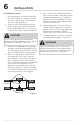
4. Remove casters and screws from
the caster kit. The Part A casters
are installed on the right front and
rear compressor side of the appli-
ance. The Part B casters are installed
on the left front and rear of the
appliance (with brake lever facing
outside). Align the caster holes with
the corresponding screw holes in the
mounting locations. See Figure 1.
CAUTION
Two or more people are required to
rotate and tilt the appliance on its back,
allowing accessibility to all sides.
WARNING
Casters with brakes are to stop chest
freezer movement on level ground only.
They are not intended to prevent move-
ment on an uneven or sloping floor.
Part A
Part A
Part B
Part B
Left Side
Front
Rear
Right Side
Bottom View
of Freezer
Part A
Part A
Compressor side
Middle
Figure 1
5. After casters are installed, with the
help of an assistant, carefully lift and
rotate the appliance to its upright
position. Move the appliance to the
desired location, and engage brakes
on the 2 left casters.
6. Wait a minimum of 2 hours before
connecting the appliance to an AC
power source. Avoid using a Ground
Fault Circuit Interrupter (GFCI)
outlet. Do not use an extension cord.
7. Load the appliance after the desired
operating temperature is reached.