
Installation Manual


3
REMOVAL OF OLD UNIT
TYPICAL INSTRUCTIONS, YOUR MODEL MAY VARY
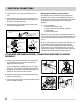
Before starting this step, turn off electrical power
at the circuit breaker or fuse box.
If your old mount is the same as the mount on your new
disposer, just reverse the assembly instructions found in
section Installation of Mounting Assembly. If your new
mount system is different, follow these instructions:
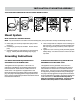
A. Use a pipe wrench to disconnect drain line where it
attaches to disposer discharge tube (see A).
B. Remove disposer from sink flange by turning mount ring
to the left clockwise (see B). If you are unable to turn
the mount ring, tap on one of the extensions from the
ring with a hammer. Some mounting systems have
tubular extensions. Inserting a screwdiver into on tube
will provide additional leverage for turning the mount
ring (see B). Some disposers may require the removal
or loosening of nuts from the mount screws (see C).
Some disposers may require the removal of a clamp.
IMPORTANT: Unless you have a new home, this is a
good time to clean out the trap and drain lines by
running a drain auger or plumber’s snake before
installing your new disposer.
Caution: Be sure to support the disposer while
perfomring this step or it may fall when the
mounting ring is disconnected from the mounting
assembly. If your disposer is hard wired (metal
shielded cable not utilizing a wall plug), complete
steps C and D. If you utilize a plug- in cord, go
on to step E.
C. When disposer is removed, turn up side down and
remove electrical cover plate (see D).
D. Use screwdriver to remove green ground wire. Remove
wire nuts from black and white power wires and
separate disposer wires from power cable wires.
Loosen screws on cable clamp and separate cable from
disposer.
E. To remove remaining mount system from the sink,
loosen mount screws, push mount ring up. Under it is
the snap ring. Use screwdriver to pop off ring (see E).
Remove mount ring, protector ring and gasket from sink
flange. Some mounts will require the unscrewing of a
large ring holding the sink flange in place. Pull sink
flange up through sink and clean off old putty from sink.
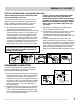
DISHWASHER CONNECTION
procedure. If dishwasher is not to be connected go to
section Installation of Mounting Assembly.
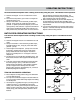
A. Using a blunt instrument (steel punch or wooden dowl),
knock out entire plug (see A). Do not use a screwdriver
or sharp instrument. When knockout plug falls into
disposer, you may remove it or simply grind it up when
the disposer is used. This will not damage the disposer
in any way, but may take sometime to grind, over the
course of several uses. Go to section Installation of
Mounting Assembly.
B. Connect dishwasher hose using hose clamp. If hose size
is different, you will need a Dishwasher Connector Kit
(see B). Make sure all plumbing connections are tight
and in accordance with all plumbing codes and ordinan-
ces. Run water and check for leaks.
If you are utilizing a dishwasher, complete the following
A
C D E
B
A
C D E
B
KNOCK
OUT PLUG
A
B
*AIR GAP
DISHWASHER
HOSE
*Air gap may not be required
for all installations. Check local
plumbing codes.
RUBBER
HOSE
DISPOSER