
Installation Manual


6
ELECTRICAL CONNECTIONS
A. Connect disposer to 110-120 Volt, 60Hz AC current
only.
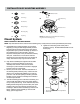
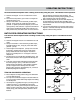
ATTACHING DISCHARGE ELBOW/ CONNECTING DISPOSER TO MOUNT
ASSEMBLY
A. Connect waste elbow to the disposer (see A), proceed
to set B and C then connect bottom of the elbow by
tightening the slip nut (see D).
If you are connecting to a dishwasher, return to section
(B) page 3. If not, make sure all plumbing connections
are tight and in accordance with all plumbing codes and
ordinances. Run water and check for leaks.
B. Hang disposer by aligning 3 mounting tabs with slide-up
ramps on mounting ring.
C. Turn mounting ring until all 3 mounting tabs lock over the
rides on the slide-up ramps.
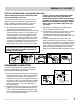
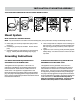
B. If plug-in cord is used, use a three prong plub (see A).
Ground wire should be attached to the ground screw in
the bottom of the end bell (see B).
C. Use a cable clamp strain relief connector where power
cord enters the disposer (see C).
Wiring Disposer Directly to House Current
This appliance must be connected to a grounded, metal
permanent wiring system or an equipment grounding con-
ductor must be run with the circuit conductors and connected
to the equipment-grounding terminator or lead on the
appliance.
A. If you use BX cable:
1. Install cable connector in hole.
2. Connect white wire to white lead of disposer.
3. Connect black.
4. Connect bare ground.
If BX cable is not used, provide a serpareate ground wire to
nearest cold water metal pipe or other suitable ground, using
the screw in the bottom of the end bell for the ground wire
(see C).
B. If your power supply does not include a ground wire, you
must provide one unless metal cable is used. Attach a
copper wire securely to disposer ground screw and attach
other end of wire to a metal cold water pipe. Use only UL
approved ground clamp. If plastic pipe is used in your home,
a qualified electrician should install a proper ground.
TO HOUSE
CURRENT OR
POWER CORD
WIRE NUTS
GROUND SCREW
STRAIN
RELIEF
NUT
A
CB
RED RESET BUTTON
RIBBED SIDE
NOTE: When viewing face of electical
plug with grounding pin at top,
the larger left blade is connected to
the identified wire.
Trace lead connected to this blade
and attach that lead to white wire
on disposer.
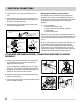
REMOVE COVER
PLATE
RUBBER
GASKET
A D
RUBBER
GASKET
A D
B
C