All about the Use & Care of your Cooktop CTABLE OF CONTENTS www.frigidaire.com USA 1-800-944-9044 Care and Cleaning . . . . . . . . . . . . . . . . . . . . . . . . 16 Before You Call . . . . . . . . . . . . . . . . . . . . . . . . . . . 18 Warranty . . . . . . . . . . . . . . . . . . . . . . . . . . . . . . . . 19 www.frigidaire.ca Canada 1-800-265-8352 A01704202 Rev C (Oct2018) Product Record and Registration . . . . . . . . . . . . . . 2 Important Safety Instructions . . . . . . . . . . . . . . .
PRODUCT RECORD AND REGISTRATION Product Record and Registration . . . . . . . . . . . . . . . . . 2 Need Help? . . . . . . . . . . . . . . . . . . . . . . . . . . . . . . . . .2 Important Safety Instructions . . . . . . . . . . . . . . . . . . . . 3 Before Setting Surface Controls . . . . . . . . . . . . . . . . . 8 Setting Surface Controls . . . . . . . . . . . . . . . . . . . . . . 12 Care and Cleaning . . . . . . . . . . . . . . . . . . . . . . . . . . . . 16 d Cleaning . . . . . . . . . . . . . . . . .
IMPORTANT SAFETY INSTRUCTIONS Read all instructions before using this appliance. DEFINITIONS This manual contains important safety symbols and instructions. Please pay attention to these symbols and follow all instructions given. This is the safety alert symbol. It is used to alert you to potential personal injury hazards. Obey all safety messages that follow this symbol to avoid possible injury or death.
IMPORTANT SAFETY INSTRUCTIONS IMPORTANT INSTRUCTIONS FOR UNPACKING AND INSTALLATION IMPORTANT - Read and follow the below instructions and precautions for unpacking, installing, and servicing your appliance: Remove all tape and packaging before using the appliance. Destroy the carton and plastic bags after unpacking the appliance. Never allow children to play with packaging material. Do not remove the wiring label and other literature attached to the appliance. Do not remove model/ serial number plate.
IMPORTANT SAFETY INSTRUCTIONS IMPORTANT INSTRUCTIONS FOR USING THE APPLIANCE WARNING Storage In or On Appliance—Flammable materials should not be stored in an oven or microwave, near surface burners or elements, or in the storage or warmer drawer (if equipped). This includes paper, plastic, and cloth items, such as cookbooks, plastic ware, and towels, as well as flammable liquids. Do not store explosives, such as aerosol cans, on or near the appliance.
IMPORTANT SAFETY INSTRUCTIONS CAUTION Do not attempt to operate the appliance during a power failure. If the power fails, always turn off the appliance. If the appliance is not turned off and the power resumes, electric surface elements may resume operation when power is restored. Once the power resumes, reset the clock (if equipped). Never leave surface elements unattended. Boilovers may cause smoking and greasy spills that may ignite.
IMPORTANT SAFETY INSTRUCTIONS IMPORTANT INSTRUCTIONS FOR CLEANING YOUR APPLIANCE CAUTION Before manually cleaning any part of the appliance, be sure all controls are turned off and the appliance is cool. Cleaning a hot appliance can cause burns.
BEFORE SETTING SURFACE CONTROLS Using Proper Cookware Cookware Material Types The size and type of cookware used will influence the heat setting needed for best cooking results. Be sure to follow the recommendations for using proper cookware as illustrated in Figure 1 and Figure 2. The cookware material determines how evenly and quickly heat is transferred from the surface element to the pan bottom.
BEFORE SETTING SURFACE CONTROLS About the Ceramic Glass Cooktop About the Radiant Surface Elements The ceramic glass cooktop has heating elements below a smooth glass surface. The designs on the ceramic cooktop outline the areas of the surface elements underneath. Always match the pan size with the diameter of the element outline on the cooktop. Only flat-bottomed cookware should be used. The element temperature rises gradually and evenly. As the temperature rises, the element will glow red.
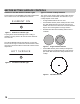
BEFORE SETTING SURFACE CONTROLS Element On and Hot Surface Indicator Lights Types of ceramic cooktop elements Some models have an ELEMENT ON indicator light that will turn on when one or more elements are turned on. The circles on the ceramic glass cooktop outline the size and type of element underneath. The elements on your cooktop depend on the model. ELEMENT ON Figure 3: • A single radiant element has one circle. • A dual radiant element (some models) has two circles.
BEFORE SETTING SURFACE CONTROLS Locations of the Radiant Surface Elements Your cooktop is equipped with radiant surface radiant elements with different wattage ratings. The ability to heat food quicker and in larger volumes increases as the element wattage increases.
SETTING SURFACE CONTROLS Single radiant surface elements (all models) To operate the single radiant element: 1. Place correctly sized cookware on surface element. 2. Push in and turn the surface control knob in either direction (Figure 12) to the desired setting (refer to the “Suggested radiant surface element settings” in Table 1). 3. When cooking is complete, turn the radiant surface element OFF before removing the cookware.
SETTING SURFACE CONTROLS Dual radiant surface elements (some models) Symbols on the backguard will help choose which portion of the dual radiant element to set. The symbol indicates a setting for the inner element only. The symbol indicates a setting for both inner and outer elements. To operate a dual radiant element: 1. Place correctly sized cookware on the surface element. 2. Push in and turn the surface control knob clockwise to begin heating both the inner and outer elements.
SETTING SURFACE CONTROLS Keep warm (some models) Use the keep warm feature to keep cooked foods hot. Always start with hot food. It is not recommended to heat cold food on the keep warm zone. All food placed on the warming zone should be covered with a lid to maintain quality. For best results, when warming pastries or breads, the cover should have an opening to allow moisture to escape. Do not use plastic wrap to cover food. Plastic may melt onto the surface and be very difficult to clean.
SETTING SURFACE CONTROLS Home Canning Be sure to read and observe all the following points when home canning with your appliance. Check with the USDA (United States Department of Agriculture) Web site and be sure to read all the information they have available as well as follow their recommendations for home canning procedures. • Use only a completely flat bottom canner with no ridges that radiate from the bottom center when home canning. Heat is spread more evenly when the bottom surface is flat.
CARE AND CLEANING Cooktop Maintenance Consistent and proper cleaning is essential to maintaining your ceramic glass cooktop. Prior to using your cooktop for the first time, apply a ceramic cooktop cleaning cream (available in most hardware, grocery, and department stores) to the ceramic surface. Clean and buff with a clean paper towel. This will make cleaning easier when soiled from cooking. Cooktop cleaning creams leave a protective finish on the glass to help prevent scratches and abrasions.
CARE AND CLEANING Cooktop Cleaning WARNING Do not use a cooktop cleaner on a hot cooktop. The fumes can be hazardous to your health, and can chemically damage the ceramic-glass surface. CAUTION Before cleaning the cooktop, be sure the controls are turned to OFF and the cooktop is cool. The glass surface could be hot from contact with hot cookware, and burns may occur if the glass surface is touched before it has cooled sufficiently.
BEFORE YOU CALL Solutions to Common Problems: Before you call for service, review the following list. It may save you time and expense. Possible solutions are provided with the problem listed. Problem Cause / Solution Entire appliance does not operate. Appliance not connected. Make sure power cord is plugged properly into outlet. Check your fuse box or breaker box to make sure the circuit is active. Electrical power outage. Check house lights to be sure.
WARRANTY Your appliance is covered by a one year limited warranty. For one year from your original date of purchase, Electrolux will pay all costs for repairing or replacing any parts of this appliance that prove to be defective in materials or workmanship when such appliance is installed, used and maintained in accordance with the provided instructions. Exclusions This warranty does not cover the following: 1. 2. 3. 4. 5. 6. 7. 8. 9. 10. 11. 12. 13.