
Installation Instructions


2
30" (762 mm) ELECTRIC RANGE INSTALLATION INSTRUCTIONS
(For 4 Wire, 60 Hz. Systems)
IMPORTANT SAFETY
INSTRUCTIONS
If the information in this manual is not followed
exactly, a fire or electrical shock may result causing property
damage, personal injury or death.
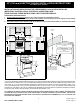
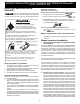
Tip Over Hazard
Range
leveling leg
Anti-tip
bracket
• A child or adult can tip the
range and be killed.
• Verify the anti-tip device has
been installed to floor or wall.
• Ensure the anti-tip device is re-engaged to floor
or wall when the range is moved.
• Do not operate the range without the anti-tip
device in place and engaged.
• Failure to follow these instructions can result in
death or serious burns to children and adults.
To check if the anti-tip bracket is installed properly, use
both arms to grasp the rear edge of the range back.
Carefully attempt to tilt range forward. When properly
installed, the range should not tilt forward.
Refer to the anti-tip bracket installation instructions
supplied with your range for proper installation.
Important Notes to the Installer
1. Read all instructions contained in these installation
instructions before installing range.
2. Remove all packing material from the oven compartments
before connecting the gas and electrical supply to the
range.
3. Observe all governing codes and ordinances.
4. Be sure to leave these instructions with the consumer.
Important Note to the Consumer
Keep these instructions with your owner's guide for future
reference.
• Aswhenusinganyappliancegeneratingheat,thereare
certain safety precautions you should follow. These are
listed in the Use & Care Manual, read it carefully.
• Besureyourrangeisinstalledandgroundedproperly
byaqualiedinstallerorservicetechnician.
• Make sure the wall coverings around the range can
withstand the heat generated by the range.
• Toeliminatetheneedtoreachoverthesurfaceelements,
cabinet storage space above the elements should be
avoided.
Before Starting
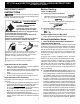
Tools You May Need
For leveling legs and Anti-Tip Bracket:
• Adjustablewrenchorchannellockpliers
• 5/16"(21mm)NutdriverorFlatHeadScrewdriver
• ElectricDrill&1/8"(3mm)DiameterDrillBit(Masonry
Drill Bit if installing in concrete)
For electrical supply connection:
• 1/4"(6mm)&3/8"(10mm)SocketdriverorNutdriver
Additional Materials You May Need
• CopperElectricalWiring&MetalConduit(forhardwiring)
Normal Installation Steps
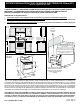
1. Anti-Tip Bracket Installation Instructions
Important Safety Warning
To reduce the risk of tipping of the range, the range should
besecuredtotheoorbyproperlyinstalledanti-tipbracket
and screws packed with the range. Failure to install the
anti-tipbracketwillallowtherangetotipoverifexcessive
weight is placed on an open door or if a child climbs upon
it.Seriousinjurymightresultfromspilledhotliquidsorfrom
the range itself.
If range is ever moved to a different location, the anti-tip
brackets must also be moved and installed with the range.
Instructions are provided for installation in wood or cement
fastenedtoeither theoororwall. Wheninstalledtothe
wall, make sure that screws completely penetrate dry wall
and are secured in wood or metal. When fastening to the
oororwall,besurethatscrewsdonotpenetrateelectrical
wiring or plumbing.
A. Locate the Bracket Using the Template-(Bracketmay
be located on either the left or right side of the range. Use
the information below to locate the bracket if template is
notavailable).Marktheoororwallwhereleftorright
side of the range will be located. If rear of range is against
thewallornofurtherthan1-1/4"(32mm)fromwallwhen
installed,youmayusethewalloroormountmethod.If
moldingisinstalledanddoesnotallowthebrackettot
ushagainstthewall,removemoldingormountbracket
totheoor.Forwallmount,locatethebracketbyplacing
the back edge of the template against the rear wall and
the side edge of template on the mark made referencing
the side of the range. Place bracket on top of template
and mark location of the screw holes in wall. If rear of
rangeisfurtherthan1-1/4"(32mm)fromthewallwhen
installed,attachbracketto theoor.For oormount,
locate the bracket by placing back edge of the template
where the rear of the range will be located. Mark the