All about the Use & Care of your Electric Range TA B L E O F C O N T E N T S Setting Oven Controls .................................. 14-20 Before Setting Oven Controls ........................... 6-7 Clean ......................................................... 21-22 Before Setting Surface Controls ....................... 7-8 Care & Cleaning .......................................... 23-26 Setting Surface Controls (Ceramic cooktop) .... 9-12 Before You Call ......................................
PRODUCT RECORD AND REGISTRATION Contents Thank you for choosing Frigidaire. Product Registration ...................................................... 2 Important Safety Instructions ............................ 3-5 Before Setting Oven Controls ............................... 6-7 Removing, replacing & arranging racks ........................ 6 Before Setting Surface Controls ........................... 7-8 About the ceramic cooktop & radiant elements ............. 7 Cookware material types ..............
IMPORTANT SAFETY INSTRUCTIONS Read all instructions before using this appliance. Do not attempt to install or operate your appliance until you have read the safety precautions in this manual. Safety items throughout this manual are labeled with a WARNING or CAUTION statement based on the risk type. Definitions This is the safety alert symbol. It is used to alert you to potential personal injury hazards. Obey all safety messages that follow this symbol to avoid possible injury or death.
IMPORTANT SAFETY INSTRUCTIONS WARNING • Storage in or on appliance — to avoid a fire hazard, flammable materials should not be stored in an oven, near surface units or in the storage drawer, warmer drawer or lower oven. This includes paper, plastic and cloth items, such as cookbooks, plasticware and towels, as well as flammable liquids. Do not store explosives, such as aerosol cans, on or near the range.
IMPORTANT SAFETY INSTRUCTIONS SELF-CLEANING OVENS • Clean in the self-cleaning cycle only the parts listed in this Use & Care Manual. Before self-cleaning the oven, remove the broiler pan and any utensils or foods from the oven. • Do Not Use Oven Cleaners—No commercial oven cleaner or oven liner protective coating of any kind should be used in or around any part of the oven. • Do Not Clean Door Gasket—The door gasket is essential for a good seal. Care should be taken not to rub, damage or move the gasket.
BEFORE SETTING OVEN CONTROLS Oven vent location Types of oven racks The oven vent is located under the left side of the control panel (See Fig. 1). When the oven is on, warm air passes through this vent. This venting is necessary for proper air circulation in the oven and good baking results. Do not block the oven vent. Your range may be equipped with one or more of the oven rack styles illustrated below. oven vent location flat handle oven rack Fig.
BEFORE SETTING OVEN CONTROLS Air circulation in the oven For best baking results allow 2-4" (5-10 cm) around the cookware for proper air circulation and be sure pans and cookware do not touch each other, the oven door, sides or back of the oven cavity. Hot air must be able to circulate around the pans and cookware in the oven for even heat to reach around the cookware (See Fig. 1).
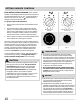
BEFORE SETTING SURFACE CONTROLS Types of cooktop elements Using proper cookware The ceramic glass cooktop has radiant surface elements located below the surface of the glass cooktop. The patterns on the ceramic glass will outline the size and type of element available. The size and type of cookware used will influence the setting needed for best cooking results. Be sure to follow the recommendations for using proper cookware as illustrated in Figs. 2 & 3.
SETTING SURFACE CONTROLS Single radiant surface elements To operate the single radiant element: 1. Place correctly sized cookware on single radiant surface element. 2. Push in and turn the surface control knob in either direction (Fig. 2) to the desired setting (Refer to the Suggested radiant surface element settings table Fig. 1). Start most cooking operations on a higher setting and then turn to a lower setting to finish cooking.
SETTING SURFACE CONTROLS Dual radiant surface elements (some models) Symbols on the backguard will help choose which portion of the dual radiant element to set. The symbol indicates a setting for the inner coil only. The symbol indicates a setting for both inner and outer coils. To operate a dual radiant element: 1. Place correctly sized cookware on dual radiant surface element. 2. Push in and turn the surface control knob clockwise (See Fig.
SETTING SURFACE CONTROLS Keep warm (some models) The purpose of the keep warm zone is to keep hot cooked foods at serving temperature. Use the keep warm feature to keep cooked foods for serving such as; vegetables, gravies, casseroles, soups, stews, breads, pastries and oven-safe dinner plates. Always start with hot food. It is not recommended to heat cold food on the keep warm zone. All food placed on the keep warm zone should be covered with a lid to maintain quality.
SETTING SURFACE CONTROLS Home canning Be sure to read and observe all the following points when home canning with your appliance. Check with the USDA (United States Department of Agriculture) website and be sure to read all the information they have available as well as follow their recommendations for home canning procedures. • Use only quality flat bottom canners when home canning. Use a straight-edge to check canner bottom (see “Cookware material types” in the Before setting surface controls section).
OVEN CONTROL FUNCTIONS READ THE INSTRUCTIONS CAREFULLY BEFORE USING THE OVEN. For satisfactory use of your oven, become familiar with the various keypad functions as described below. Oven control (for models with quick bake) clock set keypad — Use to set the time of day. bake time keypad— Use to enter the length of baking time needed.
SETTING OVEN CONTROLS Setting the clock Changing oven temperature display (°F or °C) When the appliance is first plugged in or when the power supply to the appliance has been interrupted, the display will flash "12:00". It is recommended to always set the clock for the correct time of day before using the appliance. To set the clock: 1. Press clock set once (do not hold keypad down). 2.
SETTING OVEN CONTROLS Setting controls lock The oven control may be programmed to lock the oven control keypads and the oven door. To set the controls lock feature: 1. Press clear off keypad and hold for 3 seconds. "Loc" will appear in display, the "door locked" indicator light will flash and the motor driven door lock will begin to close automatically. Allow about 15 seconds for the oven door to lock. Once the oven door is locked, the current time of day will appear in the display. 2.
SETTING OVEN CONTROLS Setting bake Setting bake time and start time features The oven may be programmed to bake at any temperature between 170°F to 550°F (77°C to 287°C). The factory preset automatic bake temperature is 350°F (177°C). The bake time and start time keypads provide settings that will turn the oven ON and OFF at the times you select in advance.
SETTING OVEN CONTROLS Setting bake time and start time features (cont’d) When the set bake time runs out: WARNING FOOD POISONING HAZARD. Do not let food sit for more than one hour before or after cooking. Doing so can result in food poisoning or sickness. CAUTION Use caution with the bake time and (delayed) start time features. Foods that can easily spoil such as milk, eggs, fish, meat or poultry, should be chilled in the refrigerator first.
SETTING OVEN CONTROLS Quick bake (some models) Benefits of the quick bake feature — Foods cook more evenly — Multiple rack baking — No special pans or bakeware needed 7 6 Quick bake uses a fan to circulate the oven's heat uniformly and continuously around the oven. This improved heat distribution allows for fast, even cooking and browning results. It also provides better baking performance when using two racks at the same time.
SETTING OVEN CONTROLS Setting broil Insert Use the broil feature to cook meats that require direct exposure to radiant heat for optimum browing results. When broiling always remember to arrange the oven racks while oven is still cool. Position the rack as suggested in the broil settings table (See Figs. 1 & 4). 7 6 5 To set Broil 1. Arrange the oven rack while oven is still cool. Fig. 2 Broil pan 2. Press broil. " — — "will appear in display. 3.
SETTING OVEN CONTROLS Adjusting the oven temperature Operating the oven light Your appliance has been factory calibrated and tested to ensure an accurate baking temperature. For the first few uses, follow your recipe times and temperature recommendations carefully. If you think the oven is cooking too hot or too cool for your recipe times, you can adjust the control so the oven cooks hotter or cooler than the temperature displayed.
CLEAN Clean A self-cleaning oven cleans itself with high temperatures (well above normal cooking temperatures) which eliminate soils completely or reduces them to a fine powdered ash you can wipe away with a damp cloth. IMPORTANT Read before starting self-clean • Completely remove ALL OVEN RACKS and ANY ACCESSORIES FROM OVEN CAVITY to avoid possible damage to oven racks. If the oven racks are not removed they may discolor.
CLEAN Setting a self-clean cycle or a delayed start self-clean cycle Setting a self-clean cycle 1. Remove all items from the oven, cooktop, and all oven racks from the oven and be sure the oven door is completely closed. Be sure the oven control displays the correct time of day and adjust if needed. NOTE To start a self-clean cycle immediately without delay, skip steps 2 & 3 in the instructions provided below. 2. Press the start time keypad. The ":" in the time of day display will flash. 3.
CARE & CLEANING Cleaning recommendation table Surface type Recommendation Control knobs (some models) Painted body parts Painted decorative trim Aluminum, plastic or vinyl trim For general cleaning, use hot, soapy water and a cloth. For more difficult soils and built-up grease, apply a liquid detergent directly onto the soil. Leave on soil for 30-60 minutes. Rinse with a damp cloth and dry. Do not use abrasive cleaners on any of these materials; they can scratch.
CARE & CLEANING Cooktop maintenance IMPORTANT Consistent and proper cleaning is essential to maintaining your ceramic glass cooktop. Prior to using your cooktop for the first time, apply some of the glass-ceramic cooktop cleaner supplied with your new appliance. Buff with a non-abrasive cloth or no-scratch cleaning pad. This will make cleaning easier when soiled from cooking. The special cooktop cleaning cream leaves a protective finish on the glass to help prevent scratches and abrasions.
CARE & CLEANING Cooktop cleaning (cont’d) Aluminum foil and oven liners (cont’d) DO NOT use the following on the cooktop: Aluminum foil and the cooktop - Use of aluminum foil on a hot cooktop can damage the ceramic glass. Do not use thin aluminum cooking utensils or allow aluminum foil to touch the ceramic cooktop under ANY circumstances. Aluminum utensils and the cooktop - Care must be taken when aluminum pots or pans are used on the cooktop.
CARE & CLEANING Removing and replacing the lift-off oven door CAUTION Oven door hinge locations with oven door fully open. • To avoid possible injury when removing or replacing the oven door, follow the instructions below carefully and always hold the oven door with both hands positioned away from the door hinge area. • The door is heavy. For safe, temporary storage, lay the door flat with the inside of the door facing down. Fig. 1 To remove oven door: 1.
Solutions to common problems • Problem BEFORE YOU CALL Solution Oven control beeps and displays an F code (fault code) error. • The oven control has detected a fault or error condition. Press clear off to clear the display & stop beeping. Try the bake or broil feature again. If the F code error repeats, remove electric power from appliance, wait 5 minutes and then repower appliance and set clock for the time of day. Try the bake or broil feature again.
BEFORE YOU CALL • Solutions to common problems Problem Solution Flames inside oven or smoking from oven vent. • Excessive spillovers in oven. For example this may happen for pie spillovers or large amounts of grease left on the oven bottom. Wipe up excessive spillovers before starting oven. If flames or excessive smoke are present see Setting broil instructions in the "Setting Oven Controls" section for additional recommendations. Oven smokes excessively when broiling.
Solutions to common problems • BEFORE YOU CALL Problem Solution Scratches or abrasions on cooktop surface. • Coarse particles such as salt or sand between cooktop and utensils can cause scratches. Be sure cooktop surface and bottoms of utensils are clean before usage. Small scratches do not affect cooking and will become less visible with time. • Cleaning materials not recommended for ceramic-glass cooktop have been used.
NOTES 30
MAJOR APPLIANCE WARRANTY is left blank intentionally ThisThis pagepage is left blank intentionally Your appliance is covered by a one year limited warranty. For one year from your original date of purchase, Electrolux will pay all costs for repairing or replacing any parts of this appliance that prove to be defective in materials or workmanship when such appliance is installed, used and maintained in accordance with the provided instructions. Exclusions This warranty does not cover the following: 1. 2.
MAJOR APPLIANCE WARRANTY