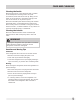
All about the Use & Care of your Top Mount Refrigerator TA B L E O F C O N T E N T S Important Safety Instructions .................................2 Features ...............................................................8 Installation ...........................................................4 Care and Cleaning ................................................ 9 Door Reversal Instructions .....................................4 Before you Call....................................................
SERIAL/MODEL #’S Read and Save These Instructions for your model. Use your refrigerator only as instructed in this guide. These instructions are not meant to cover every possible condition and situation that may occur. Common sense and caution must be practiced when installing, operating, and maintaining any appliance. Record Your Model and Serial Numbers Record the model and serial numbers in the space provided below. The serial plate is located on the upper left wall inside the refrigerator.
IMPORTANT SAFETY INSTRUCTIONS WARNING WARNING Electrical Information Child Safety • The refrigerator must be plugged into its own dedicated 115 Volt, 60 Hz., 15 Amp, AC only electrical outlet. The power cord of the appliance is equipped with a three-prong grounding plug for your protection against electrical shock hazards. It must be plugged directly into a properly grounded three prong receptacle. The receptacle must be installed in accordance with local codes and ordinances.
INSTALLATION This Use & Care Guide provides general operating instructions for your model. Use the refrigerator only as instructed in this Use & Care Guide. Before starting the refrigerator, follow these important first steps. Location • Choose a place that is near a grounded electrical outlet. Do Not use an extension cord or an adapter plug. • For the most efficient operation, the refrigerator should be located where surrounding temperatures will not drop below 10° F (-12° C) or exceed 110° F (43° C).
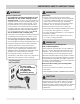
DOOR REVERSAL INSTRUCTIONS Step 1 Step 3 Remove top hinge cover. Unscrew and remove the top hinge and top hinge shim. Keep the screws so they can be used on the opposite side. Unscrew and remove the middle hinge and middle hinge shim. Save the screws. Lift the refrigerator door up and away from the appliance. Remove 1 Dismantle Hinge Cover Center Hinge Shim 1 Top Cap Center Pull Hinge Up Top Hinge Top Hinge Shim Step 2 Lift the freezer door up and away from the appliance.
DOOR REVERSAL INSTRUCTIONS Step 5 Remove right pin assemblies from the bottom of the freezer and refrigerator doors. On the opposite side, attach the replacement pin assemblies (located in the plastic bag with the Use and Care Manual) with a screwdriver. Note: You must re-use the screws from the pin assemblies that are removed in this step when attaching the new assemblies.
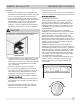
ENERGY SAVI NG TI PS Cleaning TEMPERATURE CONTROLS Cool Dow n Period • Wash any removable parts of the refrigerator interior, and exterior with mild detergent and warm water. Wipe dry. Do not use harsh cleaners on these surfaces. For best performance, allow four hours for the refrigerator to cool down completely. The refrigerator will run continuously • Do not use razor blades or other sharp instruments, which can scratch the appliance surface when removing adhesive labels.
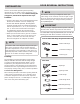
FEATURES 1 7 2 temp control 3 10 4 5 8 6 9 1 Freezer Shelf 6 Crispers 2 Freezer Control 7 Freezer Door Bins 3 Refrigerator Control 8 Full-width Door Bins 4 Lamp Switch 9 Adjustable Front Feet 5 Glass Shelves 10 Interior Light (located in center of control housing) Adj ust able I nt erior Shelves I nt er ior Light ( som e m odels) Multi-position adjustable interior shelves can be moved to any position for larger or smaller bottles.
CARE AND CLEANING Cleaning the Inside Wash inside surfaces of the refrigerator with a solution of two tablespoons of baking soda in one quart (1.136 liters) warm water. Rinse and dry. Wring excess water out of the sponge or cloth when cleaning in the area of the controls, or any electrical parts. Wash the removable parts with the baking soda solution mentioned above, or mild detergent and warm water. Rinse and dry.
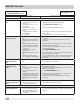
BEFORE YOU CALL 1-800-944-9044 (United States) Visit our web site at www.frigidaire.com. 1-800-265-8352 (Canada) PROBLEM CAUSE CORRECTION REFRIGERATOR OPERATION Refrigerator does not run. • • • • • Refrigerator runs too much or too long. • • • • • • • Refrigerator is plugged into a circuit that has a ground fault interrupt. Temperature control is in the OFF position. Refrigerator may not be plugged in, or plug may be loose. House fuse blown or tripped circuit breaker. Power outage.
BEFORE YOU CALL (continued) PROBLEM CAUSE CORRECTION SOUND AND NOISE (continued) Longer sound levels when compressor comes on. • Refrigerator operates at higher pressures during the start of the ON cycle. • This is normal. Sound will level off or disappear as Refrigerator continues to run. Fan runs when room temperature is below 45° F. • Exterior thermostat has activated the heater or fan. • This is normal. Popping or cracking sound when compressor comes on.
MAJOR APPLIANCE WARRANTY Major Appliance Warranty Information Your appliance is covered by a one year limited warranty. For one year from your original date of purchase, Electrolux will pay all costs for repairing or replacing any parts of this appliance that prove to be defective in materials or workmanship when such appliance is installed, used and maintained in accordance with the provided instructions. Exclusions This warranty does not cover the following: 1.
Todo acerca del uso y cuidado de su refrigerador ÍNDICE Instrucciones importantes de seguridad .......................... 2 Características .............................................................. 8 Instalación .................................................................... 4 Cuidado y limpieza ........................................................ 9 Door Reversal Instructions ............................................. 4 Antes de solicitar servicio técnico ............................
INSTRUCCIONES IMPORTANTES DE SEGURIDAD Lea y conserve estas instrucciones sobre el funcionamiento de su modelo. Use su refrigerador solamente como se indica en esta guía. Estas instrucciones no tienen por objeto cubrir todas las posibles condiciones y situaciones que se puedan presentar. Cuando se instale, opere o repare cualquier electrodoméstico, se debe tener cuidado y sentido común. Anote los números de modelo y de serie Anote los números de modelo y de serie en el espacio proporcionado a continuación.
INSTRUCCIONES IMPORTANTES DE SEGURIDAD ADVERTENCIA ADVERTENCIA Información eléctrica Seguridad de los niños • El refrigerador debe enchufarse en su propio y exclusivo tomacorriente eléctrico de 115 voltios, 60 Hz, 15 Amp, CA solamente. El cordón eléctrico está equipado con un enchufe de tres clavijas con conexión a tierra para su protección contra riesgos de choque eléctrico. Debe enchufarse directamente en un tomacorriente para tres clavijas debidamente puesto a tierra.
INSTALACIÓN Esta Guía de uso y cuidado le proporciona instrucciones de funcionamiento generales sobre su modelo. Use su refrigerador solamente como en ella se indica. Antes de encender el refrigerador, siga estos importantes primeros pasos. Ubicación • Elija un lugar que esté cerca de un tomacorriente con conexión a tierra. No utilice un cordón de extensión ni un adaptador.
INSTRUCCIONES INVERSIÓN DE LA PUERTA Paso 1 Paso 3 Quite la cubierta de la bisagra superior. Desatornille y quite la bisagra superior y la cuña de la bisagra superior. Conserve los tornillos de modo que pueda utilizarlos en el lado opuesto. Desatornille y quite la bisagra intermedia y la cuña de la bisagra intermedia. Guarde los tornillos. Levante la puerta del refrigerador y retírela del electrodoméstico.
INSTRUCCIONES INVERSIÓN DE LA PUERTA Paso 5 Extraiga los montajes de clavijas derechas de la parte inferior de las puertas del refrigerador y congelador. En el lado opuesto, acople los montajes de clavijas de reemplazo (ubicados en la bolsa de plástico con el Manual de uso y cuidado) con un destornillador. Nota: Debe volver a utilizar los tornillos de los montajes de clavijas que se extraen en este paso cuando se sujetan los nuevos montajes.
CONSEJOS PARA EL AHORRO DE ENERGÍ A Lim pieza • Lave las piezas removibles del interior y exterior del refrigerador con un detergente suave y agua tibia. Séquelas. • No utilice hojas de afeitar ni otros instrumentos electrodoméstico cuando retire las etiquetas adhesivas. Si queda algún residuo de pegamento de la cinta, puede eliminarlo usando una mezcla de agua tibia y detergente suave. También puede tocar el residuo con el lado adhesivo de la cinta que ya haya retirado. No retire la placa de serie.
CARACTERÍ STI CAS 1 2 7 temp control 3 10 4 5 8 6 9 1 Estante del congelador 6 Cajones para frutas y verduras 2 Control del congelador 7 Compartimientos para puerta del congelador 3 Control del refrigerador 8 Compartimientos para puerta de ancho completo 4 Interruptor de la lámpara 9 Pies frontales ajustables 5 Estantes de vidrio 10 Luz interior (ubicada en el centro del compartimiento de control) Bandej as int er iores aj ust ables Luz int er ior ( algunos m odelos) Las bandeja
CUIDADO Y LIMPIEZA Limpieza del interior Lave las superficies interiores del refrigerador con una solución de dos cucharadas de bicarbonato de sodio en un cuarto de galón (1 litro) de agua tibia. Enjuague y seque. Extraiga el exceso de agua de la esponja o paño cuando limpie el área de los controles o cualquier pieza eléctrica. Lave las piezas removibles usando la solución de bicarbonato de sodio mencionada anteriormente o con detergente suave y agua tibia. Enjuague y seque.
ANTES DE SOLICITAR SERVICIO TÉCNICO Visite nuestro sitio en Internet: www.frigidaire.com. 1-800-944-9044 (Estados Unidos) 1-800-265-8352 (Canadá) PROBLEMA CAUSA REFRIGERADOR OPERATION • El refrigerador está enchufado a El refrigerador un circuito de interruptor de falla no funciona. de conexión a tierra. • El control de la temperatura está en la posición ‘OFF’ (apagado). • Es posible que el refrigerador no esté enchufado o que el enchufe esté flojo.
ANTES DE SOLICITAR SERVICIO TÉCNICO PROBLEMA SONIDOS Y RUIDOS Niveles de sonido más altos cuando el refrigerador está encendido. Niveles de sonido más altos cuando se enciende el compresor. El ventilador funciona cuando la temperatura ambiente es inferior a los 45° F (7° C). Se escuchan ruidos de golpes o chasquidos cuando se enciende el compresor. Ruido burbujeante o gorgoteante, como de agua hirviente. Ruido de vibración o traqueteo.
GARANTÍA DE LOS ELECTRODOMÉSTICOS GRANDES Su electrodoméstico está cubierto por una garantía limitada de un año. Durante un año a partir de la fecha original de compra, Electrolux cubrirá todos los costos de reparación o reemplazo de cualquier pieza de éste electrodoméstico que se encuentren defectuosas en materiales o mano de obra cuando el electrodoméstico se instala, utiliza y mantiene de acuerdo con las instrucciones proporcionadas. Exclusiones Esta garantía no cubre lo siguiente: 1.
Tout à propos de l'utilisation et l'entretien de votre réfrigérateur TA B L E D E S M AT I È R E S Mesures de sécurité importantes .........................2 Caractéristiques .................................................8 Installation ........................................................4 Entretien et nettoyage ........................................9 Door Reversal Instructions ..................................4 Avant de faire appel au service après-vente .......
MESURES DE SÉCURITÉ IMPORTANTES VEUILLEZ LIRE ET CONSERVER CES INSTRUCTIONS Ce guide d’utilisation et d’entretien contient des instructions refroidisseur à vin qu’en observant les instructions présentées dans ce guide. Ces instructions ne traitent pas de toutes les conditions d’utilisation et situations possibles. Il faut user de bon sens et de prudence durant l’installation, l’emploi et l’entretien de tout appareil électroménager.
MESURES DE SÉCURITÉ IMPORTANTES AVERTISSEMENT AVERTISSEMENT Électricité Sécurité des enfants • Le réfrigérateur doit être branché sur sa propre prise électrique (CA seulement) de 115 V, de 60 Hz et de 15 A. Le cordon d’alimentation de l’appareil est muni d’une fiche à trois broches avec mise à la terre afin de vous protéger contre les chocs électriques. Cette fiche doit être branchée directement sur une prise murale à trois alvéoles correctement mise à la terre.
INSTALLATION Ce guide d’utilisation et d’entretien contient des instructions d’utilisation spécifiques à votre modèle. Utilisez votre réfrigérateur en suivant les instructions présentées dans ce manuel seulement. Avant de mettre le réfrigérateur en marche, suivez ces étapes initiales importantes. Installation • Placez l’appareil près d’une prise électrique mise à la terre. N’utilisez pas de rallonge ni de fiche d’adaptation. • 43° C (110° F).
DOOR REVERSAL INSTRUCTIONS Étape n° 1 Étape n° 3 Retirez le couvre-charnière supérieur. Dévissez et retirez la charnière et la cale de charnière supérieures. Conservez les vis pour ensuite les utiliser sur le côté opposé. Dévissez et retirez la charnière et la cale de charnière centrales. Conservez les vis. Soulevez la porte du réfrigérateur et mettezla de côté.
DOOR REVERSAL INSTRUCTIONS Étape n° 5 Retirez les composants de la cheville droite au bas des portes du congélateur et du réfrigérateur. Sur le côté opposé, fixez les composants de la cheville de remplacement (que vous trouverez dans le sac de plastique contenant le Guide d’utilisation et d’entretien) à l’aide d’un tournevis.
CONSEI LS POUR ÉCONOMI SER L’ÉNERGI E RÉGLAGE DE LA COMMANDE DE TEMPÉRATURE Net t oyage Com m ande de t em pérat ure • Lavez toutes les pièces amovibles, l’intérieur et l’extérieur avec de l’eau tiède et un détergent liquide doux. Séchez. N’utilisez pas de nettoyants agressifs sur ces surfaces. La commande de température est située à l’intérieur du réfrigérateur et à l’intérieur du compartiment congélateur de certains modèles.
FEATURES 1 7 2 temp control 3 10 4 5 8 6 9 1 Clayette du congélateur 6 Bacs à légumes 2 Commande du congélateur 7 Balconnets du congélateur 3 Commande du réfrigérateur 8 Balconnets pleine largeur 4 Interrupteur de la lumière 9 Pieds avant réglables 5 Tablettes en verre 10 Lumière intérieure (logée au centre du boîtier de commande) Clayet t es int ér ieur es réglables Éclairage int ér ieur ( cer t ains m odèles) Les clayettes intérieures ajustables à positions multiples peuvent
ENTRETIEN ET NETTOYAGE Nettoyage de l’intérieur Nettoyez les surfaces internes du réfrigérateur avec une solution de deux cuillères à soupe (30 mL) de bicarbonate de soude dans 1L d’eau tiède. Rincez et séchez. Essorez bien l’eau de l’éponge ou du chiffon avant de nettoyer autour des commandes ou des composants électriques. Lavez les pièces amovibles en utilisant la solution de bicarbonate de soude mentionnée ci-dessus ou un détergent doux et de l’eau chaude. Rincez et séchez.
AVANT DE FAIRE APPEL AU SERVICE APRÈS-VENTE 1 800 944-9044 (États-Unis) 1 800 265-8352 (Canada) PROBLÈME Visitez notre site Web au www.frigidaire.com. CAUSE FONCTIONNEMENT DU REFROIDISSEUR • Le refroidisseur est branché à un Le refroidisseur ne circuit avec interrupteur de défaut fonctionne pas. à la terre. • La commande de température est à la position OFF (Arrêt). • Le refroidisseur n’est pas branché ou la fiche n’est pas bien enfoncée.
AVANT DE FAIRE APPEL AU SERVICE APRÈS-VENTE PROBLÈME SONS ET BRUITS Le refroidisseur émet des sons plus puissants lorsqu’il fonctionne. Lorsque le compresseur fonctionne, les bruits ont une plus longue durée. Le ventilateur se met en marche lorsque la température ambiante atteint 7° C (45° F). Un bruit sec ou un craquement se fait entendre lorsque le compresseur se met en marche. Il y a un bruit d’ébullition ou un gargouillement semblable à de l’eau qui bout. On entend un son de crécelle ou de vibration.
GARANTIE SUR LES APPAREILS ÉLECTROMÉNAGERS Informations surGROS la garantie des gros électroménagers Votre appareil est couvert par une garantie limitée d’un an. Pendant un an à partir de la date d’achat originale, Electrolux assumera les coûts des réparations ou du remplacement des pièces de cet appareil qui présente un défaut de fabrication ou de matériau, si cet appareil est installé, utilisé et entretenu selon les instructions fournies avec celui-ci.