All about the Use & Care of your Electric Wall Oven TABLE OF CONTENTS www.frigidaire.com USA 1-800-944-9044 2 3 7 8 Care and Cleaning . . . . . . . . . . . . . . . . . . . . . . . . 17 Before You Call . . . . . . . . . . . . . . . . . . . . . . . . . . . 21 Warranty . . . . . . . . . . . . . . . . . . . . . . . . . . . . . . . . 24 www.frigidaire.ca Canada 1-800-265-8352 A00327202 Rev B (November (2015) Product Record and Registration . . . . . . . . . . . . . . Important Safety Instructions . . .
PRODUCT RECORD AND REGISTRATION Product Record and Registration . . . . . . . . . . . . . . . . . 2 Important Safety Instructions . . . . . . . . . . . . . . . . . . . . 3 Before Setting Oven Controls . . . . . . . . . . . . . . . . . . . 7 Oven Controls Functions. . . . . . . . . . . . . . . . . . . . . . . . 8 Care and Cleaning . . . . . . . . . . . . . . . . . . . . . . . . . . . . 17 Before You Call. . . . . . . . . . . . . . . . . . . . . . . . . . . . . . . 21 Warranty . . . . . . . . . . . . . . . .
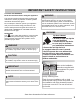
IMPORTANT SAFETY INSTRUCTIONS CAUTIONS AND WARNINGS Read all instructions before using this appliance. This manual contains important safety symbols and instructions. Please pay attention to these symbols and follow all instructions given. Do not attempt to install or operate your appliance until you have read the safety precautions in this manual. Safety items throughout this manual are labeled with a WARNING or CAUTION statement based on the risk type.
IMPORTANT SAFETY INSTRUCTIONS WARNING • • CAUTION Do not leave children alone - Children should not be left alone or unattended in the area where appliance is in use. They should never be allowed to sit or stand on any part of the appliance, including the storage drawer, lower broiler drawer, warmer drawer, or lower double oven. Stepping, leaning, or sitting on the door or drawers of an oven can result in serious injuries and also cause damage to the appliance. • Do not heat unopened food containers.
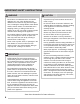
IMPORTANT SAFETY INSTRUCTIONS IMPORTANT INSTRUCTIONS FOR USING YOUR OVEN IMPORTANT Read and follow the below instructions and precautions for unpacking, installing, and servicing your appliance: • Remove all tape and packaging before using the oven. Destroy the carton and plastic bags after unpacking the oven. Never allow children to play with packaging material.
IMPORTANT SAFETY INSTRUCTIONS IMPORTANT INSTRUCTIONS FOR CLEANING YOUR OVEN GROUNDING INSTRUCTIONS WARNING CAUTION Before manually cleaning any part of the oven, be sure all controls are turned off and the oven is cool. Cleaning a hot oven can cause burns. Avoid fire hazard or electrical shock. Failure to follow this warning may cause serious injury, fire, or death. • Clean the oven regularly to keep all parts free of grease that could catch fire. Do not allow grease to accumulate.
BEFORE SETTING OVEN CONTROLS Oven Vent Location Oven Racks The oven vent is located just below the control panel (See Figure 1). When the oven is on, warm air passes through this vent. This venting is necessary for proper air circulation in the oven and good baking results. Do not block the oven vent. Steam or moisture may appear near the oven vent. This is normal. Flat oven racks may be used for most cooking needs and may be placed in most oven rack positions. .
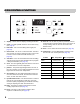
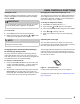
OVEN CONTROLS FUNCTIONS 1 2 10 3 11 9 6 7 4 5 12 8 13 14 1. display - shows time and displays cooking information. 2. clock - Use with up/down arrows to set the time of day (see page 9). 3. bake time - Use to set the baking time length (see page 12). 4. timer on-off - Use to set or cancel the timer. The timer does not start or stop the cooking process. Timer on-off is used to set the continuous bake function (see page 10). 5.
OVEN CONTROLS FUNCTIONS Setting the Clock Changing the Temperature Display (F or C) When the appliance is first plugged in or when the power supply to the appliance has been interrupted, the display will flash 12:00. The electronic oven control is set to display Fahrenheit (F) when shipped from the factory. The display may be set to show either Fahrenheit or Celsius (C) oven temperatures from 170°F to 550°F (77°C to 288°C).
OVEN CONTROLS FUNCTIONS Minute Timer To set the minute timer: 1. Press timer on-off. 2. Press to increase time in one minute increments. Press and hold to increase time in 10 minute increments. The timer can be set for any amount of time from 1 minute to 11 hours and 59 minutes. NOTE If is pressed first, the timer will advance to 11 hours and 59 minutes. 3. When the set time ends, the timer will beep three times and will continue to beep three times every minute until timer on-off is pressed.
OVEN CONTROLS FUNCTIONS Setting Bake To set bake: The oven can be programmed to bake at any temperature from 170°F to 550°F (77°C to 288°C). The factory preset automatic bake temperature is 350°F (176°C). 1. Press bake. The display will show — — —. CAUTION Always use pot holders or oven mitts when using the oven. When cooking, the oven interior, exterior, and oven racks become very hot which can cause burns.
OVEN CONTROLS FUNCTIONS Setting Bake Time Setting Bake Time and Start Time The bake time key sets the amount of time needed for baking. The oven will turn on immediately and stop automatically after the set bake time ends. The bake time and start time pads may be used to set the length of baking time and to delay the starting time (delayed timed bake). The oven will turn on at a later time and stop automatically after the set bake time ends.
OVEN CONTROLS FUNCTIONS Setting Broil To set broil: Use the broil feature to cook meats that require direct exposure to radiant heat for optimum browning results. When broiling always remember to arrange the oven racks while oven is still cool. Position the rack as suggested in Table 1 below. 1. Arrange the oven rack while oven is still cool. 2. Press broil. The display will show — —. 3. Press for HI broil or for LO broil. Most foods may be broiled at the HI broil setting.
OVEN CONTROLS FUNCTIONS Adjusting the Oven Temperature To adjust oven temperature: Your appliance has been factory calibrated and tested to ensure an accurate baking temperature. For the first few uses, follow your recipe times and temperature recommendations carefully. If you think the oven is cooking too hot or too cool for your recipe times, you can adjust the control so the oven cooks hotter or cooler than the temperature displayed. 1. Press bake while the oven is idle.
OVEN CONTROLS FUNCTIONS Self Clean A self cleaning oven cleans itself with temperatures well above normal cooking temperatures which eliminate soils completely or reduce them to a fine powdered ash that can be wiped away with a damp cloth. IMPORTANT Adhere to the following self clean precautions • Completely remove all oven racks and any accessories. If the oven racks are not removed they will lose their special coating properties and no longer slide in and out of the oven cavity easily.
OVEN CONTROLS FUNCTIONS Setting a Self Clean Cycle or a Delayed Start Self Clean Cycle. IMPORTANT Stopping or Interrupting a Self Clean Cycle To stop or interrupt a self cleaning cycle once it has been activated: 1. Press clear off. To start a self clean cycle immediately without a delay, skip steps 2 and 3 in the instructions below. 2. Once the oven has cooled down for about 1 hour and the door locked light has turned off, the oven door can be opened. 3.
CARE AND CLEANING Cleaning Various Parts of Your Oven Before cleaning any part of the oven, be sure all controls are turned off and the oven is cool. Remove spills and any heavy soiling as soon as possible. Regular cleaning will reduce the number of major cleaning later. Surface Type Recommendation Aluminum and Vinyl trim Painted body parts Painted decorative trims Plastic Use hot, soapy water and dry with a clean cloth.
CARE AND CLEANING General Cleaning Refer to the table at the beginning of this chapter for more information about cleaning specific parts of the range. Aluminum Foil, Aluminum Utensils, and Oven Liners WARNING Never cover any slots, holes, or passages in the oven bottom or cover an entire oven rack with aluminum foil or any other materials. Doing so blocks air flow through the oven and may cause carbon monoxide poisoning. Aluminum foil linings may trap heat, causing a fire hazard.
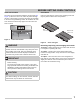
CARE AND CLEANING Removing and Replacing the Oven Door Oven door hinge locations CAUTION The door is heavy. For safe, temporary storage, lay the door flat with the inside of the door facing down. To remove the oven door: 1. Open oven door completely, horizontal with floor (See Figure 8). 2. Pull the door hinge locks on both left and right door hinges down from the oven frame completely toward the oven door (See Figure 9). A tool such as a small flat-blade screwdriver may be required.
CARE AND CLEANING Cleaning Exposed Bake Ovens WARNING The oven bake and broil elements may appear to have cooled after they have been turned off. The elements may still be hot and burns may occur if these elements are touched before they have cooled sufficiently. Replacing the Oven Light The interior oven lights are located at the rear of the oven cavity and are covered with a glass shield. The glass shield must be in place whenever the oven is in use (See Figure 13).
BEFORE YOU CALL Solutions to Common Baking Problems For best cooking results, heat the oven before baking cookies, breads, cakes, pies or pastries, etc. There is no need to preheat the oven for roasting meat or baking casseroles. The cooking times and temperatures needed to bake a product may vary slightly from your previously owned appliance. Baking Problems and Solutions Chart Baking Problems Causes Corrections Cookies and biscuits burn on the bottom.
BEFORE YOU CALL Solutions to Common Problems Before you call for service, review the following list. It may save you time and expense. Possible solutions are provided with the problem listed: Problem Solution Oven control panel beeps and displays error codes • Oven control has detected a fault or error condition. Press clear off to clear the error code. • Try bake or broil function. If the F or E code error repeats, turn off power to appliance, wait 5 minutes and then repower appliance.
BEFORE YOU CALL Oven smokes excessively when broiling. • Incorrect setting. See “Setting Broil”on page 13. • Meat too close to the broil element. Reposition broil rack to provide proper clearance between the meat and broil element. Remove excess fat from meat. Cut remaining fatty edges to prevent curling, but do not cut into lean. • Grease build up on oven surfaces. Regular cleaning is necessary when broiling frequently. Grease or food splatters will cause excessive smoking.
WARRANTY Your appliance is covered by a one year limited warranty. For one year from your original date of purchase, Electrolux will pay all costs for repairing or replacing any parts of this appliance that prove to be defective in materials or workmanship when such appliance is installed, used and maintained in accordance with the provided instructions. Exclusions This warranty does not cover the following: 1. 2. 3. 4. 5. 6. 7. 8. 9. 10. 11. 12. 13.