
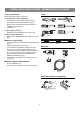
Information Sheet


8
INSTALLATION INSTRUCTIONS - FREESTANDING GAS RANGE
Read the following electrical
connection details before
connecting electricity to range.
Before servicing, disconnect electrical
supply at circuit breaker, fuse or power cord.
Electric requirements:
$GHGLFDWHGSURSHUO\JURXQGHGDQGSRODUL]HGEUDQFK
FLUFXLWSURWHFWHGE\DDPSFLUFXLWEUHDNHURUWLPHGHOD\
fuse. See serial plate for proper voltage.
Extension cord precautions:
%HFDXVHRISRWHQWLDOVDIHW\KD]DUGVXQGHUFHUWDLQ
conditions, we strongly recommend against the use of any
H[WHQVLRQFRUG
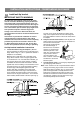
Please read carefully! For personal safe-
ty, this product must be properly grounded.
Do not, under any circumstances, cut or remove the third
JURXQGSURQJIURPWKHSRZHUFRUG6HH)LJ
:KHUHDVWDQGDUGWZRSURQJZDOOUHFHSWDFOHLV
encountered, it is the personal responsibility and obligation
of the customer to have it replaced with a properly ground-
ed three-prong wall receptacle.
Grounding instructions:
The power cord of this appliance is equipped with a
SURQJJURXQGLQJSOXJZKLFKPDWHVZLWKDVWDQGDUG
SURQJJURXQGLQJZDOOUHFHSWDFOHWRPLQLPL]HWKH
SRVVLELOLW\RIHOHFWULFVKRFNKD]DUGIURPWKLVDSSOLDQFH
The customer should have the wall receptacle and circuit
FKHFNHGE\DTXDOL¿HGHOHFWULFLDQWRPDNHVXUHWKH
UHFHSWDFOHLVSURSHUO\JURXQGHGDQGSRODUL]HG
)LJ
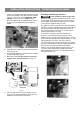
Burner cap lip
Burner cap
Correct burner cap placement
Fig. 14
Incorrect burner cap placement
)LJ
Check burner cap placement.
It is very important to be sure that all surface burner caps
and burner grates are properly installed and in the correct
locations before operating the appliance. Please note that
the burner heads are secured to the cooktop. The cook-
top is not removeable. Do not attempt to remove or lift
the cooktop.
7RSUHYHQWÀDUHXSVDQGDYRLGFUHDWLRQRI
harmful by-products, do not use the cooktop without all
burner caps properly installed to insure proper ignition and
JDVÀDPHVL]H
$OZD\VNHHSWKHEXUQHUFDSVDQGEXUQHUKHDGVLQSODFH
whenever the surface burners are in use. Do not allow
spills, food, cleaning agents or any other material to
HQWHUWKHJDVRUL¿FHKROGHURSHQLQJV
&KHFNDQGEHVXUHWKHVL]HRIHDFKEXUQHUFDSPDWFKHV
WKHVL]HRIWKHEXUQHUKHDG&KHFNDQGEHVXUHWKDWDOO
round style burner caps are correctly in place on round
burner heads.
Check and be sure that all oval style burner caps are cor-
UHFWO\LQSODFHRQRYDOEXUQHUKHDGVLIHTXLSSHG&KHFN
and be sure that all dual or twin style burner caps are cor-
UHFWO\LQSODFHRQGXDORUWZLQEXUQHUKHDGVLIHTXLSSHG
2QURXQGVW\OHEXUQHUVWKHEXUQHUFDSOLS6HH)LJ
VKRXOG¿WVQXJLQWRWKHFHQWHURIEXUQHUKHDGDQGEHOHYHO
5HIHUWR)LJVIRUFRUUHFWDQGLQFRUUHFWEXUQHUFDS
placement.
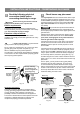
2QFHLQSODFH\RXPD\FKHFNWKH¿WE\JHQWO\VOLGLQJ
WKHEXUQHUFDSIURPVLGHWRVLGH)LJWREHVXUHLW
LVFHQWHUHGDQG¿UPO\VHDWHG:KHQWKHEXUQHUFDSOLS
makes contact inside the center of the burner head you will
be able to hear the burner cap click. Please note that the
EXUQHUFDSVKRXOG127PRYHRႇWKHFHQWHURIWKHEXUQHU
head when sliding from side to side.
)LJ
Do not, under any
circumstances, cut,
remove or bypass the
grounding prong.
Preferred method
Grounding
type wall
receptacle
Power
supply
cord with
3-prong
grounding
plug
5 6
Fig. 12