
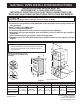
Installation Instructions


7
GAS WALL OVEN INSTALLATION INSTRUCTIONS
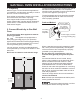
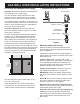
Gasket
SMALL End Towards
Regulator For
Natural Gas
Figure10
ENLARGED End
Towards Regulator
For L.P. Gas
Figure12
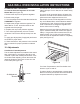
Pin
L.P.
Nat.
Waist-High
Broiler Orice
Orice
Air Shutter
Using a ½" wrench, turn down the adjustable orice
which injects gas into the oven burner. Turn orice
approximately 2½ turns until snug against the LP
metering pin. Do not overtighten.
8.LP/PropaneGasConversion
A.PressureRegulatorConversion
Note: Do not remove the Pressure Regulator.
ConvertthePressureRegulatorforusewithLP
Gas (see Figure 10).
If applicable, remove broiler or storage drawer by
pulling drawer out to stops. Lift drawer front to clear
stops and pull out.
Locate pressure regulator on lower back wall and
convert as shown in Figure 10.
1. Remove the cap from the pressure regulator.
2. Remove the plunger.
3. Turn the plunger upside down with the enlarged
end TOWARDS regulator.
4. Replace the plunger inside the regulator. The
letters LP or 10" W.C. should be visible on the
exposed end of the plunger.
5. Replace the cap on the pressure regulator.
NOTE: The type of gas pressure the regulator is set
for is indicated on the top of the plunger.
C.AdjustBroilerBurnerOrice(Self-Cleaning)
ModelsOnly)(see gure 12)
Figure11
Pin
L.P.
Nat.
Air Shutter
Oven Burner Orice
Orice
Using a ½" wrench, turn down the adjustable orice
which injects gas into the oven burner. Turn orice
approximately 2½ turns until snug against the LP
metering pin. Do not overtighten.
Regulator
B.AdjustOvenBurnerOrice(see Figure 11)