All about the Use & Care of your Gas Wall Oven TA B L E O F C O N T E N T S Setting Oven Controls.............................................7 Important Safety Instructions..................................3 Care & Cleaning (Cleaning Chart)..........................15 Grounding Instructions...........................................5 Care & Cleaning...................................................16 Oven Ignition.........................................................
WELCOME & CONGRATULATIONS Product Registration Register Your Product The PRODUCT REGISTRATION CARD should be filled in completely, signed and returned to Electrolux Home Products. Serial Plate Location Congratulations on your purchase of a new appliance! At Electrolux Home Products, we are very proud of our product and are completely committed to providing you with the best service possible. Your satisfaction is our number one priority.
IMPORTANT SAFETY INSTRUCTIONS DEFINITIONS Read all instructions before using this appliance. Save these instructions for future reference. This is the safety alert symbol. It is used to alert you to potential personal injury hazards. Obey all safety messages that follow this symbol to avoid possible injury or death. WARNING This symbol will help alert you to situations that may cause serious bodily harm, death or property damage. WARNING • All appliance can tip. • Injury to persons could result.
IMPORTANT SAFETY INSTRUCTIONS • Do not leave children alone—Children should not be left alone or unattended in the area where an appliance is in use. They should never be allowed to sit or stand on any part of the appliance. • DO NOT TOUCH INTERIOR OVEN BURNER OR INTERIOR SURFACES OF THE WALL OVEN UNTIL THEY HAVE COOLED. The oven heating burner may be hot even though the flames are not visible. Areas near the burner may become hot enough to cause burns.
IMPORTANT SAFETY INSTRUCTIONS IMPORTANT The California Safe Drinking Water and Toxic Enforcement Act requires the Governor of California to publish a list of substances known to the state to cause cancer, birth defects or other reproductive harm, and requires businesses to warn customers of potential exposure to such substances. SAVE THESE INSTRUCTIONS Grounding Instructions (electric ignition models only) IMPORTANT: READ AND SAVE THESE INSTRUCTIONS.
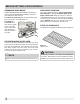
BEFORE SETTING OVEN CONTROLS ARRANGING OVEN RACKS ALWAYS ARRANGE OVEN RACKS WHEN THE OVEN IS COOL (PRIOR TO OPERATING THE OVEN). Always use oven mitts when using the oven. To remove an oven rack, pull the rack forward until it stops. Lift up front of rack and slide out. To replace an oven rack, fit the rack onto the guides on the oven walls. Tilt the front of the rack upward and slide the rack back into place.
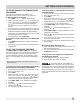
SETTING OVEN CONTROLS CONTROL PAD FEATURES READ THE INSTRUCTIONS CAREFULLY BEFORE USING THE OVEN. For satisfactory use of your oven, become familiar with the various features and functions of the oven as described below. Detailed instructions for each feature and function follow later in this Use & Care Guide. Note: The appearance of your oven control may differ slightly from the one illustrated below. However, all functions are the same.
SETTING OVEN CONTROLS Note: The time of day must first be set in order to operate the oven. TO SET THE CLOCK When the range is first plugged in, or when the power supply to the range has been interrupted, the display will flash "12:00". 1. Press CLOCK once (do not hold pad down). 2. Within 5 seconds, press and hold the or until the correct time of day appears in the display. Note: The clock cannot be changed during any timed bake or Self-Clean cycle. TO SET THE MINUTE TIMER: 1. Press TIMER ON-OFF. 2.
SETTING OVEN CONTROLS TO SET OR CHANGE THE TEMPERATURE FOR BAKING The oven can be programmed to bake at any temperature from 170°F to 550°F (77°C to 287°C). To Set the Controls for Baking: 1. Press BAKE. "— — —" appears in the display. 2. Within 5 seconds, press the or . The display will show "350°F (177°C)". By pressing and holding the or , the temperature can then be adjusted in 5°F increments (1°C if the control is set to display Celsius). 3.
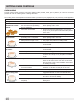
SETTING OVEN CONTROLS OVEN BAKING For best cooking results, heat the oven before baking cookies, breads, cakes, pies or pastries, etc. There is no need to preheat the oven for roasting meat or baking casseroles. The cooking times and temperatures needed to bake a product may vary slightly from your previously owned appliance. Baking Problems and Solutions Chart Baking Problems Causes • Cookies and biscuits put into Cookies and the oven before the preheating biscuits burn on the time is completed. bottom.
SETTING OVEN CONTROLS BROILING INFORMATION Grid Broiling is a method of cooking tender cuts of meat by direct heat under the broil element of the oven. Always use a broiler pan and grid for broiling. PREHEATING Preheating the oven is suggested when searing rare steaks. (Remove all utensils from the oven before preheating. Foods will stick if placed on hot metal.) To preheat, set the control(s) to BROIL as instructed in this Use & Care Guide.
SETTING OVEN CONTROLS BROIL Grid Broiling is a method of cooking tender cuts of meat by direct heat under the broil element of the oven. Be sure you center your broiler pan directly under the broil element for best results. Arrange oven rack while oven is still cool. Position the rack as needed. The broiler pan and its insert allow dripping grease to drain and be kept away from the high heat of the broiler. DO NOT use the pan without its insert. DO NOT cover the insert with foil.
SETTING OVEN CONTROLS SELF-CLEANING During the selfcleaning cycle, the outside of the oven can become very hot to the touch. DO NOT leave small children unattended near the appliance. The health of some birds is extremely sensitive to the fumes given off during the self-clean cycle of any wall oven. Move birds to another well ventilated room. DO NOT line the oven walls, racks, bottom or any other part of the appliance with aluminum foil.
SETTING OVEN CONTROLS STARTING THE SELECT SELF-CLEAN CYCLE For satisfactory results, use a 2 hour Self-Clean cycle for light soils or a 3 hour cycle for average to heavy soils. NOTE: The kitchen area should be well ventilated using an open window, ventilation fan or exhaust hood during the 1st Self-Clean cycle. This will help eliminate the normal odors associated with the 1st Self-Clean cycle. To Set the Controls for a Self-Clean Cycle: 1. Be sure the clock shows the correct time of day. 2. Press CLEAN.
GENERAL CARE & CLEANING CLEANING VARIOUS PARTS OF YOUR APPLIANCE Before cleaning any part of the appliance, be sure all controls are turned OFF and the appliance is COOL. REMOVE SPILL OVERS AND HEAVY SOILING AS SOON AS POSSIBLE. REGULAR CLEANING WILL REDUCE THE NUMBER OF MAJOR CLEANING LATER. Surfaces How to Clean Aluminum (Trim Pieces) Use hot, soapy water and a cloth. Dry with a clean cloth. DO NOT scour or use allpurpose cleaners, ammonia, powdered cleansers or commercial oven cleaner.
GENERAL CARE & CLEANING REMOVING AND REPLACING THE OVEN DOOR (HINGE A) CAUTION Hinge support Hinge lever hook The door is heavy. For safe, temporary storage, lay the door flat with the inside of the door facing down. To Remove Oven Door: 1. Open the door to the fully opened position. 2. Pull up the lock located on both hinge supports and engage it in the hinge lever hooks (Figure 1). You may have to apply a little downward pressure on the door to pull the locks fully over the hinge lever hooks. 3.
GENERAL CARE & CLEANING REMOVING AND REPLACING THE OVEN DOOR (HINGE B) CAUTION The door is heavy. For safe, temporary storage, lay the door flat with the inside of the door facing down. To Remove Oven Door: 1. Open oven door completely (horizontal with floor - See Fig. 1). 2. Pull the door hinge locks on both left and right door hinges down from the oven frame completely towards the oven door (See Fig. 2). A tool such as a small flat-blade screwdriver may be required. 3.
GENERAL CARE & CLEANING TO REMOVE AND REPLACE OVEN BOTTOM To Remove the Oven Bottom: 1. Lift up the lift tab at the back of the oven bottom 2. Slide oven bottom out, and lift it up and out. To Replace the Oven Bottom: 1. Slide horizontal tabs on back of oven bottom into the holes at the back of oven cavity. 2. Lower the front of the oven bottom so locking flange fits into locking channel. 3. Replace lift tab to hold oven bottom in place.
ADJUSTING THE OVEN TEMPERATURE Your oven control has been precisely set at the factory. This setting may differ from your previous oven however, so your recipe times may not give you the results you expect. If you think that the oven is cooking too hot or too cool for your recipe times, you can adjust the control so that the oven cooks hotter or cooler than the temperature displayed. TO ADJUST OVEN TEMPERATURE: 1. Press BAKE. 2. Set the temperature to 550°F (287°C) by pressing and holding the . 3.
BEFORE YOU CALL AVOID SERVICE CHECKLIST Before you call for service, review this list. It may save you time and expense. The list includes common occurrences that are not the result of defective workmanship or materials in this appliance. This oven is equipped with an electronic oven controller (some models). Among its many features is a full time oven circuit diagnostics system.
BEFORE YOU CALL OCCURRENCE POSSIBLE CAUSE/SOLUTION Oven smokes excessively during broiling. Door is open. Door should be closed during broiling. Meat too close to the broil burner. Reposition the rack to provide more clearance between the meat and the broiler. Preheat broil element for quick searing operation. Meat not properly prepared. Remove excess fat from meat. Slash remaining fatty edges to prevent curling, but do not cut into the lean. Grid on broiler pan wrong side up.
MAJOR APPLIANCE WARRANTY Your appliance is covered by a one year limited warranty. For one year from your original date of purchase, Electrolux will pay all costs for repairing or replacing any parts of this appliance that prove to be defective in materials or workmanship when such appliance is installed, used and maintained in accordance with the provided instructions. Exclusions This warranty does not cover the following: 1.