
Installation instructions


GAS WALL OVEN INSTALLATION INSTRUCTIONS
8
9.NaturalGasConversion
ConvertthePressureRegulatorforusewith
Natural Gas (see Figure 10)
A. Remove the cap from the pressure regulator.
B. Remove the plunger.
C. Turn the plunger around so that the small end is
TOWARDS the regulator.
D. Replace the plunger inside the regulator. The
letters NAT or 4" W.C. should be visible on the
exposed end of the plunger.
E. Replace the cap on the pressure regulator.
F. Turn orice approximately 2½ turns counter-
clockwise. This will move the spud away from the
pin.
G. Apply gas, adjust pilots (if equipped) and burner
air shutter for proper ame.
H. There should be 4" WC pressure in the manifold
after conversion for proper operation on Natural
Gas.
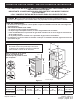
10.Adjustments
The air shutter adjustment is located on the venturi
tube, which sets on the orice of the valve, and
is locked in place with a Phillips head screw. If the
air shutter needs adjusting, loosen the screw and
rotate the shutter to allow more or less air to the
burner tube (see Figure 13).
Air Adjustment
Shutter
Loosen
Figure13
For Natural Gas, the air shutter should be approxi-
mately half open. For LP Gas, the air shutter nearly
full open.
Too much air will cause the ame to lift away from
the burner. Too little air will cause the ame to turn
yellow at the outer edges and soot to form.
Remember, the oven will be shipped from the fac-
tory set for Natural Gas, unless otherwise stated. If
connecting to LP gas, be sure to follow procedure
under "Conversion" to change the regulator and
burner orice to the LP setting.
To observe the burner ame while making adjust-
ments, the oven bottom and the ame spreader
must be removed.
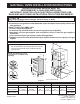
1. Remove the two screws from the rear of the
oven bottom. Lift the oven bottom out of the
cavity (see Figure 14a).
2. The ame spreader is attached with two tabs
or shoulder brackets and secured with three
screws. Remove The screws, slide ame sprea-
der back, and lift the spreader out of the oven
cavity (see Figure 14b).
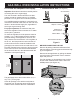
Figure12
Pin
L.P.
Nat.
Air Shutter
Oven Burner Orice
Orice
Using a ½" wrench, turn down the adjustable orice
which injects gas into the oven burner. Turn orice
approximately 2½ turns until snug against the LP
metering pin. Do not overtighten.
Regulator
B.AdjustOvenBurnerOrice(see Figure 12)
Figure14aFigure14b