REFRIGERATOR use & care Introduction........................................................2 Controls and Settings .................................. 13 Important Safety information.....................3 Storage Features............................................ 14 Features (Frigidaire).......................................5 Normal Operating Sounds.......................... 16 Installation..........................................................6 Care and Cleaning..............................
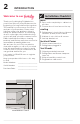
INTRODUCTION Welcome to our family Thank you for bringing Frigidaire into your home! We see your purchase as the beginning of a long relationship together. This manual is your resource for the use and care of your product. Please read it before using your appliance. Keep it handy for quick reference. If something doesn’t seem right, the troubleshooting section will help you with common issues.
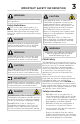
IMPORTANT SAFETY INFORMATION WARNING Please read all instructions before using this appliance. Safety Definitions This is the safety alert symbol. It is used to alert of potential personal injury hazards. Obey all safety messages that follow this symbol to avoid possible injury or death. DANGER DANGER indicates an imminently hazardous situation which, if not avoided, will result in death or serious injury. CAUTION CAUTION Risk of fire or explosion. Flammable refrigerant used.
IMPORTANT SAFETY INFORMATION Proper Disposal of your Appliance • Unplug the appliance before cleaning and before replacing the AC LED light bulb to avoid electrical shock. Use only a 5-watt or less AC LED light bulb. • Performance may be affected if the voltage varies by 10% or more. Operating the refrigerator with insufficient power can damage the compressor. Such damage is not covered under your warranty.
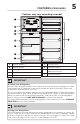
FEATURES (FRIGIDAIRE) *Features may vary according to model H G F E I D C B A A Crisper Drawer F Freezer Shelf B Crisper Cover G Freezer Control C Sliding Deli Drawer* H D Full Shelves Ice Maker Electrical/ Water Inlet Cover E Refrigerator Control I Fixed Door Bins IMPORTANT Cleaning your Refrigerator Remove tape and glue residue from surfaces before turning the refrigerator on. Rub a small amount of liquid dish soap over the adhesive with your fingers.
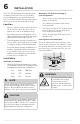
INSTALLATION This Use & Care Guide provides general operating instructions for your model. Use the appliance only as instructed in this Use & Care Guide. Before starting the unit, follow these important first steps. Location Guidelines for final positioning of your refrigerator: • All 4 corners of the cabinet must rest firmly on the floor. • The cabinet should be level at the front and rear. • Choose a place that is near a grounded electrical outlet.
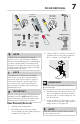
DOOR REMOVAL Socket Wrench Set T20 & T25 Torx Head Screwdriver 5 0 T2 Top Hinge Screw 5/16" (8mm) T20 Bottom Hinge Screw Hammer Putty Knife * Optional Tool: T25 Center Hinge Screw NOTE * Hand held Drill/Driver 3. * We do not recommend to using an electric tool to unscrew and screw parts because it may damage the screw threads or cause screw heads to be stripped off. However, if you have an electric tool with torque control, the torque cannot be larger than 6 N·m (53 in.lb).
DOOR REMOVAL 6. Using a 5/16 in. socket, unscrew the center hinge pin. Open the refrigerator door 90º, and, by hand, remove the pin, and lift the door off the bottom hinge pin. IMPORTANT 13. Install the bottom hinge covers. 14. Using a putty knife gently remove the 3 center hinge hole covers (see Figure 4A) and install on the opposite side of the cabinet (see Figure 4B). A B Place the door on a padded surface to avoid damage. 7.
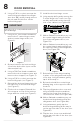
DOOR REMOVAL A A B B Refrigerator Door Bottom C Figure 6 IMPORTANT Freezer Door Bottom C Figure 7 IMPORTANT Due to use over time, the door closer might get slightly deformed. Use pliers to adjust the door closer to fit inside the endcap slot Due to use over time, the door closer might get slightly deformed. Use pliers to adjust the door closer to fit inside the endcap slot 23. Using a T25 Torx Head screwdriver, attach the center hinge with the 3 center hinge screws. 33.
WATER SUPPLY CONNECTION Ice Maker Models Only WARNING To avoid electric shock, which can cause death or severe personal injury, disconnect the refrigerator from electrical power before connecting a water supply line to the refrigerator. CAUTION To Avoid Property Damage: • Use stainless steel braided tubing for the water supply line. Do not use water supply tubing made of ¼ in. plastic.
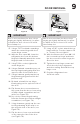
WATER SUPPLY CONNECTION To Connect the Water Supply Line To the Ice Maker Inlet Valve 1. Disconnect the refrigerator from the electrical power source. 2. Place the end of water supply line into a sink or bucket. Turn ON the water supply and flush the supply line until the water is clear. Turn OFF the water supply at the shutoff valve. 3. Plastic Water Tubing to Ice Maker Fill Tube ½" Clamp Water Valve Bracket Remove the plastic cap from the water valve inlet and discard the cap. Valve Inlet 4.
ICE MAKER NOTE Automatic ice makers are optional accessories that you may install in most models at any time. Visit www.frigidaire.com for information about Ice Maker Kit 117000. If your refrigerator has an automatic ice maker, it will produce minimal ice during the first 24 hours of operation. Air in new plumbing lines may cause the ice maker to cycle 2 or 3 times before making a full tray of ice. With no usage, it will take approximately 1 to 2 days to fill the ice container.
CONTROLS AND SETTINGS 13 Cool Down Period Temperature Adjustment To ensure safe food storage, allow the refrigerator to operate with the doors closed for at least 8 hours before loading it with food. Adjust the temperature gradually: adjust the knob in small increments, allowing the temperature to stabilize. Refrigerator and Freezer Controls (some models) NOTE When first turning the refrigerator on, adjust the control to Recommended. After 24 hours, adjust the controls as needed.
STORAGE FEATURES NOTE A Automatic ice makers are optional accessories that you may install in most models at any time. Visit www.frigidaire.com for information about Ice Maker Kit 117000. Shelf Adjustment CAUTION Do not clean glass shelves or covers with warm water when they are cold. Shelves and covers may break if exposed to sudden temperature changes or impact, such as bumping. Tempered glass is designed to shatter into many small, pebble-size pieces. This is normal.
STORAGE FEATURES 15 Crisper Humidity Control Sliding Deli Drawer (some models) The crisper humidity control, present on the crisper drawers of some models, allows you to adjust the humidity within the crisper. This can extend the life of fresh vegetables that keep best in high humidity. Use the deli drawer for storage of luncheon meats, spreads, cheeses, and other deli items. Please be sure to support the glass when removing the drawer.
NORMAL OPERATING SOUNDS Understanding the sounds you may hear Your new, high-efficiency refrigerator may introduce unfamiliar sounds. These sounds normally indicate your refrigerator is operating correctly. Some surfaces on floors, walls, and kitchen cabinets may make these sounds more noticeable. NOTE Following is a list of major components in your refrigerator and the sounds they can cause: A Evaporator Refrigerant through the evaporator may create a boiling or gurgling sound.
CARE AND CLEANING Protecting your investment Keeping your refrigerator clean maintains appearance and prevents odor build-up. Wipe up any spills immediately and clean the freezer and refrigerator compartments at least twice a year. When cleaning, take the following precautions: • Never use CHLORIDE or cleaners with bleach to clean stainless steel. • Do not wash any removable parts in a dishwasher. • Always unplug the electrical power cord from the wall outlet before cleaning.
CARE AND CLEANING Care and Cleaning Tips Part What To Use Tips and Precautions Interior & Door Liners • Soap and water • Baking soda and water Use 2 tbsp of baking soda in 1 qt of warm water. Be sure to wring excess water out of sponge or cloth before cleaning around controls, light bulb or any electrical part. Door Gaskets • Soap and water Wipe gaskets with a clean soft cloth. Drawers & Bins • Soap and water Use a soft cloth to clean drawer runners and tracks.
TROUBLESHOOTING 19 Let us help you troubleshoot your concern! This section will help you with common issues. If you need us, visit our website, chat with an agent, or call us. We may be able to help you avoid a service visit. If you do need service, we can get that started for you! 1-800-374-4432 (United States) Frigidaire.com 1-800-265-8352 (Canada) Frigidaire.ca Common Occurences Refrigerator does not run. • Ensure the plug is tightly pushed into an electrical outlet.
LIMITED WARRANTY Your appliance is covered by a one year limited warranty. For one year from your original date of purchase, Electrolux will pay all costs for repairing or replacing any parts of this appliance that prove to be defective in materials or workmanship when such appliance is installed, used and maintained in accordance with the provided instructions. Exclusions This warranty does not cover the following: 1.
welcome home Our home is your home. Visit us if you need help with any of these things: owner support accessories service registration (See your registration card for more information.) Frigidaire.com 1-800-374-4432 Frigidaire.