
Complete Owner's Guide


11
DOOR REMOVAL
Hinge
Pin
Center
Hinge
Screws
Hinge
Hole
Plug
Figure 3
Figure 4
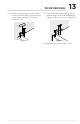
Door
Stopper
Door
Stopper
Screw
Bottom Hinge
Pin
Figure 5
Figure 6
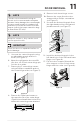
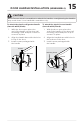
5. Unscrew the center hinge pin using
an adjustable wrench and set it
aside (see Figure 3).
6. Open the refrigerator door and lift
the door o of the bottom hinge pin.
Set the door aside.
7. Remove the 3 center hinge screws
using a Phillips screwdriver and set
the center hinge aside (see Figure 3).
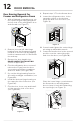
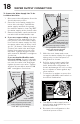
8. Remove the 3 pan head screws on
the opposite side of the center hinge
(Figure 4) and install them in the holes
where the center hinge was attached.
9. Remove both lower hinge covers.
10. Remove the screw from the door
stopper with a Phillips screwdriver
(see Figure 5).
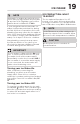
11. Unscrew the bottom hinge pin from
the right-hand position using an ad-
justable wrench (see Figure 5).
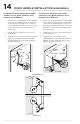
12. Install the bottom hinge pin in the
left-hand hole of the left-hand lower
hinge (see Figure 6).
13. Flip the door stopper. Reinstall the
door stopper on top of the bottom
hinge with the screw (see Figure 6).
IMPORTANT
Place the door on a padded surface to
avoid damage.
NOTE
* We do not recommend to using an
electric tool to unscrew and screw parts
because it may damage the screw threads
or cause screw heads to be stripped o.
However, if you have an electric tool with
torque control, the torque cannot be larg-
er than 6 N·m (53 in.lb).
NOTE
Keep the screws so they can be used
on the opposite side.