All about the Use & Care of your Portable Air Conditioner TA B L E O F C O N T E N T S Important Safety Instruc Imp uctio tions ns ... . ..... .......... ...... ......... ......... 2-3 Air Conditioner Features ................... ............... .......... 8 Produc uctt Registration ...... ..... .......... .... .......... .......... .. ....... . ........... . 4 9Op rating Instructions Ope ons ........................................... 9-11 Normal Sound un s .................. ..... ...... . ...... .
Important Safety Instructions NO OTE: This USE & CARE MANUAL provides specific operating instructions for your model. Use the Portable air conditioner only as instructed in this USE & CARE MANUAL. These instructions are not meant to cover every possible condition and situation that may occur. Common sense and caution must be practiced when installing, operating, and maintaining any appliance.
Important Safety Instructions SA AFETY PRECAUTIONS CAUTION! Avoid Injury or damage to the unit or other property Provide occasional ventilation during use. Do not direct airflow at fireplaces or other heat related sources as this could cause flare ups or make units run excessively. Do not climb on or place objects on the unit. Do not hang objects off the unit. Do not place containers with liquids on the unit.
Product Registration & Normal Sounds Product Registration Record Your Model and Serial Numbers Record in the space provided below the model and serial numbers. On all models, the serial plate is located on the side of the cabinet. Model No. Serial No. Register Your Product The self-addressed PRODUCT REGISTRATION CARD should be filled in completely, signed and returned to the Frigidaire Company.
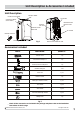
Unit Description & Accessories Included Unit Description ROOM AIR DISCHARGE CONTROL PANEL AIR INTAKE CARRYING HANDLE (BOTH SIDES) DEHUMIDIFYING DRAIN OUTLET EXHAUST AIR OUTLET REMOTE SIGNAL RECEIVER AIR INTAKE REMOTE CONTROL CASTOR Fig.
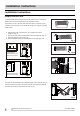
Installation Instructions Installation Instructions EXHAUSTING HOT AIR In the COOLING Mode the appliance must be placed close to a window or opening so that the warm exhaust air can be ducted outside. First position unit on a flat floor and make sure there’s a minimum of 12" clearance around the unit, and is within the vicinity of a single circuit outlet power source. Extend the side of hose 1. Extend either side of the hose (Fig. 3) and screw the hose to adaptor A (Fig. 4) . 2.
Installation Instructions Installation Instructions (continued) Installation in a double-hung sash window 1. Cut the foam seals(adhesive type) to the proper lengths and attach them to the window and stool. (Fig. 10) 2. Open the window sash and place the window slider kit on the window stool (Fig. 11). Attach the window slider kit to the window stool. Adjust the length of the window slider kit according to the width of window. Screw down the two screws on the window slider kit. See Fig.11.
Air Conditioner Features Air Conditioner Features CONTROL PANEL Fig. 21 REMOTE CONTROL MODE INDICATION FAN SPEED SELECTION TEMPERATURE BUTTON FAN SPEED SELECTOR MODE SELECTOR TIMER BUTTONS SLEEP BUTTON SWING BUTTON ON/OFF BUTTON RESET + LOCK PIN BUTTONS Fig. 22 Battery Size: AAA Warning: 1. Do not mix old and new batteries. Do not mix alkaline, standard (carbon-zinc), or rechargeable (nickelcadmium) batteries. 2. This device complies with Part 15 of the FCC Rules.
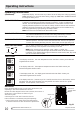
Operating Instructions Operating Instructions NOTE The following instructions represent the Control Panel, the same instructions can be used for the Remote Control. (except timer function) COOLING MODE: In this mode the exhaust adaptor hose MUST be used. 1. Press the MODE button until the "Cool" indicator lights. 2. Press the " " Temp buttons for desired setting. 3. Press the FAN button for desired fan speed. HEATING MODE: (on some models) In this mode you do not need to use the exhaust adaptor hose.
Operating Instructions Operating Instructions (continued) temperature display. Use the same way as above to set the delay start timing by pressing TIMER ON button. To cancel the timer setting, simply tap TIMER ON or TIMER OFF button to change the timing to 0.0. SLEEP OPERATION: In this mode the selected temperature will increase by 2 °F 30 minutes after the mode is selected. The temperature will then increase by another 2 °F after an additional 30 minutes.
Operating Instructions, CARE & CLEANING Operating Instructions (continued) ADDITIONAL THINGS YOU SHOULD KNOW Now that you have mastered the operating procedure, here are more features in your control that you should become familiar with. The "Cool" circuit has an automatic 3 minute time delayed start if the unit is turned off and on quickly. This prevents overheating of the compressor and possible circuit breaker tripping. The fan will continue to run during this time.
Before You Call Before calling for service, review this list. It may save you time and expense. This list includes common occurrences that are not the result of defective workmanship or materials in this appliance. OCCURRENCE SOLUTION Air conditioner will not operate. Wall plug disconnected. Push plug firmly into wall outlet. Plug Current Device Tripped. Press the RESET button. House fuse blown or circuit breaker tripped. Replace fuse with time delay type or reset circuit breaker. Control is OFF.
Major Appliance Limited Warranty Your appliance is covered by a limited one-year warranty and a limited 2-5 year warranty on the sealed system (the compressor, condenser, evaporator and tubing). For one year from your original date of purchase, Electrolux will pay all costs for repairing or replacing any parts of this appliance that prove to be defective in materials or workmanship when such appliance is installed, used and maintained in accordance with the provided instructions.