
Owner's Manual


7
(continued)
2009 Electrolux Home Products, Inc. All rights reserved.
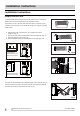
Installation in a double-hung sash window
3. Close the window sash securely a
g
ainst the window slider kit. (Fi
g
. 13
)
7. Cut the foam seal to an appropriate len
g
th and seal the open
g
ap
between the top window sash and outer window sash, as shown in Fi
g
.15.
2. O
p
en the window sash and
p
lace the window slider kit on the window stool
(Fi
g
. 11). Attach the window slider kit to the window stool. Ad
j
ust the len
g
th
of the window slider kit accordin
g
to the width of window. Screw down the
two screws on the window slider kit. See Fi
g
.11. Cut the ad
j
ustable window
slider kit if the width of window is less than 26.6 inches (Fi
g
. 12).
1. Cut the foam seals(adhesive type) to the proper len
g
ths and attach them
to the window and stool. (Fi
g
. 10
)
Installation in a sliding sash window
3. Close the slidin
g
sash securely a
g
ainst the window slider kit. (Fi
g
. 18
)
1. Cut the foam seals(adhesive type) to the proper len
g
ths and attach them
to the window frame. See Fi
g
.16.
2. O
p
en the window sash and
p
lace the window slider kit on the window stool.
See Fi
g
.17. Attach the window slider kit to the window stool. Ad
j
ust the
len
g
th of the window slider kit accordin
g
to the hei
g
ht of window. Screw
down the two screws on the window slider kit. See Fi
g
.17. Cut the ad
j
ustable
window slider kit if the hei
g
ht of window is less than 26.6 inches (Fi
g
. 12).
6
. Cut the foam seal to an appropriate len
g
th and seal the open
g
ap
between the slidin
g
sash and outer window sash, as shown in Fi
g
.19.
Fig. 10
Foa
m se
a
l A
(
adhesive t
yp
e
)
Fig. 16
Foa
m se
a
l
(
adhesive t
yp
e
)
Installation Instructions
Installation Instructions
Fig. 19
Foa
m se
a
l
Fig. 11
W
in
do
w sli
d
er ki
t
W
in
do
w st
oo
l
26.6"~48.5"
sc
r
e
w
s
Fig. 20
Fig. 12
Cut this side to fit
y
our windo
w
4
. Drive two 1
/
2" screws to secure the window slider kit to the window sash.
(FIG. 13)
6
.
To secure lower sash in place, attach right angle sash lock with
1/2″ (12.7mm) screw as shown (FIG. 14).
NOTE: It is difficult to lock the windows with the sash lock for Vinyl-Clad
windows, so you can use lock by window itself.
7. To secure the slidin
g
sash in place, attach ri
g
ht an
g
le sash lock with 1/2"
(12.7mm) screw as shown.(Fi
g
.20
)
5
. Sec
u
re the win
do
w sli
d
er kit t
o
the win
do
w st
oo
l
(FIG. 13)
:
A: For wooden windows: Use 3/4" screws for securin
g
.
B: For Vin
y
l-Clad windows: Use
1/2″ hex head cap screws
for securin
g
.
4
. Drive two 1
/
2" screws to secure the window slider kit to the window sash.
(Fi
g
. 18
)
5. Drive two 3/4" screws to secure the window slider kit to the window stool.
(Fi
g
. 18
)
Fig. 14
Fig. 15
Foam seal
m
3
/
4″ screws or 1
/
2″
hex head ca
p
screw
s
1
/
2″ screw
s
Fig. 13
W
in
do
w sli
d
er ki
t
W
in
do
w st
oo
l
sc
r
e
w
s
Fig. 17
26.6"~48.5"
W
indow stool
W
in
do
w sli
d
er kit
3
/
4″ screw
s
1
/
2″ screw
s
Fig. 18
W
in
do
w st
oo
l
W
in
do
w sli
d
er kit