All about the Use & Care of your Compact Refrigerator TA B L E O F C O N T E N T S Important Safety Instructions.......................2 Optional Features......................................10 Features At A Glance...................................4 Care & Cleaning........................................11 Installation.................................................5 Before You Call.........................................12 Door Removal/Reversal Instructions.............
IMPORTANT SAFETY INSTRUCTIONS WARNING Please read all instructions before using this refrigerator. For your Safety • DO NOT store or use gasoline, or other flammable liquids in the vicinity of this or any other appliance. Read product labels for warnings regarding flammability and other hazards. • DO NOT operate the refrigerator in the presence of explosive fumes. • Avoid contact with any moving parts of automatic ice maker. • Remove all staples from the carton.
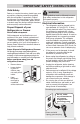
IMPORTANT SAFETY INSTRUCTIONS Child Safety Destroy or recycle the carton, plastic bags, and any exterior wrapping material immediately after the refrigerator is unpacked. Children should never use these items to play. Cartons covered with rugs, bedspreads, plastic sheets or stretch wrap may become airtight chambers, and can quickly cause suffocation.
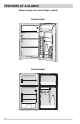
FEATURES AT A GLANCE Features may vary according to model Some Models Some Models 4
INSTALLATION This Use & Care Guide provides general operating instructions for your model. Use the refrigerator only as instructed in this Use & Care Guide. Before starting the refrigerator, follow these important first steps. Location • Choose a place that is near a grounded electrical outlet. Do Not use an extension cord or an adapter plug. • If possible, place the refrigerator out of direct sunlight and away from the range, dishwasher or other heat sources.
DOOR REMOVAL/REVERSAL INSTRUCTIONS Tools Necessary: or PhillipsTM Head NOTE NOTE Socket Wrench Set or Adjustable Wrench 3/8" (10mm) Fixed Wrench Single door models do not include the middle hinge steps The direction in which your refrigerator doors open (door swing) can be reversed, from left to right or right to left, by moving the door hinges from one side to the other. Reversing the door swing should be performed by a qualified person.
DOOR REMOVAL/REVERSAL INSTRUCTIONS IMPORTANT 7. Tilt the unit back, remove the adjustable feet from both sides then unscrew bottom hinge. For single door units, skip steps 4 through 6. 4. Hold the door in place while unscrewing the middle hinge, then lift the lower door and place it on a soft pad to avoid damage. Bottom of Unit Remove adjustable feet Remove middle hinge 5. Move pin hole plug (top of refrigerator door) from left side to right side. Remove bottom hinge 8.
DOOR REMOVAL/REVERSAL INSTRUCTIONS 9. Locate left bottom hinge (in accessory bag). 13 Locate the top left hinge and the top left hinge cover and attach to the top of unit. Attach the screw cover to the top right side. Attach top hinge & cover 10. Attach the left bottom hinge. Replace both adjustable feet. Stand the unit upright. Attach bottom hinge IMPORTANT For single door units, skip steps 11 through 12. 11 Place the refrigerator door on the lower hinge.
CONTROLS Cool Down Period For best performance, allow 4 hours for the refrigerator to cool down completely. The refrigerator will run continuously for the first several hours. Temperature Control The temperature control is located inside the refrigerator compartment of the unit. The temperature is factory preset to provide satisfactory food storage temperatures. However, the temperature control is adjustable to provide a range of temperatures for your personal satisfaction.
OPTIONAL FEATURES CAUTION Do not clean glass shelves or covers with warm water when they are cold. Shelves and covers may break if exposed to sudden temperature changes or impact, such as bumping. Tempered glass is designed to shatter into many small, pebble-size pieces. This is normal. Glass shelves and covers are heavy. Use both hands when removing them to avoid dropping. Shelf Adjustment Refrigerator shelves are easily adjusted to suit individual needs. Before adjusting the shelves, remove all food.
CARE & CLEANING Part Care & Cleaning Tips What To Use Tips and Precautions Interior & Door Liners • Soap and water • Baking soda and water Use 2 tablespoons of baking soda in 1 quart of warm water. Be sure to wring excess water out of sponge or cloth before cleaning around controls, light bulb or any electrical part. Door Gaskets • Soap and water Wipe gaskets with a clean soft cloth. Drawers & Bins • Soap and water Use a soft cloth to clean drawer runners and tracks.
BEFORE YOU CALL 1-800-944-9044 (United States) 1-800-265-8352 (Canada) Visit our web site at www.frigidaire.com. Common Occurrences Before calling for service, review this list. It may save you time and expense. This list includes common occurrences that are not the result of defective workmanship or materials in this appliance. Refrigerator does not run. • Ensure plug is tightly pushed into electrical outlet. • Check/replace fuse with a 15 amp time-delay fuse. Reset circuit breaker.
MAJOR APPLIANCE WARRANTY Your appliance is covered by a one year limited warranty. For one year from your original date of purchase, Electrolux will pay all costs for repairing or replacing any parts of this appliance that prove to be defective in materials or workmanship when such appliance is installed, used and maintained in accordance with the provided instructions. Exclusions This warranty does not cover the following: 1.
Todo acerca del uso y cuidado de su compacto refrigerador ÍNDICE Instrucciones importantes de seguridad........2 Características opcionales..........................10 Características generales..............................4 Cuidado y limpieza....................................11 Instalación..................................................5 Antes de solicitar servicio técnico...............12 Instrucciones de desinstalación de la puerta.....6 Garantía de los electrodomésticos grandes.....13 www.
INSTRUCCIONES IMPORTANTES DE SEGURIDAD ADVERTENCIA Lea todas las instrucciones antes de usar este refrigerador. Para su seguridad • • • • NO almacene ni utilice gasolina ni otros líquidos inflamables en las inmediaciones de este o cualquier otro artefacto. Lea las etiquetas de los productos para informarse sobre la combustibilidad y otros peligros. NO haga funcionar el refrigerador en la presencia de vapores explosivos. Evite cualquier contacto con las piezas móviles del fabricador automático de hielo.
INSTRUCCIONES IMPORTANTES DE SEGURIDAD Seguridad de los niños Destruya o recicle inmediatamente la caja de cartón, las bolsas de plástico y cualquier otro material de empaque exterior después de que el refrigerador sea desempacado. Los niños nunca deben jugar con estos objetos. Las cajas de cartón cubiertas con alfombras, colchas, hojas de plástico o envolturas elastizadas y cualquier otro material de empaque pueden convertirse en cámaras sin aire y causar asfixia rápidamente.
CARACTERÍSTICAS GENERALES Las características pueden variar según el modelo Algunos Modelos Algunos Modelos 4
INSTALACIÓN Esta Guía de uso y cuidado le proporciona instrucciones de funcionamiento generales sobre su modelo. Use su refrigerador solamente como en ella se indica. Antes de encender el refrigerador, siga estos importantes primeros pasos. Consejos para la colocación del refrigerador en su ubicación final: Ubicación Para nivelar el gabinete usando las patas frontales de nivelado: • • • Elija un lugar que se encuentre próximo a un tomacorriente con conexión a tierra.
INSTRUCCIONES DE DESINSTALACIÓN DE LA PUERTA Herramientas necesarias: or Destornillador de punta PhilipsMR NOTA NOTA Juego de llaves de cubo or Llave ajustable Llave fija de 10 mm (3/8") Los modelos de una sola puerta no incluyen los pasos de las bisagras centrales. La dirección en la que se abre la puerta del refrigerador (giro de la puerta) puede ser invertida de izquierda a derecha o de derecha a izquierda cambiando las bisagras de la puerta de un lado al otro.
INSTRUCCIONES DE DESINSTALACIÓN DE LA PUERTA IMPORTANTE Para las unidades de una sola puerta, saltee los pasos 4 al 6. 4. Sostenga la puerta en su lugar mientras desatornilla la bisagra central, luego levante la puerta inferior y colóquela sobre una almohadilla blanda para evitar dañarla. 7. Incline la unidad hacia atrás, extraiga las patas ajustables de ambos lados y luego desatornille la bisagra inferior. La parte inferior de la unidad Extraiga las patas ajustables Extraiga la bisagra central 5.
INSTRUCCIONES DE DESINSTALACIÓN DE LA PUERTA 9. Ubique la bisagra inferior izquierda (en la bolsa de accesorios). 12 Coloque la puerta superior sobre la bisagra central. Asegúrese de que la puerta esté alineada horizontal y verticalmente de manera que el burlete quede ajustado en todos los lados. 13 Ubique la bisagra superior izquierda y la tapa de la bisagra superior izquierda y fíjelas a la parte superior de la unidad. Fije la tapa de tornillo al lado superior derecho. 10.
CONTROLES Período de enfriamiento Para lograr un mejor rendimiento, permita que pasen 4 horas para que el frigorífico se enfríe completamente. El frigorífico funcionará de manera continuada durante las primeras horas. Control de temperatura El control de temperatura está ubicado dentro del compartimento del frigorífico de la unidad. La temperatura viene ajustada de fábrica para proporcionar valores satisfactorios para el almacenamiento de alimentos.
CARACTERÍSTICAS OPCIONALES PRECAUCIÓN No limpie los estantes de vidrio ni las tapas con agua caliente si están fríos. Los estantes y las tapas pueden romperse por el cambio brusco de temperatura, o deformarse. El vidrio templado se ha diseñado para romperse en muchos pedazos de tamaño pequeño. Esto es normal. Los estantes de vidrio y las tapas son pesados. Utilice las dos manos al retirarlos para evitar caídas.
CUIDADO Y LIMPIEZA Sugerencias para el cuidado y la limpieza Pieza Qué usar Sugerencias y precauciones Interior y revestimiento de las puertas • Agua y jabón • Bicarbonato de sodio y agua Use 2 cucharadas de bicarbonato de sodio en 1 litro de agua tibia. Asegúrese de escurrir el excedente de agua de la esponja o paño antes de limpiar los controles, la bombilla o cualquier otra pieza eléctrica. Juntas de la puerta • Agua y jabón Limpie las juntas con un paño limpio y suave.
ANTES DE SOLICITAR SERVICIO TÉCNICO 1-800-944-9044 (Estados Unidos) 1-800-265-8352 (Canadá) INCIDENTES COMUNES El refrigerador no funciona. Visite nuestro sitio en Internet: www.frigidaire.com. Antes de solicitar servicio, revise esta lista. Al hacerlo, puede ahorrar tiempo y dinero. Esta lista incluye los incidentes más comunes que no son originados por el empleo de mano de obra o materiales defectuosos en este electrodoméstico. • Asegúrese de que el enchufe esté firmemente conectado al tomacorriente.
GARANTÍA DE LOS ELECTRODOMÉSTICOS GRANDES Su electrodoméstico está cubierto por una garantía limitada de un año. Durante un año a partir de la fecha original de compra, Electrolux cubrirá todos los costos de reparación o reemplazo de cualquier pieza de este electrodoméstico que se encuentre defectuosa en materiales o mano de obra, siempre que el electrodoméstico se instale, utilice y mantenga de acuerdo con las instrucciones proporcionadas. Exclusiones Esta garantía no cubre lo siguiente: 1.
Tout à propos de l'utilisation et l'entretien de votre compact réfrigérateur TA B L E D E S M AT I È R E S Caractéristiques facultatives.......................10 Aperçu des caractéristiques..........................4 Entretien et nettoyage...............................11 Installation.................................................5 Avant de faire appel au service après-vente.....12 Instructions de dépose de la porte................6 Garantie sur les gros appareils électroménagers..................
MESURES DE SÉCURITÉ IMPORTANTES AVERTISSEMENT Veuillez lire ces instructions au complet avant d'utiliser le réfrigérateur. Pour votre sécurité • • • • N’ENTREPOSEZ PAS et n’utilisez pas d’essence ni aucun autre liquide inflammable à proximité de cet appareil ou d’un autre électroménager. Lisez les étiquettes du produit concernant les risques d’inflammabilité et autres avertissements. NE FAITES PAS fonctionner le réfrigérateur en présence de vapeurs explosives.
MESURES DE SÉCURITÉ IMPORTANTES Sécurité des enfants Détruisez ou recyclez le carton, les sacs en plastique et tout matériau d’emballage externe immédiatement après le déballage du réfrigérateur. Les enfants ne devraient jamais jouer avec ces articles. Les cartons recouverts de tapis, de couvertures, de feuilles de plastique ou de film étirable peuvent devenir étanches à l’air et rapidement provoquer un étouffement.
APERÇU DES CARACTÉRISTIQUES Les caractéristiques peuvent varier selon le modèle (certains modèles) (certains modèles) 4
INSTALLATION Ce guide d’utilisation et d’entretien contient Directives pour la mise en place finale de des instructions d’utilisation spécifiques à votre votre réfrigérateur modèle. N’utilisez votre appareil uniquement • Les quatre coins de la caisse doivent qu’en suivant les instructions présentées dans reposer fermement sur le plancher. ce guide. Avant de mettre l’appareil en marche, • Le cabinet devrait être égal au devant et suivez ces étapes initiales importantes. à l’arrière.
INSTRUCTIONS DE DÉPOSE DE LA PORTE Outils nécessaires: ou Tournevis à tête Phillips™ REMARQUE REMARQUE Jeu de clés à douilles ou Clé à molette Clé polygonale de 10 mm (3/8") Les modèles à une porte n’inclut pas les étapes des ressorts Les portes de votre réfrigérateur peuvent être inversées de façon à ce que ce dernier puisse s’ouvrir de gauche à droite ou de droite à gauche. L’inversion des portes se fait en changeant les charnières de côté.
INSTRUCTIONS DE DÉPOSE DE LA PORTE IMPORTANT Pour les appareils à une porte, passez les étapes 4 à 6. 4. Maintenez la porte en place tout en dévissant la charnière centrale, puis soulevez la porte inférieure et placezla sur un tampon doux pour éviter les dommages. 7. Inclinez l’appareil vers l’arrière, retirez les pattes ajustables des deux côtés et dévissez la charnière inférieure. Bas de l'appareil Retirez les pattes ajustables Retirez la charnière centrale 5.
INSTRUCTIONS DE DÉPOSE DE LA PORTE 9. Localisez la charnière inférieure gauche (dans un sac d’accessoire). 12 Placez la porte supérieure sur la charnière centrale. Assurez-vous que la porte est alignée et à la verticale afin que le sceau soit fermé sur tous les côtés. 13 Localisez la charnière supérieure gauche et le couvercle de la charnière supérieure gauche et fixez-les sur l’appareil. Fixez le couvercle de la vis au côté supérieur droit. 10. Fixez la charnière inférieure gauche.
COMMANDES Période de refroidissement Pour une meilleure performance, allouez 4 heures au réfrigérateur pour qu’il refroidisse complètement. Le réfrigérateur fonctionnera en continu pendant les premières heures. Contrôle de la température Le contrôle de la température est situé à l’intérieur du compartiment du réfrigérateur. La température est préréglée en usine pour offrir des températures d’entreposage des aliments satisfaisantes.
CARACTÉRISTIQUES FACULTATIVES ATTENTION Ne nettoyez pas les clayettes en verre ou les couvercles avec de l’eau chaude lorsqu’ils sont encore froids. Les clayettes et les couvercles peuvent briser si exposés à des changements de température soudains ou à un impact, tel des heurts. Le verre trempé est conçu pour se fracasser en plusieurs petits morceaux de la grosseur de cailloux. Ceci est normal. Les clayettes en verre et les couvercles sont pesants.
ENTRETIEN ET NETTOYAGE Conseils d’entretien et de nettoyage Pièce Produits à utiliser Intérieur et • Eau savonneuse revêtements • Bicarbonate de soude de porte et eau Joints des portes Bacs et balconnets • Eau savonneuse • Eau savonneuse Clayettes en • Eau savonneuse verre • Nettoyant pour verre Extérieur • Pulvérisation liquide douce • Eau savonneuse • Nettoyant pour verre non abrasif Extérieur • Eau savonneuse (modèles en acier inoxydable seulement) • Nettoyant pour acier inoxydable Conseils et p
AVANT DE FAIRE APPEL AU SERVICE APRÈS-VENTE 1 800 944-9044 (États-Unis) 1 800 265-8352 (Canada) Visitez notre site Web au www.frigidaire.com. Situations courantes Avant de faire appel au service après-vente, consultez cette liste. Cela pourrait vous faire économiser temps et argent. Cette liste décrit des situations courantes qui ne sont causées ni par un défaut de fabrication ni par un matériau défectueux. Le réfrigérateur ne fonctionne pas.
GARANTIE SUR LES GARANTIE SUR LESGROS GROSAPPAREILS APPAREILS ÉLECTROMÉNAGERS ÉLECTROMÉNAGERS Votre appareil est couvert par une garantie limitée d'un an. Pendant un an à partir de la date d'achat d'origine, Electrolux assumera les coûts des réparations ou du remplacement des pièces de cet appareil si ce dernier présente un défaut de matériau ou de fabrication, à la condition que l'appareil soit installé, utilisé et entretenu selon les instructions fournies.