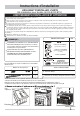
Installation Instructions READ BEFORE INSTALLING UNIT BK Window Mounting (6,000 - 8,000 BTU) INSTALLATION WARNINGS AND CAUTION Carefully read the installation manual before beginning. be exposed: Carefully inspect location where air conditioner will be installed. Be sure it will support the weight of the unit over an extended period of time. NOTE: Mounting Hardware Qty. 7 the best way to store unit during winter, or when not in use.
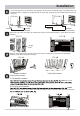
Installation LEFT + RIGHT FILLER PANEL ASSEMBLY NOTE: Top Rail and Side Panels at each side are offset to provide the proper pitch to the rear. This is necessary for proper condensed water utilization and drainage. If you are not using the Side Panels for any reason, this pitch to the rear must be maintained! Place unit on floor, a bench or a table. There is a Left and Right side Filler Panels - be sure to use the proper panel for each side.
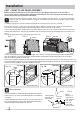
Installation Keep a firm grip on the air conditioner, carefully place the unit into the window opening so the bottom of the air conditioner frame is against the window sill (FIG. 6A & FIG. 6B). Carefully close the window behind the top rail of the unit. FIG. 6B FIG. 6A INSIDE OUTSIDE INSIDE OUTSIDE Wooden Windows Vinyl-Clad Windows Extend the side panels out against the window frame (FIG. 7A for wooden windows), (FIG. 7B for Vinyl-Clad windows). FIG. 7A FIG.
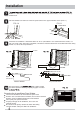
Installation NOTE: It is difficult to lock the windows with the sash lock for Vinyl-Clad windows, so you can use lock by window itself. Cut foam window seal and insert it into the space between the upper and lower sashes (FIG. 11). FIG. 10 FIG. 11 FOAM SEAL Check that air conditioner is tilted back about 1/4" to 1/2" (tilted about 2º to 4º downward to the outside, see FIG. 12A & FIG. 12B).
Instrucciones de montaje LEA ESTO ANTES DE MONTAR LA UNIDAD Montaje del BK en ventanas (6,000-8,000 BTU) IADVERTENCIAS PARA INSTALACION Y PRECAUCIÓN Lea cuidadosamente el manual de instalación antes de comenzar. Siga cada paso como se indica. Observe todos los códigos eléctricos locales, estatales y nacionales y haga la instalación solo con personal calificado, matriculado y autorizado. Preste atención a las notificaciones sobre peligro y seguridad.
How to Install Instalación MONTAJE DEL PANEL DE RELLENO IZQUIERDO Y DERECHO NOTA: El raíl superior y los paneles laterales a cada lado se compensan para proporcionar el espacio necesario a la parte trasera. Esto es necesario para el adecuado tratamiento y drenaje del agua condensada. ¡Si no usa los paneles laterales por alguna razón, debe mantener este espacio hasta la parte trasera! Ponga la unidad sobre el suelo, un banco o una mesa de trabajo.
How to Install Instalación Sujete firmemente el aparato de aire acondicionado, y colóquelo con cuidado sobre la apertura de la ventana de tal modo que la parte inferior de cuadro quede sobre el antepecho (FIG. 6A & FIG. 6B). Baje con cuidado la ventana por detrás del raíl superior de la unidad. FIG. 6B FIG. 6A INTERIOR EXTERIOR INTERIOR EXTERIOR Ventanas de madera Ventanas de PVC Extienda los paneles laterales hasta el marco de la ventana (FIG. 7A para ventanas de madera), (FIG.
Instalación Para asegurar la hoja inferior en su lugar, ajuste la placa de bloqueo para la hoja de ángulo recto con tornillos NOTA: Es complicado bloquear las ventanas de PVC con la placa de bloqueo, por lo que puede usar el bloqueo propio de la ventana. Corte el burlete de espuma a la medida e insértelo en el espacio entre las dos hojas de la ventana (FIG. 11). FIG. 10 FIG.
Instructions d’installation LIRE AVANT D’INSTALLER L’UNITÉ BK Installation pour fenêtre (6,000-8,000 BTU) AVERTISSEMENTS D'INSTALLATION ET ATTENTION Lisez attentivement le manuel d'installation avant de commencer. Suivez chaque étape comme indiqué. Respectez tous les codes électriques locaux, fédéraux et nationaux à l'aide de personnel qualifié, licencié et autorisé uniquement. Prêtez attention aux avis de danger et de sécurité.
How to Install Installation ASSEMBLAGE DE BOUCLIERS GAUCHE ET DROIT REMARQUE: le rail supérieur et les panneaux latéraux sur chaque côté sont décalés pour fournir le degré approprié à l’arrière. Ceci est nécessaire pour l’utilisation et le drainage d’eau condensée appropriées. Si vous n’utilisez pas les panneaux latéraux pour une raison quelconque, ce degré à l’arrière doit être maintenu! Placez l’unité sur le sol, un banc ou une table.
How to Install Installation Gardez une prise ferme sur le climatiseur, placez avec précaution l’unité dans l’ouverture de fenêtre afin que le bas du cadre de climatiseur soit contre le rebord de fenêtre (FIG. 6A et FIG. 6B). Fermez avec précaution la fenêtre derrière le rail supérieur de l’unité. FIG. 6B FIG. 6A EXTÉRIEUR INTÉRIEUR INTÉRIEUR EXTÉRIEUR Fenêtres en bois Fenêtres à revêtement en vinyle Étendez les panneaux latéraux contre le cadre de fenêtre (FIG. 7A pour les fenêtres en bois), (FIG.
Installation Pour sécuriser la guillotine inférieure en place, attachez le verrou de guillotine d’angle droit avec la vis de REMARQUE : il est difficile de verrouiller les fenêtres avec le verrou de guillotine pour fenêtre à revêtement en vinyle, vous pouvez donc utiliser le verrou de la fenêtre. Coupez le joint de fenêtre à mousse et insérez-le dans l’espace entre les guillotines supérieure et inférieure (FIG. 11). FIG. 10 FIG.