All about the Installation of your Dryer TA B L E O F C O N T E N T S Important Safety Instructions ........................... 2-3 Accessories ...................................................... 17 Installation Requirements .............................. 4-10 Notes .............................................................. 18 Installation Instructions ................................11-14 Français........................................................... 19 Reversing Door ..................
IMPORTANT SAFETY INSTRUCTIONS WARNING For your safety the information in this manual must be followed to minimize the risk of fire or explosion or to prevent property damage, personal injury or loss of life. Do not store or use gasoline or other flammable vapors and liquids in the vicinity of this or any other appliance. WARNING - RISK OF FIRE Read all of the following instructions before installing and using this appliance: • Destroy the carton and plastic bags after the dryer is unpacked.
IMPORTANT SAFETY INSTRUCTIONS WARNING Please read all instructions before using this dryer.
INSTALLATION REQUIREMENTS Electrical system requirements 4-WIRE POWER SUPPLY CORD KIT (not supplied) NOTE Because of potentially inconsistent voltage capabilities, the use of this dryer with power created by gas powered generators, solar powered generators, wind powered generators or any other generator other than the local utility company is not recommended. Electrical requirements for electric dryer CIRCUIT - Individual 30 amp. branch circuit fused with 30 amp. time delay fuses or circuit breakers.
INSTALLATION REQUIREMENTS Gas supply requirements WARNING EXPLOSION HAZARD Uncoated copper tubing will corrode when subjected to natural gas, causing gas leaks. Use ONLY black iron, stainless steel, or plastic-coated brass piping for gas supply. 1 Installation MUST conform with local codes, or in the absence of local codes, with the National Fuel Gas Code, ANSI Z223.1 (latest edition). 2 The gas supply line should be 1/2 inch (1.27 cm) pipe.
INSTALLATION REQUIREMENTS Exhaust system requirements, continued WARNING The dryer must be connected to an exhaust outdoors. Regularly inspect the outdoor exhaust opening and remove any accumulation of lint around the outdoor exhaust opening and in the surrounding area. WARNING FIRE HAZARD • Do not allow combustible materials (for example: clothing, draperies/curtains, paper) to come in contact with exhaust system.
INSTALLATION REQUIREMENTS Exhaust system requirements, continued WARNING Install male fittings in correct direction: FIRE HAZARD Do not install the dryer where gasoline or other flammables are kept or stored. If the dryer is installed in a garage, it must be a minimum of 18 inches (45.7 cm) above the floor. Failure to do so can result in death, explosion, fire or burns.
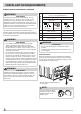
INSTALLATION REQUIREMENTS Clearance requirements IMPORTANT DO NOT INSTALL YOUR DRYER: 1 In an area exposed to dripping water or outside weather conditions. 2 In an area where it will come in contact with curtains, drapes, or anything that will obstruct the flow of combustion and ventilation air. 3 On carpet. Floor MUST be solid with a maximum slope of 1 inch (2.54 cm). MINIMUM INSTALLATION CLEARANCES - Inches (cm) SIDES REAR TOP FRONT Alcove 1” (2.5 cm) 6” (15.2 cm) 24” (61 cm) n/a Closet 1” (2.
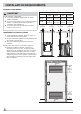
INSTALLATION REQUIREMENTS Dryer Dimensions 48.6” (123.5 cm) to clear open door 27” (68.6 cm) electrical supply on rear of unit1,2 38.5” (97.5 cm) 44.2” (112 cm) centerline height for rear vent gas supply pipe on rear of gas unit 2.6” (6.5 cm) 3.7” (9.5 cm) floor line 5.1” (12.8 cm) 30.8” (78.2 cm) to front of closed door 14.9” 12.1” (37.8 cm) (30.8 cm) to center of rear vent Power supply cord length on electric Canadian dryer approximately 59 inches (150 cm).
INSTALLATION REQUIREMENTS Grounding requirements - Electric dryer (USA) WARNING Improper grounding of the dryer may cause serious injury or death. Check with a licensed electrician if you are in doubt as to whether the appliance is properly grounded. For a grounded, cord-connected dryer: 1 The dryer MUST be grounded. In the event of a malfunction or breakdown, grounding will reduce the risk of electrical shock by a path of least resistance for electrical current.
INSTALLATION INSTRUCTIONS Electrical connection (non-Canada) - 3 wire cord 3-wire receptacle (NEMA type 10-30R) WARNING ELECTRICAL SHOCK HAZARD Failure to disconnect power source before servicing could result in personal injury or even death. 1 Turn off power supply to outlet. 2 Remove the screw securing the terminal block access cover in the upper corner on the back of the dryer.
INSTALLATION INSTRUCTIONS Electrical connection (non-Canada) - 4 wire cord 4-wire receptacle (NEMA type 14-30R) WARNING Neutral (WHITE wire) Ground (GREEN wire) 30 AMP NEMA 14-30 ELECTRICAL SHOCK HAZARD Failure to disconnect power source before servicing could result in personal injury or even death. 1 Turn off power supply to outlet. 2 Remove the screw securing the terminal block access cover in the upper corner on the back of the dryer.
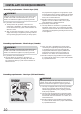
INSTALLATION INSTRUCTIONS Gas connection 1 Remove the shipping cap from gas pipe at the rear of the dryer. 3 Open the shutoff valve in the gas supply line to allow gas to flow through the pipe. Wait a few minutes for gas to move through the gas line. IMPORTANT DO NOT connect the dryer to L.P. gas service without converting the gas valve. An L.P. conversion kit must be installed by a qualified gas technician. to d rye r 2 Connect a 1/2 inch (1.27 cm) I.D.
INSTALLATION INSTRUCTIONS General installation 1 Connect the exhaust duct to the outside exhaust system. Use of a 4” (102 mm) clamp (item A) is recommended to connect the dryer to the exhaust vent system. Use metal foil tape to seal all other joints. 2 Use a carpenter’s level to level your dryer front-to-back and side-to-side. 3 Use adjustable pliers to adjust the leveling legs so the dryer is level front-to-rear and side-to-side, and stable corner-to-corner.
REVERSING DOOR Your dryer is designed so the door swing may be reversed at any time without additional parts. Conversion is accomplished by transferring hinges and door strike to the opposite sides of the cabinet. 1 Be sure you have adequate swing area before reversing door. 2 You will need a screw driver with a Phillips bit. 3 Protect flat work surface, such as top of dryer or floor near dryer, with a soft cloth or towel.
REVERSING DOOR 5 Remove the striker plate and the latch plate from the front panel. 7 Grasping firmly the top of the door, position the door near the door opening and align the top hinge hole to the top hole in the front panel door opening. Attach the upper hinge to the front panel with one screw. Once the first screw is started, attach the second screw to the lower hinge. Once both screws are tightened, install the remaining two screws.
ACCESSORIES LP CONVERSION KIT P/N HA004 Gas dryers intended for use in a location supplied with LP must use a conversion kit prior to installation. UNIVERSAL APPLIANCE WRENCH CAUTION Failure to use accessories manufactured by (or approved by) the manufacturer could result in personal injury, property damage or damage to the dryer. P/N 137019200 A UNIVERSAL APPLIANCE WRENCH is available to aid in dryer/washer/pedestal feet adjustment.
NOTES 18
Tout à propos de Installation de votre Sécheuse TA B L E O F C O N T E N T S Mesures de sécurité importantes ...................20-21 Inversion de la porte ....................................33-34 Exigences d’installation .................................22-28 Accessoires ...................................................... 35 Instructions d’installation ..............................29-32 Remarques ......................................................
MESURES DE SÉCURITÉ IMPORTANTES AVERTISSEMENT Pour votre sécurité, l’information contenue dans ces instructions doit être suivie afin de réduire les risques d’incendie ou d’explosion ou pour prévenir les dommages matériels, les blessures ou la mort. Vous ne devez ni entreposer, ni utiliser d’essence ou d’autres vapeurs ou liquides inflammables à proximité de cet appareil ou de tout autre appareil électroménager.
MESURES DE SÉCURITÉ IMPORTANTES AVERTISSEMENT Veuillez lire ces instructions au complet avant d’utiliser le sécheuse. Sachez reconnaître les symboles, les avertissements et les étiquettes de sécurité. Les mesures de sécurité présentées dans ce guide sont identifiées par le mot AVERTISSEMENT ou ATTENTION selon le type de risque présenté ci-dessous. Définitions Voici le symbole d’avertissement concernant la sécurité. Il est utilisé pour vous avertir des risques de blessures potentiels.
REQUISITOS DE INSTALACIÓN Exigences des systèmes électriques REMARQUE Étant donné les variations de tension possibles, l’utilisation de cette sécheuse avec une source d’alimentation produite par une génératrice à essence, solaire ou éolienne ou par toute autre source d’alimentation différente de celle fournie par les services publics n’est pas recommandée. Exigences électriques de la sécheuse électrique: CIRCUIT - Circuit indépendant de 30 ampères avec fusible temporisé ou disjoncteur de 30 A.
EXIGENCES D’INSTALLATION Exigences relatives à l’alimentation en gaz AVERTISSEMENT RISQUE D’EXPLOSION Un tuyau en cuivre sans revêtement se corrode lorsqu’il entre en contact avec le gaz naturel, entraînant des fuites. Utilisez SEULEMENT des tuyaux en fer noir, en acier inoxydable ou encore en cuivre avec revêtement en plastique pour l’alimentation en gaz. 1 L’installation DOIT être conforme aux codes locaux ou au code national sur le combustible, ANSI Z223.
INSTALLATION REQUIREMENTS Exigences de système d’évacuation (suite) AVERTISSEMENT Nombre de tours à 90° LONGUEUR MAXIMALE pour le conduit en métal rigide de 10,2 cm (4 po) RISQUE D’INCENDIE Une sécheuse doit être évacuée vers l’extérieur. N’évacuez pas une sécheuse dans une cheminée, un mur, un plafond, un grenier, un vide sanitaire ou dans tout espace clos d’un bâtiment. La sécheuse produit de la charpie inflammable.
INSTALLATION REQUIREMENTS Exhaust system requirements, continued AVERTISSEMENT Install male fittings in correct direction: RISQUE D’EXPLOSION N’installez pas la sécheuse là où de l’essence ou autres matières inflammables sont entreposées. Si la sécheuse est installée dans un garage, elle doit être placée au moins à 45,7 cm (18 po) du sol. Le non-respect de cette recommandation peut entraîner un choc électrique, une explosion, un incendie ou même la mort.
EXIGENCES D’INSTALLATION Exigences de dégagement IMPORTANT N’INSTALLEZ PAS VOTRE SÉCHEUSE : 1 À un endroit exposé aux écoulements d’eau ou aux aléas des conditions météorologiques extérieures. 2 À un endroit où elle entrera en contact avec des rideaux ou tout autre objet qui nuirait à l’écoulement de l’air de combustion ou de ventilation. 3 Sur un tapis. Le plancher DOIT être solide et présenter une pente inférieure à 2,5 cm (1 po).
EXIGENCES D’INSTALLATION Dimensions de Sécheuse 48.6” (123.5 cm) Avec la porte grande ouverte 27” (68.6 cm) Alimentation électrique à l’arrière de la sécheuse1,2 38.5” (97.5 cm) 44.2” (112 cm) Hauteur de la ligne centrale de l’évent arrière Alimentation en gaz à l’arrière de l’appareil à gaz 2.6” (6.5 cm) 3.7” (9.5 cm) Plancher 5.1” (12.8 cm) 30.8” (78.2 cm) À partir de l’avant de la porte lorsqu’elle est fermée 14.9” 12.1” (37.8 cm) (30.
INSTRUCTIONS D’INSTALLATION Exigences de mise à la terre - Sécheuse électrique (É.-U.) AVERTISSEMENT Un raccordement inadéquat du conducteur de mise à la terre de l’équipement peut accroître les risques de choc électrique. En cas de doute quant à la mise à la terre de l’appareil, consultez un électricien qualifié. Pour une sécheuse avec cordon, mise à la terre : 1 Cet appareil DOIT être mis à la terre.
INSTALLATION INSTRUCTIONS Connexion électrique (sauf au Canada) - cordon à 3 fils Prise à 3 alvéoles (NEMA type 10-30R) AVERTISSEMENT RISQUE DE CHOC ÉLECTRIQUE Le fait de ne pas débrancher l’appareil de sa source d’alimentation en électricité avant son entretien peut causer des blessures, voire la mort. 1 Coupez l’alimentation à la prise. 2 Retirez la vis qui fixe le couvercle d’accès du bornier dans le coin inférieur du dos de la sécheuse.
INSTRUCTIONS D’INSTALLATION Connexion électrique (sauf au Canada) - cordon à 4 fils Prise à 4 alvéoles (NEMA type 14-30R) WARNING Fils neutres Mises à la terre (Fils BLANCS) (Fils VERTS) 30 AMP NEMA 14-30 ELECTRICAL SHOCK HAZARD Failure to disconnect power source before servicing could result in personal injury or even death. 1 Coupez l’alimentation à la prise. 2 Retirez la vis qui fixe le couvercle d’accès du bornier dans le coin supérieur du dos de la sécheuse.
INSTRUCTIONS D’INSTALLATION Connexion de gaz 1 Retirez le capuchon d’expédition de la conduite de gaz à l’arrière de l’appareil. IMPORTANT NE RACCORDEZ PAS la sécheuse à une alimentation en propane liquide sans avoir préalablement converti la soupape de gaz. Le nécessaire de conversion au propane liquide doit être installé par un technicien qualifié. 3 Ouvrez le robinet d’arrêt dans la conduite d’alimentation de gaz pour permettre au gaz de s’écouler dans le tuyau.
INSTRUCTIONS D’INSTALLATION Installation (générale) 1 Branchez la conduite d’évacuation au système d’évacuation extérieur L’utilisation d’un collier (pièce A) de 102 mm (4 po) est recommandée pour raccorder la sécheuse au système d’évacuation. Utilisez du ruban métallique pour sceller les autres joints. 2 Utilisez un niveau à bulle pour mettre l’appareil à niveau de l’avant vers l’arrière et latéralement.
INVERSION DE LA PORTE La sécheuse est conçue de façon que l’ouverture de la porte puisse être inversée en tout temps sans pièces additionnelles. L’inversion de la porte requiert le transfert des charnières au côté opposé du châssis. 1 Assurez-vous qu’il y a suffisamment d’espace avant d’inverser la porte. 2 Vous aurez besoin d’un tournevis avec embouts cruciforme. 3 Protégez la surface de travail, comme le dessus de la sécheuse ou le plancher près de la sécheuse, avec un chiffon doux ou une serviette.
INVERSION DE LA PORTE 5 Retirer la plaque de butée et la plaque du loquet du panneau avant. 7 Aggriper fermement le dessus de la porte, placer la porte à proximité de l’ouverture de la porte et aligner le trou supérieur de la charnière au trou supérieur du panneau avant de la porte. Fixer la charnière supérieure au panneau avant à l’aide d’une vis. Une fois la première vis fixée, mettre la deuxième vis dans la charnière inférieure. Une fois les deux vis serrées, installer les deux autres vis.
ACCESSOIRES NÉCESSAIRE DE CONVERSION AU GPL PIÈCE N° HA004 Les sécheuses à gaz qui seront utilisées dans un endroit alimenté par du propane liquide doivent recourir à un nécessaire de conversion avant l’installation. CLÉ D’APPAREIL UNIVERSELLE ATTENTION Tout défaut d’utiliser les accessoires fabriqués ou certifiés par le fabricant pourrait entraîner des blessures, des dommages aux biens ou à la sécheuse.
REMARQUE 36
Todo acerca del Instalación de su Secadora ÍNDICE Instrucciones importantes de seguridad .........38-39 Inversión de la puerta...................................51-52 Requisitos de instalación ...............................40-46 Accesorios ....................................................... 53 Instrucciones de instalación ..........................47-50 Notas ..............................................................
INSTRUCCIONES IMPORTANTES DE SEGURIDAD ADVERTENCIA Para su seguridad, debe seguir la información de esta guía para minimizar el riesgo de incendio o explosión o para evitar daños a la propiedad, lesiones personales o incluso la muerte. No almacene ni utilice gasolina ni otros líquidos o vapores inflamables cerca de este o de cualquier otro electrodoméstico.
INSTRUCCIONES IMPORTANTES DE SEGURIDAD ADVERTENCIA Lea todas las instrucciones antes de usar este secadora. Lista de verificación de instalación Ventilación de escape De flujo libre y sin acumulación de pelusa Identificación de los símbolos, palabras y avisos de seguridad Las indicaciones de seguridad incluidas en este manual aparecen precedidas de un aviso titulado “ADVERTENCIA” o “PRECAUCIÓN”, de acuerdo con el nivel de riesgo.
REQUISITOS DE INSTALACIÓN Electrical system requirements CABLE DE ALIMENTACIÓN ELÉCTRICA TETRAFILAR (no incluido) NOTA Debido a posibles variaciones en el voltaje, no se recomienda utilizar esta secadora con electricidad generada a partir de generadores a gas, solares, eólicos ni de ninguna otra clase que no sean los empleados por su empresa de electricidad local. Requisitos eléctricos de la secadora eléctrica: CIRCUITO: circuito independiente individual de 30 amp.
REQUISITOS DE INSTALACIÓN Requerimientos del suministro de gas ADVERTENCIA PELIGRO DE EXPLOSIÓN Las tuberías de cobre sin recubrimiento se corroen al exponerse al gas natural, lo que provoca pérdidas de gas. Utilice SOLAMENTE tuberías de hierro negro, acero inoxidable o latón plastificado para el suministro de gas. 1 La instalación DEBE realizarse de acuerdo con los códigos locales o, en ausencia de ellos, con el Código de Gas Nacional (National Fuel Gas Code), ANSI Z223.1 (última edición).
REQUISITOS DE INSTALACIÓN Requisitos del sistema de escape (continuación) PELIGRO DE INCENDIO Una secadora de ropa debe tener ventilación al exterior. No ventile la secadora a una chimenea, pared, techo, ático, pasajes entre pisos ni ningún espacio oculto de la vivienda. Las secadoras de ropa producen pelusa combustible. Si la secadora no tiene ventilación al exterior, algunas pelusas finas se expulsarán en el área de lavandería.
INSTALLATION REQUIREMENTS Requisitos del sistema de escape (continuación) ADVERTENCIA PELIGRO DE EXPLOSIÓN No instale la secadora en el mismo lugar en el que haya o se almacene gasolina u otros productos inflamables. Si la secadora se instala en un garaje, debe estar a una altura mínima de 45,7 cm (18 pulgadas) por encima del suelo. De lo contrario, podría producirse una explosión, un incendio, quemaduras o incluso la muerte.
REQUISITOS DE INSTALACIÓN Requisitos de despeje IMPORTANTE NO INSTALE LA SECADORA: 1 En una zona expuesta a la humedad o a las condiciones climáticas externas. 2 En un área en la que esté en contacto con cortinas, telas colgantes o cualquier otra cosa que pueda obstruir el flujo de aire de ventilación y combustión. 3 Sobre una alfombra. El piso DEBE ser firme con una pendiente máxima de 2,5 cm (1 pulgada). MINIMUM INSTALLATION CLEARANCES - Inches (cm) SIDES REAR TOP FRONT Alcove 1” (2.5 cm) 6” (15.
REQUISITOS DE INSTALACIÓN Dimensiones de la Secadora 48.6” (123.5 cm) al frente de la puerta cerrada 27” (68.6 cm) suministro eléctrico en la parte trasera de la unidad1,2 38.5” (97.5 cm) 44.2” (112 cm) altura de la línea central para ventilación trasera tubería de suministro de gas en la parte trasera de la unidad de gas 2.6” (6.5 cm) 44.2” (112 cm) línea del piso 5.1” (12.8 cm) 30.8” (78.2 cm) al frente de la puerta cerrada 14.9” 12.1” (37.8 cm) (30.
INSTRUCCIONES DE INSTALACIÓN Requisitos de conexión a tierra: secadora eléctrica (Estados Unidos) ADVERTENCIA Una conexión incorrecta del conductor de conexión a tierra del equipo puede provocar un peligro de descarga eléctrica. Si no está seguro de haber realizado correctamente la conexión a tierra del artefacto, consulte a un electricista autorizado. Para una secadora conectada a tierra: 1 La secadora DEBE tener conexión a tierra.
INSTRUCCIONES DE INSTALACIÓN Conexión eléctrica (fuera de Canadá): trifilar Receptáculo trifilar (tipo NEMA 10-30R) ADVERTENCIA PELIGRO DE DESCARGA ELÉCTRICA El no desconectar el suministro eléctrico antes de realizar cualquier reparación puede ocasionar lesiones personales o incluso la muerte. 1 Desconecte el suministro eléctrico del tomacorriente. 2 Extraiga el tornillo que sujeta la cubierta de acceso del bloque terminal que se encuentra en la esquina superior de la parte trasera de la secadora.
INSTRUCCIONES DE INSTALACIÓN Conexión eléctrica (fuera de Canadá): tetrafilar Receptáculo tetrafilar (tipo NEMA 14-30R) ADVERTENCIA Neutro (cable BLANCO) Tierra (cable VERDE) 30 AMP NEMA 14-30 PELIGRO DE DESCARGA ELÉCTRICA El no desconectar el suministro eléctrico antes de realizar cualquier reparación puede ocasionar lesiones personales o incluso la muerte. 1 Desconecte el suministro eléctrico del tomacorriente.
INSTRUCCIONES DE INSTALACIÓN Conexión de gas 1 Quite el tapón del tubo de gas en la parte trasera de la secadora. IMPORTANTE NO conecte la secadora al servicio de gas LP sin convertir la válvula de gas. El kit de conversión a gas LP debe ser instalado por un técnico calificado. 2 Conecte un tubo aprobado o uno semi-rígido de 1,27 cm (1/2 pulgada) de diámetro interior desde la línea de suministro de gas al tubo de 0,96 cm (3/8 pulgada) ubicado en la parte trasera de la secadora.
INSTRUCCIONES DE INSTALACIÓN Instalación general 1 Conecte el tubo de escape al sistema de escape exterior. Se recomienda usar una abrazadera (pieza A) de 4” (10,2 cm) para conectar las secadora al sistema de ventilación de escape. Utilice cinta de papel de aluminio para sellar las demás uniones. 2 Utilice un nivel de carpintero para nivelar todos los costados de la secadora.
INVERSIÓN DE LA PUERTA Su secadora ha sido diseñada para que la puerta pueda ser cambiada de lado en cualquier momento sin necesidad de piezas adicionales. La conversión se hace transfiriendo las bisagras al lado opuesto del gabinete. 1 Asegúrese de que haya suficiente espacio de giro antes de invertir la puerta. 2 Necesitará un destornillador de cabeza Phillips. 3 Proteja las superficies de trabajo planas, como la parte superior de la secadora o el piso cerca de ésta utilizando un paño o toalla suave.
INVERSIÓN DE LA PUERTA 5 Retire la placa de cerrojo y la placa de pestillo del panel frontal. 7 Mientras sostiene con firmeza la parte superior de la puerta, sitúe la puerta cerca del hueco y alinee el orificio de la bisagra superior con el orificio superior del hueco de la puerta del panel frontal. Una la bisagra superior al panel frontal con un tornillo. Una vez iniciado el primer tornillo, fije el segundo tornillo a la bisagra inferior.
ACCESORIOS KIT DE CONVERSIÓN A GAS LP Pieza No.. HA004 Las secadoras a gas diseñadas para el uso en lugares con suministro de LP requieren utilizar un kit de conversión antes de la instalación. PRECAUCIÓN El no utilizar accesorios fabricados (o aprobados) por el fabricante puede ocasionar lesiones personales, daños a la propiedad o daños a la secadora. LLAVE UNIVERSAL PARA ELECTRODOMÉSTICOS Pieza No..
NOTAS 54