professional the the the 2
This unit has many exciting features which are different from those found on standard PTAC models. The owner must be familiar with these features in order to fully understand the operation and capability of the unit. Total Corrosion© Protection -- All Frigidaire PTAC’s come standard with anti-corrosion protection, to increase system and component durability in standard applications and protect system and components in Coastal areas where Air sea salt content is higher than standard applications.
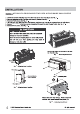
When units are shipped with a sleeve: 6 We recommend always to use a Frigidaire sleeve. When units are shipped without a sleeve: is Your product that s ps the inside air from side CONDENSER ARCHITECTURAL ALUMINUM OUTDOOR GRILLE (C) 1/2"O.D.
Frigidaire RIGIDAIRE RIGIDAIRE GRILLE ing (see Frigidaire GE’s C kit m look image , the actual baffle n 5
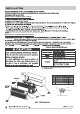
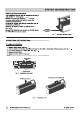
ATION OF A FRIGIDAIRE PTAC INTO A FRIGIDAIRE WALL SLEEVE 8 9 0 unit to sleeve 1 2 10 8 11 9 12 6
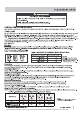
Turn off electrical power before service or installation. LCDI Refer to Table 1 for LCDI detection device images.
the screw 13 (For Ducted Installations Only) 10 4 18 NOTE: Upward air direction should only be used on ducted installations.
the 10 4 16 /Energy Saver: Cooling /Energy Saver: Heating 17 4 1. 2. allow the wall t 3.Energy Saver The dip control of the unit. When in wall ip Switches (Heating mode) adjust accordingly in order to mode, the control panel will be disabled. /Energy Saver 4.Energy Saver ip Switches (Cooling mode) This is the most efficient mode for electrical usage. cooling 5*6. 7.
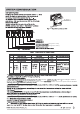
SYSTEM CONFIGURATION KEYPAD CONFIGURATION Keypad Configuration You can customize your unit additionally using the keypad configuration options. To enter Keypad configuration Connect the unit to power. Press and hold the "fan speed " and the "V " for 5 continuous seconds, within 30 seconds of the unit being powered up. If the unit has had power for more than 30 continuous seconds, keypad configuration cannot be made.
temp/timer hi dry indoor low cool setpoint fan timer timer auto heat on·off fan speed mode on·off temp/timer unit "ON-OFF" "mode" . Dry, " " V 4. "V" 5. "fan speed" 6. "timer" It is used for setting high, low or auto fan speed. The corresponding LED will be lit when selected. It is used for setting the timer function.
OPERATION 7. Timer function (1) Timer ON: When the unit is off, timer ON can be set. Setting range is 0.5~24h. When timer ON time is reached, the system will operate according to the set mode. (2) Timer OFF: When the unit is off, timer OFF can be set. Setting range is 0.5~24h. When timer OFF time is reached, the system will stop operation. (3) Timer setting: Press "timer " to set timer function and "timer" icon will be on. The time can be adjusted by pressing " " or "V" buttons.
the 19 18 21 S control panel guard two Low fan H on page 17 Hi fan L 19
20 ncorrect 21 20 21 Frigidaire on- they error the can i 23 Table 5—STATUS LED Indicator Definitions 1 2 3 4 5 6 7 8 9 4 Indoor air temp sensor open/short Indoor coil sensor open or short Outdoor coil sensor open/short Freeze Guard protection Indoor coil freeze protection Outdoor coil high temp protection Defrost (heat pump type) Indoor coil high temp protection Thermostat wiring error 8-segment display ‘F1’, with STATUS light flash 1 times and off 3 sec, repeat 8-segment display ‘F2’, with STAT
Coil on outdoor side of unit should be checked annually. Unit will need to be removed from its sleeve to inspect dirt build-up that can occur inside of the coil. If clogged with dirt or soot, coil should be professionally cleaned. Under extreme conditions, more frequent cleanings may be required. Clean the coils and basepan with a soft brush and compressed air or vacuum. A pressure washer may also be used, but be aware that the aluminium fins must not be bent.
(Best to use compressed air.
LCDI Compressor is not running. LCDI There is a protective time delay (approx.3 minutes) on starting the compressor after a power outage (or restarting after it has been turned off), to prevent tripping of the compressor overload.
SAFETY PRECAUTIONS SAFETY PRECAUTIONS DANGER! Avoid Serious Injury or Death 1. Do not attempt to install air conditioner by yourself. 2. This air conditioner contains no user-serviceable parts. Always call an authorized Electrolux servicer for repairs. 3. When moving the air conditioner, always call an authorized Electrolux servicer for disconnection and re-installation. 4. Do not insert or place fingers or objects into the air discharge area in the unit. 5.
MAJOR APPLIANCE LIMITED WARRANTY Your appliance is covered by a limited two-year warranty and a limited 3-5 year warranty on the sealed system (the compressor, condenser, evaporator and tubing). For two years from your original date of purchase, Electrolux will pay all costs for repairing or replacing any parts of this appliance that prove to be defective in materials or workmanship when such appliance is installed, used and maintained in accordance with the provided instructions.