
Installation Instructions
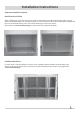
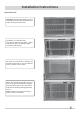

Grille to Sleeve Attachment
In cases where the dual intake grille fits inside the sleeve and the grille flange overlaps the sleeve flange,
direct attachment may be possible.
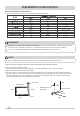
Grille Installation
1. Remove the existing grille.
2. Place the grille included with the new air conditioner towards the rear of the sleeve.
3. Mark through the hole positions.
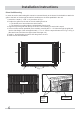
4. Drill through the sleeve flanges with a 1/8" drill bit.
5. Attach the new grille with self-threading screws and washers (not included).
6. It is VERY IMPORTANT that the grille is placed exactly as shown.
7. Most decorative exterior grilles may be left in place as long as the proper interior air direction
grille is installed.
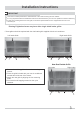
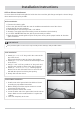
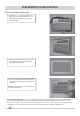
Seal Installation
1. Attach(1)1" x 1 ½" x 25" long seal in the center at the
top of the sleeve.
Remove the backing paper and press into position.
2. Attach(2)1" x 1 ½" x 14" seals to the left and right sides
of the sleeve.
3. Cut(2)1" x 3/8" x 25" long seals to 14" long each and
attach to the vertical sections of the grille as shown.
4. Attach (2) – 4 1/2" x 3 ½" x 1 ½" centering/support
blocks one on each side wall. Place in center of side
wall with the tapered end facing the opening.
5. Gently slide unit into sleeve.
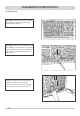
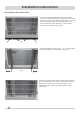
Ground Wire Installation
1. Install screw end of ground wire into inside of sleeve
according to preparation instructions.
2. Before sliding unit all the way back remove second
screw from left side of unit.
3. Remove plastic washer from screw.
4. Screw the other end of the ground wire into the unit as
shown. Make sure the toothed washer is against the
cabinet.
5. Slide unit completely to the rear.
If the provided grille is not used, it may lead to product damage and possible failure.
IMPORTANT
7
Installation Instructions