
Ice Kit Installation Instructions

2
Ice Maker Installation Instructions
1. Unplug refrigerator from electrical outlet.
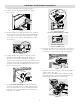
2. Lift the freezer shelf up and out. Set aside.
See Figure 1.
3. Remove water inlet and electrical cover, located
on the inside of the unit, by inserting a flathead
screwdriver on left side of opening in the small
cover. Push to the right to disengage the snap.
See Figure 2.
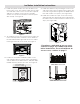
4. Locate dimples in the freezer liner for screw
placement (a flashlight may help). Align the
shoulder screws with the dimples. Push the
screws to penetrate the freezer liner and drive the
screws in until they are tight against the liner. Use
2 screws on the left side wall, and 3 on the top of
the liner. See Figure 3.
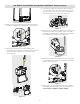
5. For a 30" wide refrigerator install the bracket
onto the ice maker. The Ice maker will slide onto
the mounting features on the bracket and snap
into place. The locking feature is located on the
rear of the ice maker.
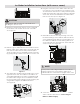
6. Plug the ice maker in the electrical connector on
the back wall. Once connected, do not allow the
ice maker to hang unsupported. See Figure 4.
7. Slide the ice maker onto the 2 side wall shoulder
screws. See Figure 5A.
Make sure the ice maker water channel is under
the water fill tube, continue to slide until the ice
maker snaps into place. See Figure 5B.
28" wide refrigerator
Use the ice maker only
Locking
Feature
1
2
30" wide refrigerator
Use the bracket with the ice maker
Figure 1
Figure 2
To Ceiling
To Wall
Install 5
Shoulder
Screws
Figure 3
Plug
Electrical
Connector
Figure 4
Figure 5
A
B