
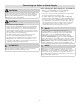
Ice Kit Installation Instructions

3
Ice Maker Installation Instructions
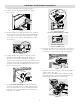
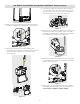
9. To install the ice bin, the freezer shelf needs to be
in the lowest position. Slide the ice bin between
the side wall and the right side of the ice maker
housing positioned on the shelf. See Figure 7.
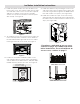
10. Locate the Ice maker installation label on the
rear outside right top corner of the refrigerator.
Cut the label on the dashed lines, and push flaps
inward until they stick to the unit. See Figure 8.
8. Install the plastic shutter into the window in the
front of the cover. The shutter snaps into the clips
on inside face of the cover, no tools are required.
Slide the ice maker cover onto the shoulder
screws on top of the unit until it locks into place
with a snap. See Figure 6.
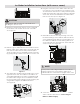
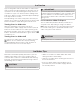
11. Install the water line by screwing the nut on the
end of the tube onto the water inlet. Tighten the
nut until snug, and then tighten an additional ¼
turn with needle nose pliers. (See Figure 9A.)
12. Install the 2 water line clips on the unit evenly
spaced inside the depressed area located under
the water inlet. Insert the water line tube into the
clips. (See Figure 9B.)
*If you have a unit with an access cover,
continue to page 4 for additional instal-
lation instructions. For a unit without an
access cover, continue to page 5.
Units with access cover
Units without access cover
Figure 6
Figure 7
Cut on dashed lines
and push in on flaps
Figure 8
Water
Line
Clip
Water
Inlet
A
B
Figure 9