
Ice Kit Installation Instructions

4
Ice Maker Installation Instructions (with access cover)
NOTE
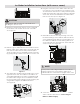
Ensure power cord is aligned with the notch at the
bottom of the access cover and the water line is
located inside the notch at the top right of the cover.
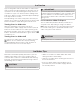
16. Plug the connector on the water valve wire har-
ness into the connector above the condenser coil.
You will hear a click when it is fully seated in place.
Install the water valve clip at the bottom right side
of the unit, and route and attach the water valve
harness into the clip. See Figure 13.
CAUTION
Wear gloves and use extreme CAUTION when
handling the access cover.
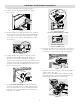
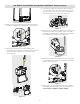
13. Remove 8 screws from access cover located at
the bottom rear outside of the unit. Set aside.
See Figure 10.
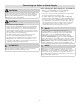
14. Place the green water tube to the icemaker into the
bottom outlet of the water valve. You must push the
tube into the valve until it is fully seated in place.
Check to make sure you installed the tube correctly
by gently pulling to make sure it does not come out.
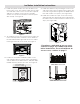
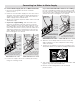
15. The water valve location has pre-made holes on the
right rear of the unit. The water line should be ori-
ented downward when the valve is installed. Install
the water valve using a ¼" hex head driver, install
the 2 hex head screws. Tighten screws until they are
snug and then tighten an additional ¼ turn.
See Figure 12.
17. Reinstall the access cover by hooking cover onto
the bottom flange of the cabinet, and then tilt the
cover upward to align with the screw locations on
the cabinet. Install the screws starting with the 2
on the left side, then the right side , finish with the
center screws. See Figure 14.
18. Connect the household water line to the water
valve. Follow instructions in Connecting Ice
Maker to Water Supply.
Remove 8 Screws
Figure 10
Plug water tube
into water valve
Figure 11
Figure 12
Figure 13
Figure 14
Water
line
Power cord