
Ice Kit Installation Instructions

5
Ice Maker Installation Instructions (without access cover)
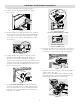
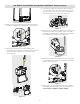
19. Remove the connector box from the unit with a
Philips screwdriver. Discard screw. See Figure 15.
20. Open the connector box using a flat head
screwdriver. Insert at the notched point and turn.
Insert the water valve in the hole in the box.
See Figure 16.
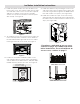
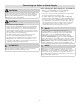
21. Connect the valve wire harness with the white
connector from the unit. Insert the wiring in the
box as shown. Close the box cover completely,
ensuring all wiring is inside. See Figure 17.
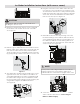
22. Plug the green water tube from the icemaker into
the bottom outlet of the water valve. The tube
should be pushed into the valve up to the black
line marked on the tube. See Figure 18.
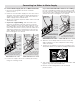
23. Attach the water valve bracket to the unit at the
2 pre-made holes using the 2 screws included in
the kit. See Figure 19.
24. Connect the household water line to the water
valve fitting (pointed up). Follow instructions in
Connecting Ice Maker to Water Supply.
Figure 15
Figure 16
Figure 17
Figure 18
Figure 19