
Ice Kit Installation Instructions

7
Connecting Ice Maker to Water Supply
To Connect Water Supply Line To Ice Maker Inlet Valve
1. Disconnect refrigerator from an electrical
power source.
2. Place the end of water supply line into the sink or
a bucket. Turn ON the water supply and flush the
supply line until the water is clear. Turn OFF the
water supply at the shuto valve.
3. Remove the plastic cap from water valve inlet and
discard the cap.
4. If you use copper tubing, slide the brass com-
pression nut and then ferrule (sleeve) onto the
water supply line. Push the water supply line into
the water valve inlet as far as it will go (¼" / 6.4
mm). Slide the ferrule (sleeve) into the valve inlet
and finger tighten the compression nut onto the
valve. Tighten another ½ turn with a wrench; DO
NOT overtighten. See below.
If you use braided flexible stainless steel tubing,
the nut is already assembled on the tubing. Slide
the nut onto the valve inlet and finger tighten the
nut onto the valve. Tighten another ½ turn with a
wrench; DO NOT overtighten. See below.
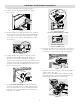
6. With the steel clamp and the screw, secure the
water supply line to the rear panel of the refrig-
erator as shown.
7. To turn the ice maker on, press the ice maker’s On/
O power switch so the LED is steadily illuminated.
service
mode
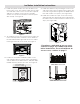
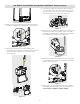
Plastic Water
Tubing to Ice
Maker Fill Tube
Brass
Compression
Nut
Ferrule
Sleeve
Water
Valve Inlet
Water
Valve
Copper water line
from household water supply
¼" Clamp
(Include enough tubing in loop to allow
moving refrigerator out for cleaning.)
Units with access cover
Brass
Compression
Nut
Water
Valve
Copper water line
from household water supply
Plastic Water
Tubing to Ice
Maker Fill Tube
(Include enough tubing in loop to allow
moving refrigerator out for cleaning.)
Ferrule
(Sleeve)
¼" Clamp
Water
Valve Inlet
Units without access cover
Water Valve
Bracket
Valve Inlet
Water Valve
6 ft minimum (1.8 m)
braided flexible stainless steel
water line from household water supply
Plastic Water
Tubing to Ice
Maker Fill Tube
(Include enough tubing in to allow
moving refrigerator out for cleaning.)
½" Clamp
Units with access cover
Water Valve
Bracket
Valve Inlet
Water Valve
6 ft minimum (1.8 m)
braided flexible stainless steel
water line from household water supply
Plastic Water Tubing
to Ice Maker
Fill Tube
(Include enough tubing to allow
moving refrigerator out for cleaning.)
½" Clamp
Units without access cover
8. Turn ON the water supply at the shuto valve and
tighten any connections that leak.
9. Reconnect the refrigerator to an electrical
power source.
5. Secure the copper line to the clamp (as shown),
using the existing screw.