All about the Installation of your Washer TA B L E O F C O N T E N T S Important Safety Instructions ........................... 2-3 Accessories ...................................................... 10 Installation Requirements ................................ 4-6 Français........................................................... 11 Installation Instructions ................................... 7-9 Español ...........................................................
IMPORTANT SAFETY INSTRUCTIONS WARNING Please read all instructions before using this washer.
IMPORTANT SAFETY INSTRUCTIONS WARNING NOTE The electrical service to the washer must conform with local codes and ordinances and the latest edition of the National Electrical Code, ANSI/NFPA 70, or in Canada, the Canadian Electrical Code C22.1 part 1. WARNING SUFFOCATION HAZARD Destroy the carton and plastic bags after the washer is unpacked. Children might use them for play. Cartons covered with rugs, bedspreads, or plastic sheets can become airtight chambers causing suffocation.
INSTALLATION REQUIREMENTS Electrical system requirements CIRCUIT - Individual, properly polarized and grounded 15 amp. branch circuit fused with 15 amp. time delay fuse or circuit breaker. POWER SUPPLY - 2 wire, with ground, 120 volt single phase, 60 Hz, Alternating Current.
INSTALLATION REQUIREMENTS Drain system requirements 1 Drain capable of eliminating 17 gals (64.3 L) per minute. 2 A standpipe diameter of 1-1/4 in. (3.18 cm) minimum. 3 The standpipe height above the floor should be: Minimum height: 39 in. (99 cm) Maximum height: 96 in. (244 cm) Installation in a Recess or Closet If washer and dryer are installed in the same closet, door ventilation is required: A minimum of 120 square inches (774.
INSTALLATION REQUIREMENTS Clearance requirements MINIMUM INSTALLATION CLEARANCES - Inches (cm) SIDES REAR TOP FRONT Alcove 1” (2.5 cm) 6” (15.2 cm) 24” (61 cm) n/a Closet 1” (2.5 cm) 6” (15.2 cm) 24” (61 cm) 2” (5.1 cm) IMPORTANT DO NOT INSTALL YOUR WASHER: 1 In an area exposed to dripping water or outside weather conditions. The ambient temperature should never be below 60° F (15.6° C) to maximize detergent effectiveness.
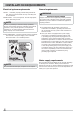
INSTALLATION INSTRUCTIONS Leveling your washer Excessive noise and vibration can be prevented by properly leveling the washer. 1 With the washer within 4 feet (1 m) of its final location, use a carpenter’s level to level your washer front-toback and side-to-side. For front-to-back leveling, place edge of the level flush to the front panel. For side-toside leveling place the edge of the level flush to the side panel.
INSTALLATION INSTRUCTIONS Connecting drain hose to washer IMPORTANT Inspect rubber flap on pump outlet. Ensure it is in place and not folded under or torn. 1 With the spring clamp already installed, place the drain hose elbow over the pump outlet at the lower rear of the washer. Ensure the hose elbow is completely and squarely seated to the pump outlet before using pliers to move the spring clamp into place.
INSTALLATION INSTRUCTIONS Connecting drain and electrical 1 Snap one end of the drain hose hanger (shipped in washer drum) onto the drain hose. Continue wrapping it around the hanger and snap it in place. 2 Place the hook end of the drain hose in the drain opening. Secure the drain hose with the cable tie (provided in the enclosure package) to the standpipe, inlet hose, laundry tub, etc. so the hose does not pull out from the force of the water. NOTE The standpipe inside diameter must be 1-1/4” (3.
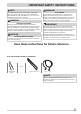
ACCESSORIES INLET HOSE KITS Please call 866-233-8353 (in Canada, 800-265-8352) to explore hose kit options that will meet your specific installation needs. UNIVERSAL APPLIANCE WRENCH P/N 137019200 A UNIVERSAL APPLIANCE WRENCH is available to aid in dryer/washer feet adjustment. CAUTION Failure to use accessories manufactured by (or approved by) the manufacturer could result in personal injury, property damage or damage to the washer.
Tout à propos de Installation de votre Laveuse TA B L E D E S M AT I È R E S Mesures de sécurité importantes ...................12-13 Instructions d’installation ..............................17-19 Exigences d’installation .................................14-16 Accessoires ......................................................
MESURES DE SÉCURITÉ IMPORTANTES AVERTISSEMENT Veuillez lire ces instructions au complet avant d’utiliser le laveuse. Liste de vérification d’installation Mise à niveau La laveuse est au niveau latéralement et de l’avant vers l’arrière Sachez reconnaître les symboles, les avertissements et les étiquettes de sécurité.
MESURES DE SÉCURITÉ IMPORTANTES AVERTISSEMENT REMARQUE L’installation électrique de la laveuse doit être conforme aux codes et aux règlements locaux ainsi qu’à la toute dernière édition du National Electrical Code (ANSI/ NFPA 70), ou au Canada, au Code canadien de l’électricité (C22.1, article 1). AVERTISSEMENT RISQUE D’ÉTOUFFEMENT Détruisez le carton d’emballage et les sacs en plastique après avoir déballé l’appareil. Les enfants pourraient les utiliser pour jouer.
EXIGENCES D’INSTALLATION Exigences des systèmes électriques CIRCUIT - Circuit indépendant de 15 ampères, polarisé et mis à la terre, avec fusible temporisé ou disjoncteur de 15 A. ALIMENTATION ÉLECTRIQUE - Câble monophasé à deux fils mis à la terre, 120 volts, 60 Hz; courant alternatif.
EXIGENCES D’INSTALLATION Exigences relatives au système d’évacuation 1 Le drain doit pouvoir évacuer 64,3 L (17 gal) d’eau à la minute. 2 Tuyau d’évacuation d’au moins 3,18 cm (1-1/4 po) de diamètre.
EXIGENCES D’INSTALLATION Exigences de dégagement DÉGAGEMENTS MINIMAUX - Centimètres (pouces) CÔTÉS ARRIÈRE AVANT AVANT Alcôve 1” (2.5 cm) 6” (15.2 cm) 24” (61 cm) n/a Placard 1” (2.5 cm) 6” (15.2 cm) 24” (61 cm) 2” (5.1 cm) IMPORTANT N’INSTALLEZ PAS VOTRE LAVEUSE : 1 À un endroit exposé aux écoulements d’eau ou aux aléas des conditions météorologiques extérieures. La température ambiante ne devrait jamais tomber sous 15,6 °C (60 °F) afin d’optimiser l’efficacité du détergent. 1” (2.
INSTRUCTIONS D’INSTALLATION Mise à niveau de votre appareil Les bruits excessifs et les vibrations peuvent être évités en mettant correctement la laveuse à niveau. 1 En plaçant la laveuse à 1 m (4 pi) de son emplacement définitif, utilisez un niveau à bulle pour mettre l’appareil à niveau de l’avant vers l’arrière et latéralement. Pour mettre la laveuse de l’avant vers l’arrière à niveau, bord la place du niveau au ras du panneau frontal.
INSTRUCTIONS D’INSTALLATION Raccordement du boyau de vidange à la rondelle IMPORTANT Inspecter la bavette en caoutchouc sur l’orifice de sortie de la pompe. S’assurer que celle-ci est en place et qu’elle n’est pas pliée ou déchirée. 1 Avec le collier de serrage à ressort déjà installé, placez le coude du tuyau de vidange sur le raccord de sortie de la pompe sur le côté inférieur arrière de la rondelle.
INSTRUCTIONS D’INSTALLATION Branchement électrique et branchement du tuyau de vidange 1 Formez un U à l’extrémité du tuyau de vidange avec le tuyau pointé vers la vidange. Placez l’extrémité recourbée du tuyau de vidange dans une cuve ou la conduite des eaux usées et fixez-la à l’aide d’un lien fourni dans le paquet. 2 Placez le côté du tuyau de vidange en forme de crochet dans l’ouverture du tuyau d’évacuation.
ACCESSOIRES KITS TUYAUX D‘ALIMENTATION S’il vous plaît appelez 866-233-8353 (au Canada, 800265-8352) pour explorer les options de tuyaux d’entrée qui pourrait s’adapter à votre installation spécifiques. ATTENTION Tout défaut d’utiliser les accessoires fabriqués ou certifiés par le fabricant pourrait entraîner des blessures, des dommages aux biens ou à la laveuse.
Todo acerca del Instalación de su Lavadora ÍNDICE Instrucciones importantes de seguridad .........22-23 Instrucciones de instalación ..........................27-29 Requisitos de instalación ...............................24-26 Accesorios .......................................................
INSTRUCCIONES IMPORTANTES DE SEGURIDAD ADVERTENCIA Lea todas las instrucciones antes de usar este lavadora. Lista de verificación de instalación Nivelación La lavadora está nivelada de lado a lado y de adelante hacia atrás Identificación de los símbolos, palabras y avisos de seguridad Las indicaciones de seguridad incluidas en este manual aparecen precedidas de un aviso titulado “ADVERTENCIA” o “PRECAUCIÓN”, de acuerdo con el nivel de riesgo. Definiciones Este es el símbolo de alerta de seguridad.
INSTRUCCIONES IMPORTANTES DE SEGURIDAD ADVERTENCIA NOTA La reparación eléctrica de la lavadora debe cumplimentar los códigos y las ordenanzas locales y la última edición del Código Eléctrico Nacional (National Electrical Code), el ANSI/NFPA 70, o bien en Canadá, el CSA C22.1 del Código Eléctrico de Canadá (Canadian Electrical Code) Parte 1. ADVERTENCIA PELIGRO DE ASFIXIA Después de desembalar la lavadora, destruya los cartones y las bolsas de plástico. Los niños podrían utilizarlos para jugar.
REQUISITOS DE INSTALACIÓN Requisitos del sistema eléctrico CIRCUITO - Circuito individual de bifurcación de 15 amp., correctamente polarizado y con conexión a tierra con fusible de retardo de 15 amp. o con interruptor automático. SUMINISTRO ELÉCTRICO: corriente alterna de 2 cables, con conexión a tierra, 120 voltios, monofásica, 60 Hz.
REQUISITOS DE INSTALACIÓN Requisitos del sistema de desagüe 1 Desagüe con capacidad para eliminar 64,3 l (17 galones) por minuto. 2 Un tubo vertical con un diámetro mínimo de 3,18 cm (1-1/4 pulg.).
REQUISITOS DE INSTALACIÓN Requisitos de despeje MINIMUM INSTALLATION CLEARANCES - Inches (cm) LATERALES PARTE TRASERA Hueco 1” (2.5 cm) 6” (15.2 cm) 24” (61 cm) n/a Armario 1” (2.5 cm) 6” (15.2 cm) 24” (61 cm) 2” (5.1 cm) IMPORTANTE NO INSTALE LA LAVADORA: 1 En una zona expuesta a la humedad o a las condiciones climáticas externas. Para maximizar la eficacia del detergente, la temperatura ambiente nunca debe ser menor a los 15,6° C (60° F).
INSTRUCCIONES DE INSTALACIÓN Nivelación de la lavadora Las vibraciones y el ruido excesivo se pueden evitar nivelando la lavadora correctamente. 1 Con la lavadora a menos de 4 pies (1 m) de su ubicación final, utilice un nivel de carpintero para nivelar todos los costados de la lavadora. Para nivelar la unidad de adelante hacia atrás, coloque el borde del nivel al ras del panel frontal. Para nivelar la unidad de lado a lado, coloque el borde del nivel al ras del panel lateral.
INSTRUCCIONES DE INSTALACIÓN Conexión de la manguera de drenaje a la lavadora IMPORTANTE Inspeccione la pieza de goma en la salida de la bomba. Asegúrese de que esté en el lugar correcto y que no esté doblada hacia abajo ni rota. 1 Con la abrazadera con resorte ya instalada, coloque el codo de la manguera de drenaje sobre la salida de la bomba en la parte trasera de la lavadora.
INSTRUCCIONES DE INSTALACIÓN Conexión del desagüe y del suministro eléctrico 1 Forme una “U” en el extremo del tubo de drenaje co el tubo señalando hacia el drenaje. Coloque el extremo formado del tubo de drenaje en lavadero o una tubería vertical y fíjelo con su sujetacables incluido en el paquete. 2 Coloque el extremo con gancho de la manguera de drenaje en la abertura de desagüe.
ACCESORIOS KITS DE MANGUERAS LLENADO Por favor llame al 866-233-8353 para explorar las opciones de la manguera del kit que satisfagan sus necesidades específicas de instalación. PRECAUCIÓN El no utilizar accesorios fabricados (o aprobados) por el fabricante puede ocasionar lesiones personales, daños a la propiedad o daños a la secadora. LLAVE UNIVERSAL PARA ELECTRODOMÉSTICOS Pieza No.